- Some Quick Improvements to Hornby's 'Railroad' GWR Dining Car -
by Tony Richards
Perhaps inevitably, r-t-r manufacturers fight shy of the more esoteric, limited-market coaches, although some recent releases would have been unthinkable a few years back [the Devon Belle Observation Car or the LMS Inspection Saloon for example]. This creates gaps for rake-creators however, at least at r-t-r level, and the dining car is just one of them. Granted, Hornby does produce a fine Gresley Buffet Car, a slightly challenged LMS 12-wheeler and Bachmann a variety of Mk 1 eateries. But all else that's left is Hornby's grisly [that's grisly, not Gresley] Collett bow-ended diner. It's a shame a new one could not have accompanied the Hawksworths, but we are where we are. So, with that out of the way, I decided that I should try some basic improvement of the Collett offering so that it would not jar too much in my largely Bachmann 'Cheltenham Flyer' rake.
At the outset, this simple guide is about improving this model at minimal cost rather than bringing it up to prototypical standards: to do the latter would require so much significant surgery to the underframe, the ends and the body that it would probably be easier to look for some Comet etched sides and start from there. Quite a lot can be done to make the existing model less toy-like however, and I think it's worth a little time to achieve that, particularly if it’s to run alongside newer, more-detailed Bachmann types. I'm aiming to produce the visual equivalent of sleight-of-hand here, nothing else..........
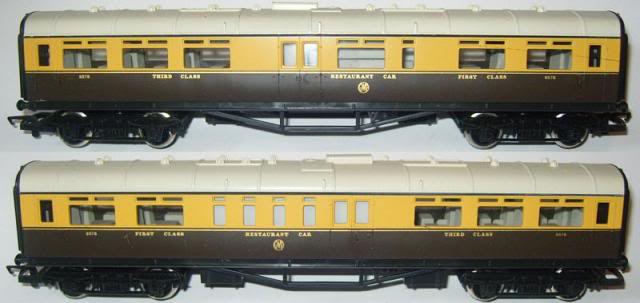
The Hornby model is based on a late-20s Collett prototype and it dates back to 1978. It is widely available on eBay and still in production through the ‘Railroad’ range. This improvement guide applies to all of the issues of the model but the later releases do have the advantage of being fitted with GWR-type bogies whilst the earlier ones had BR Mk1 bogies. If you can live with incorrect bogies that's fine: if you want to improve an earlier release however you may well find the newer bogies difficult to source as they do not appear to be available as spares currently. For this project I bought a new Railroad model via eBay for £17.99 post-free.
As it stands, the body moulding is compromised in a number of ways: over-scale and inaccurate roof ventilators and ribs particularly stand out and they’ll have to go. The gangway connections are underscale and pretty horrible also: they too will be dealt with. The interior is a one-piece insert moulded in dark brown plastic: easy to paint and to add brass table lamps. Flush-glazing is also an option which I shall address. The exterior has the latest version of the GWR livery and is very nicely applied. It's a pity to change it really but it represents the 1927-34 period and I want the later 1934-42 'Roundel' period: it, too, will require attention. Finally, the underframe is rudimentary in the extreme with the most basic representation of trussing and no gas tanks. The riding height needs reducing, too. If you have a much-earlier model to improve, repainting the entire body will be essential if you wish to lose the butter-yellow self-coloured plastic upper and thin glossy brown lower finish. This all sounds pretty daunting but believe me, it’s not.
As with earlier coach improvement projects, the intention is that everything [with the exception of paint] will come from the bits box, or be fabricated from scratch.
Here is the model as bought :
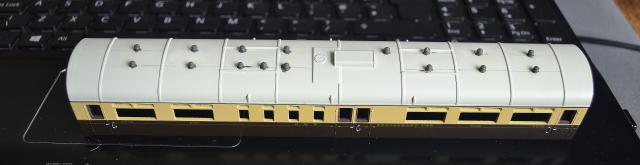
The first job involved dismantling the coach and then attending to the roof. Photos show the ventilators before and after removal:


I used Xuron-type shears to remove the roof vents - a quick, easy cut, and then a chisel-blade and wet-and-dry to take them down flush. This was surprisingly easy. The roof will be marked up in due course for drilling to take the replacement ventilators [Dapol Centenary coach spares bought years ago]. Photos wlil follow.
I had a re-think on the roof-ribbing. Whilst a little too prominent, removing it completely - to be replaced by thinner and lower-profile plastic strip - would just be too time-consuming and difficult to achieve consistently. It's the latter that's the real problem as the roof detail is just so visible. Further, complete removal would almost certainly damage some of the other detail, so it stays.
The riding height was successfully reduced also, by cutting down the boss onto which the bogies clipped - rather poor photos show by how much on a before-and-after basis. If anyone wishes to attempt this, the easiest way to do it is by slicing the boss with a razor saw which has been placed flat across the solebars. No damage was done to the solebars in this way and I think it would have been far easier - and neater - than filing. The coach still runs without wobble on its bogies, but is now at a similar height to its Bachmann counterparts. I have also cut the corridor connections from the ends and sliced off the buffer heads for more realistic replacements.


The next two photos are 'before and after' shots to illustrate the affect on riding height that reducing the bogie boss has had. The left-hand photo is before and the right hand after. The difference is noticeable.


The latter photo above also shows other detail improvements which will be explained later.
The underframe was the next area to receive attention - 'before and after' shots again show what was done to add basic detail. Really, four gas tanks with bowed ends should have been fitted but I only had room for three flat-ended ones. Once painted they'll be fine. The truss rods were also strengthened by cross members fabricated out of square-section plastic moulding.


Returning to the roof, two longitudinal pencil lines were carefully marked up to ensure that the holes drilled to accept the replacement ventilators were exactly in line. The next two photos show the new ventilators in place. Whilst they are slightly over-scale, the visual improvement is considerable [compare them with the photograph above]. The ventilators came from the 'bits box' but were originally Dapol Centenary coach mouldings, bought in as spares.

At the same time, more realistic buffers were fitted to the buffer beams, the originals having been cut away, as mentioned above, earlier during the build. The new metal buffers are not strictly accurate for a GWR coach but they are a significant improvement on the originals.

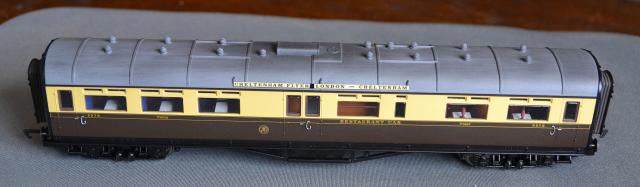
Improvements have also been made to each of the corridor end mouldings: the moulded handrails were cut away and the truly awful corridor connections cut back significantly. The handrails were repalced with new ones fabricated out of Florist's Wire [soft iron wire] and the corridor connections were improved by overlaying GWR Centenary coach connectors. These will close up the gap between the coaches quite nicely [again, see photos above for comparison]. 'Before and after' photos are shown below.


Painting will cover any imperfection in the surgery required to improve the connections.
The roof has now received its first coat of primer and, overall, the improvements to the roof look quite effective. It will receive a further light flash of grey and then a decision will need to be taken over what the final colour will be, probably weathered grey but a decision awaits.....
I next addressed the livery changes I wanted. The letters 'GWR' and the coat of arms [see photo above] were carefully removed with a toothpick after having softened them with IPA first of all. This has to be done quickly and the body then wiped clean or the IPA will also attack the paintwork. Apply the IPA with a paintbrush and confine it to the decals only. Once 'Pressfix' shirtbutton roundels were applied [see later photos], the body was sprayed with matt varnish to seal the decals and protect the paintwork.
Setting the body aside for a while I tidied up the interior seating and table moulding. No photos I'm afraid although you can see it in place in various photos above and below. All of the woodwork was painted mid-Walnut, the table tops white and the seats in blue and red to denote their class. Tables in the first-class end were drilled to accept small brass table lamps [old Hornby Pullman lamps in fact] which had their shades painted a mid-pink/red.
With the body and interior ready for reuniting, it was time to insert the flush-glazing. I used an SE Finecast flush glazing product and this might be of interest to those who have either not come across it before or those who know it but have yet to use it.
The set for the Collett Diner is SE 59 and it cost £3.75 post free: it's not a premium product by any measure but it was cheap enough to be disposable if it didn't pass muster. Photograph one shows the material as it comes: a number of small sheets of vacuum-formed transparent mouldings to flush glaze three of the four window sizes. The only openings not provided for are the toplight-style narrow lights above the main windows [see photos]. These are too small to address in this way and whilst one could cut plastic to fill them from the outside, I decided that it really wasn't worth the effort: it would represent three hours of my life that I'd never get back......
The quality of the mouldings, dimensionally, was excellent: only one needed a really hard push to insert and the rest dropped in nicely, filling the apertures satisfactorily. Note however that the plastic is not even close to optical quality. It is transparent but you cannot see clearly through the coach and out through the other side. This is not a problem however and the painted seating area shows through acceptably. Very slight and tolerable downside - some depressed dimpling is noticeable when the windows are fitted. This is really minimal though, a consequence of inward tension on the centre caused by the close fitting of all of the sides in the frames - the centre is very slightly depressed. Don't be put off by this though, it is barely noticeable.
Fixing: cut to size carefully and note that there is only one spare main window. Allow a deeper top edge to the main windows so that the plastic will also cover the top-light openings. I fixed the mouldings with epoxy resin: it is easy to apply to the inside of the body with a toothpick and does not risk clouding the plastic as superglue does. It holds well, too. However, beware ! Epoxy is appalling messy stuff and I had to apply so much, because so many windows were being glazed, that even with care I covered the outside in gluey finger prints. These were easily removed by giving them a quite wipe with an IPA-soaked tissue. Having already varnished the paintwork, the IPA did not affect it. It may well have otherwise.
The photos below show the glazing effect with before [top left] and after photos. It's a shame that Lazerglaze have not turned their attention to these coaches but I suppose they are Railroad and so not a priority. At the price, I don't think you can go far wrong with SE Finecast mouldings for Railroad coaches.


After spraying the entire chassis with Halfords' matt black and then rejoining it to the body, I realsied that I had omitted to fit a hand rail against the the window in the centre of the last photo [above the word 'restaurant']. This I did later and it can be seen in the final photos. The only other job involved refitting the bogies, a simple push fit, and the coach was then complete and ready for revenue-earning service.
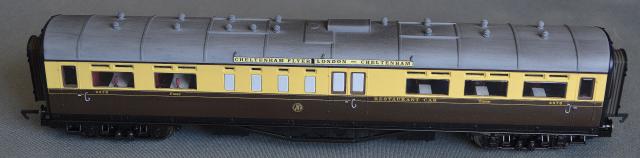
The project is now complete with comparison photos below to show what can be easily achieved: a twenty-year old original Hornby release and modified Railroad restaurant car. If you start with an older restaurant car you'll probably need to repaint at least the upper cream panels. A rattle can will probably suffice, Ford Sahara beige is often used.
I'm really pleased with the weathering effect on the roof also: black weathering powders sprinkled over and then dragged the length with a soft one inch paintbrush. Then a slightly damp sponge was gently dragged along the roof to produce subtle and quite pleasing streaks of soot and dirt.