- A Wrenn Mica B restoration -
A mid-week quickie by Tony Richards
The prototype and the model: a very short history, and a bit of a waffle.......
‘But why Mica ?’ you ask. Well, why Toad ? Or Bloater ? Or, more improbably, Gadfly, Cricket or Hydra ? The meaning of these telegraphic code words will be understood by enthusiasts and modellers alike: the reason for their initial choice remains buried within the arcane world of Great Western bureaucracy however. And GWR telegraphic codes were not confined to rolling stock either, not at all: 'Moselle' for example meant ‘give this matter special attention’; 'Santoi' meant ‘send breakdown van at once’; 'Lima', ‘can you spare a horse for a few days’: and 'Blimey' notes that 'the Gents is flooded'. Actually, that last one's a lie [no, really ?] But this is all a digression….
Whilst the history of GWR perishable vans goes back to the 1870s, the Mica B on which the Wrenn model is based dates to the early 1920s and is a further development of a series of refrigerated vans built for the carriage of meat. The bodies were insulated and the insides lined with zinc. Tanks for dry ice were situated on the roof [as may be seen on the model]. They were painted white, with red lettering, but would have become filthy in use fairly quickly. Mica B vans were vacuum fitted.
The Wrenn model is, by any other name, a direct copy of the older Hornby Dublo model [using the same mould]. It’s a compromise Mica of course, as the dimensions are not wholly accurate, the roof hatches are incorrect and whilst the underframe is better than the earlier Hornby-Dublo offering, it is still a very heavily moulded affair. However, it’s the only r-t-r Mica B available and is not unattractive nor too toy-like to be used. Whilst Parkside Dundas does make an excellent plastic kit, it costs more than the two Wrenn models I acquired together [£4 each]. I'm surprised that no manufacturer has so far produced a scale r-t-r offering of this important GWR vehicle.
For anyone wishing to attempt this restoration themselves, I’d advise that you source the Wrenn model as the majority of Hornby Dublo ones have very solid chassis mouldings: a web of metal allowing no daylight between the lower solebars and the brake rigging for example [the very last productions did not suffer from this]. This could all be drilled and filed out but it would be tedious and quite difficult, the metal web is fairly thick and the Mazak quite hard.
The rather poor photo below illustrates what I mean.
A start……..
This restoration requires simply a screwdriver, a scalpel, four replacement wheel sets, eight top-hat bearings, replacement couplings, paint and transfers.
The photo below shows what I started with: two grubby but otherwise complete Mica Bs.
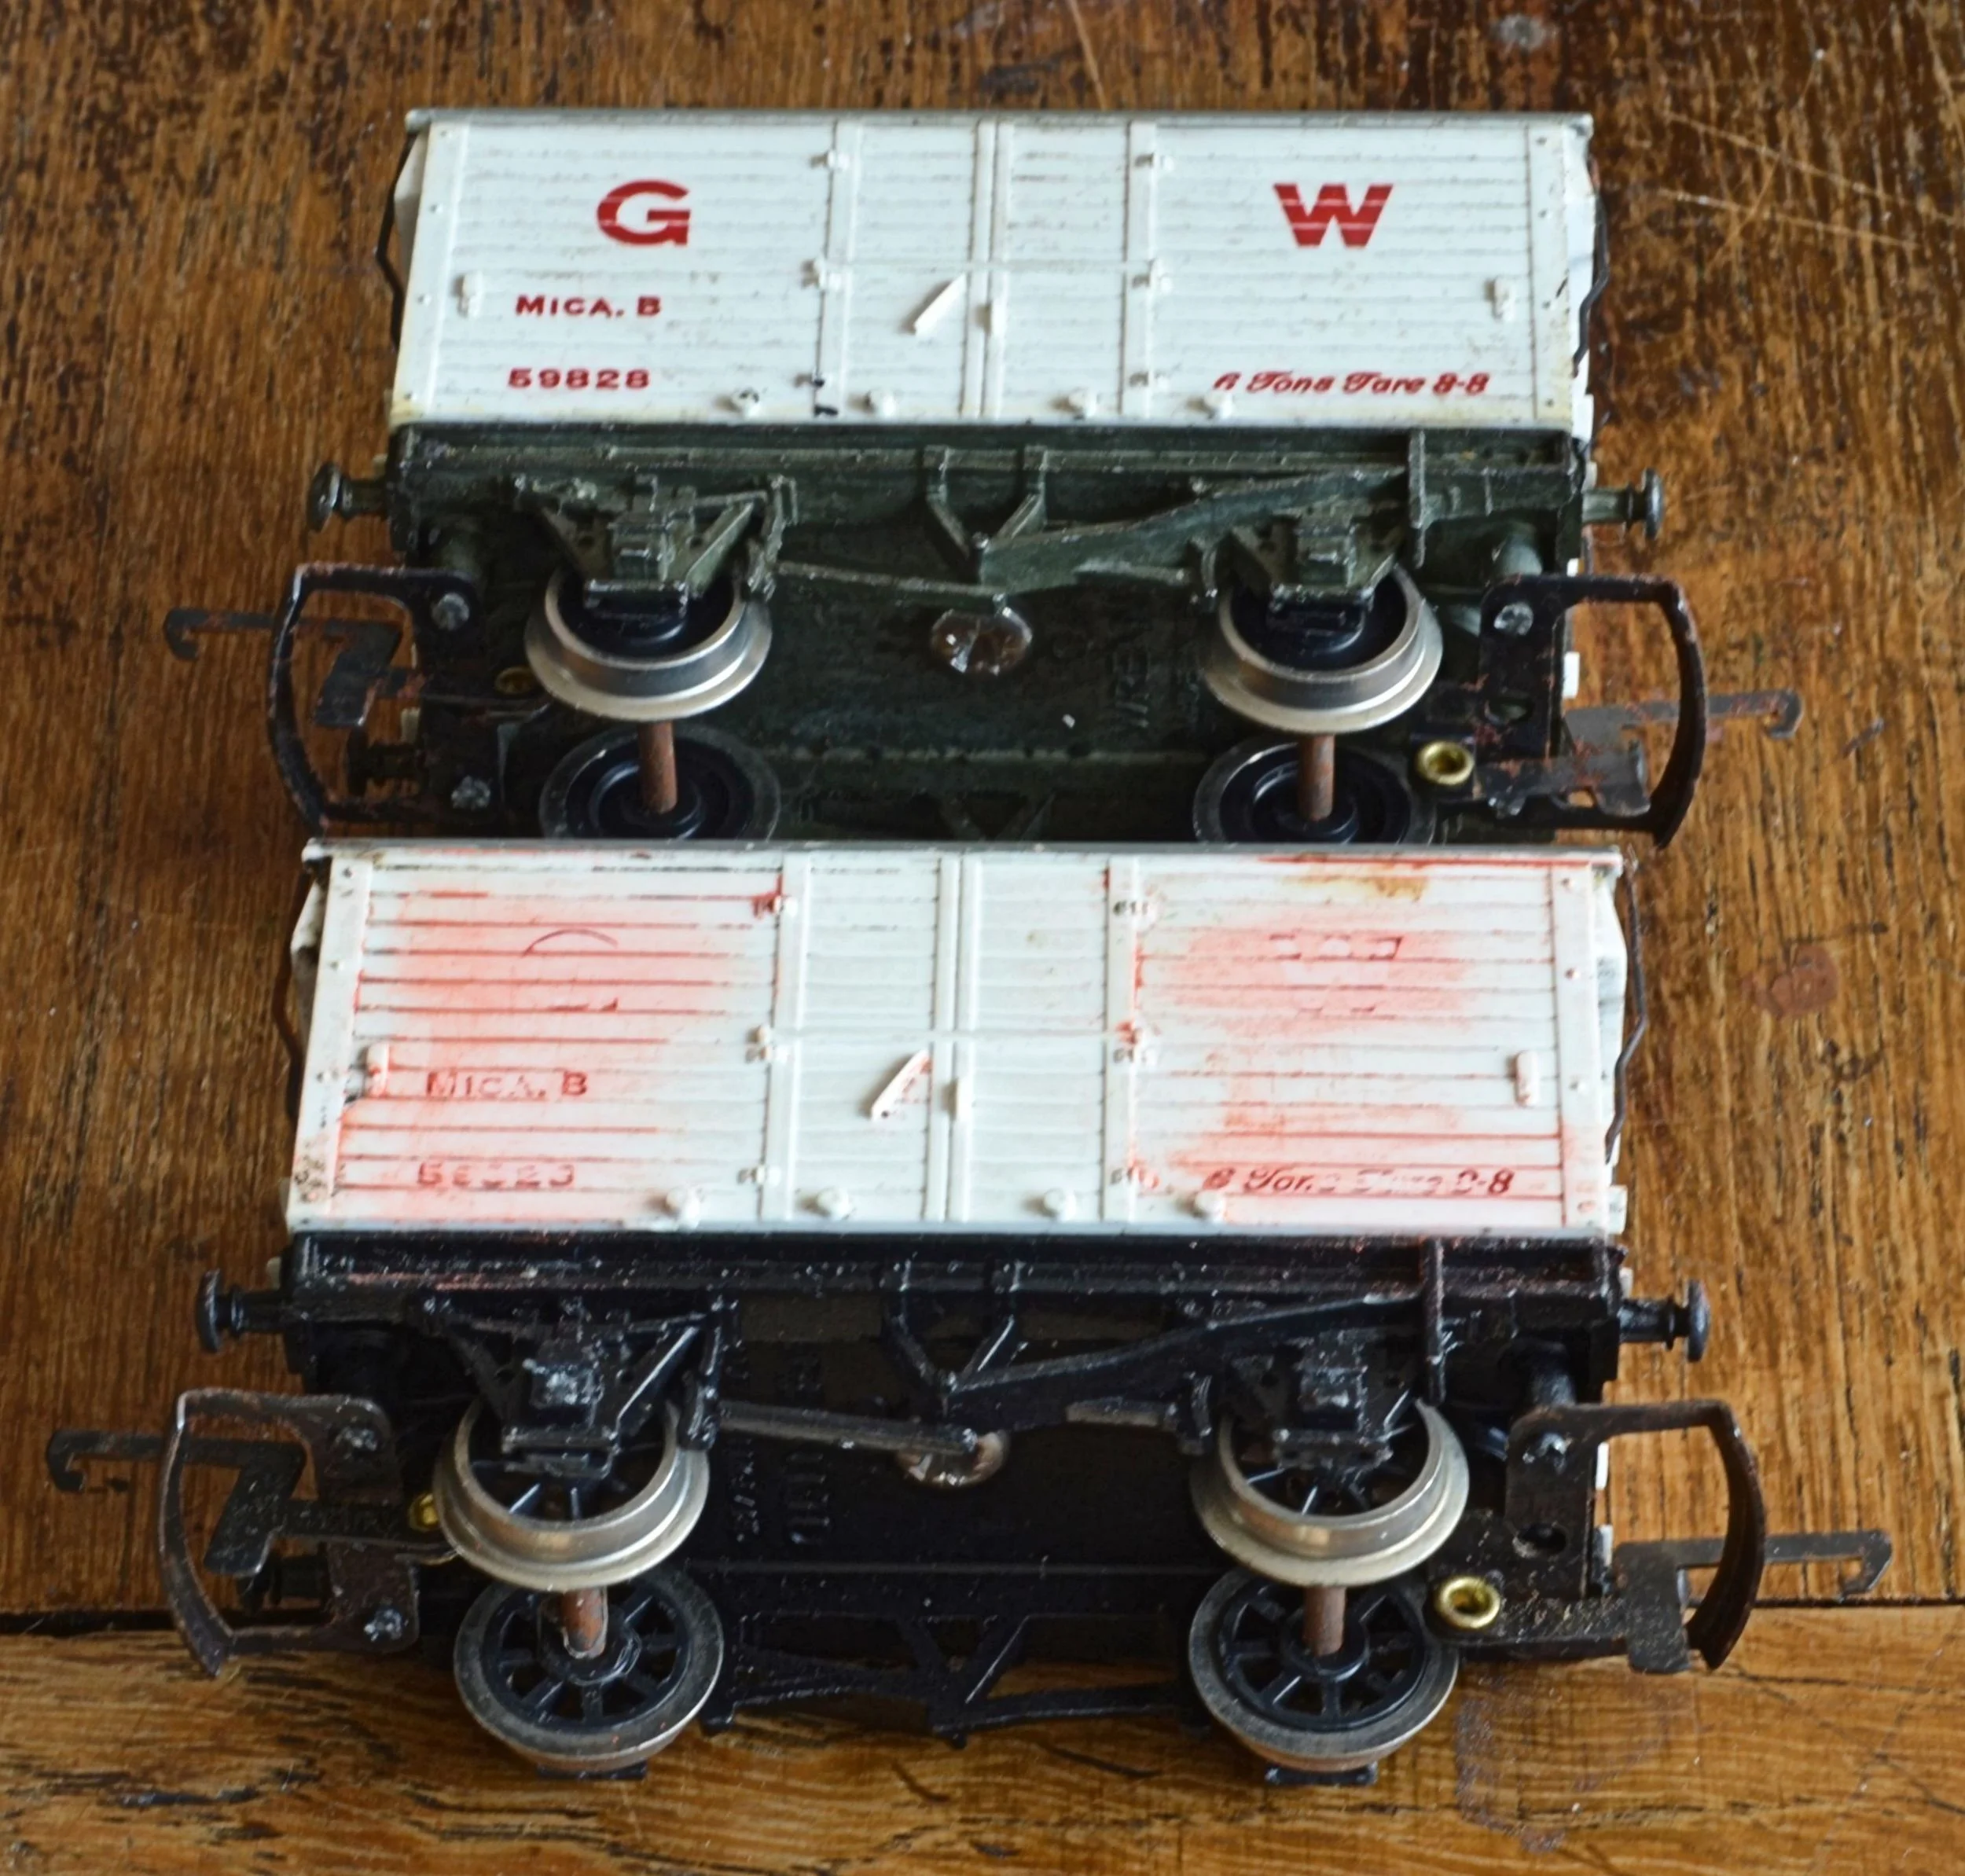
The first job involved dismantling the models. A large cross-head screw [which can be seen above on the underside] released the body and gentle upward prizing of the axles released the wheel-sets and their plastic insertss. Do what you want with the wheels [just don’t reuse them] but retain the inserts safely. With the body removed, the end handrails can be carefully taken off and retained for painting later. That’s it: just a small handful of component parts.
Attending to the body first, I removed all of the red lettering and numbers. This is important: if you do not it will show as a raised area under the later respray. By far the easiest way to do this is to scrape it carefully with the edge of an X-Acto-type chisel blade. This can be done without damaging the plastic underneath. I did try to sand it away with fine emery paper but it showed signs of removing some plastic too. Use the blade ! 'Mr Muscle' oven-cleaner was then used to remove the flaking grey paint from the roof. Once done, the body was then washed in hot, soapy water and left to dry.
I'd note here that bodies with the 'Eskimo' transfers [as opposed to 'GW'] can be cleaned up nicely with 'Mr. Muscle'. Scraping these will not be necessary.
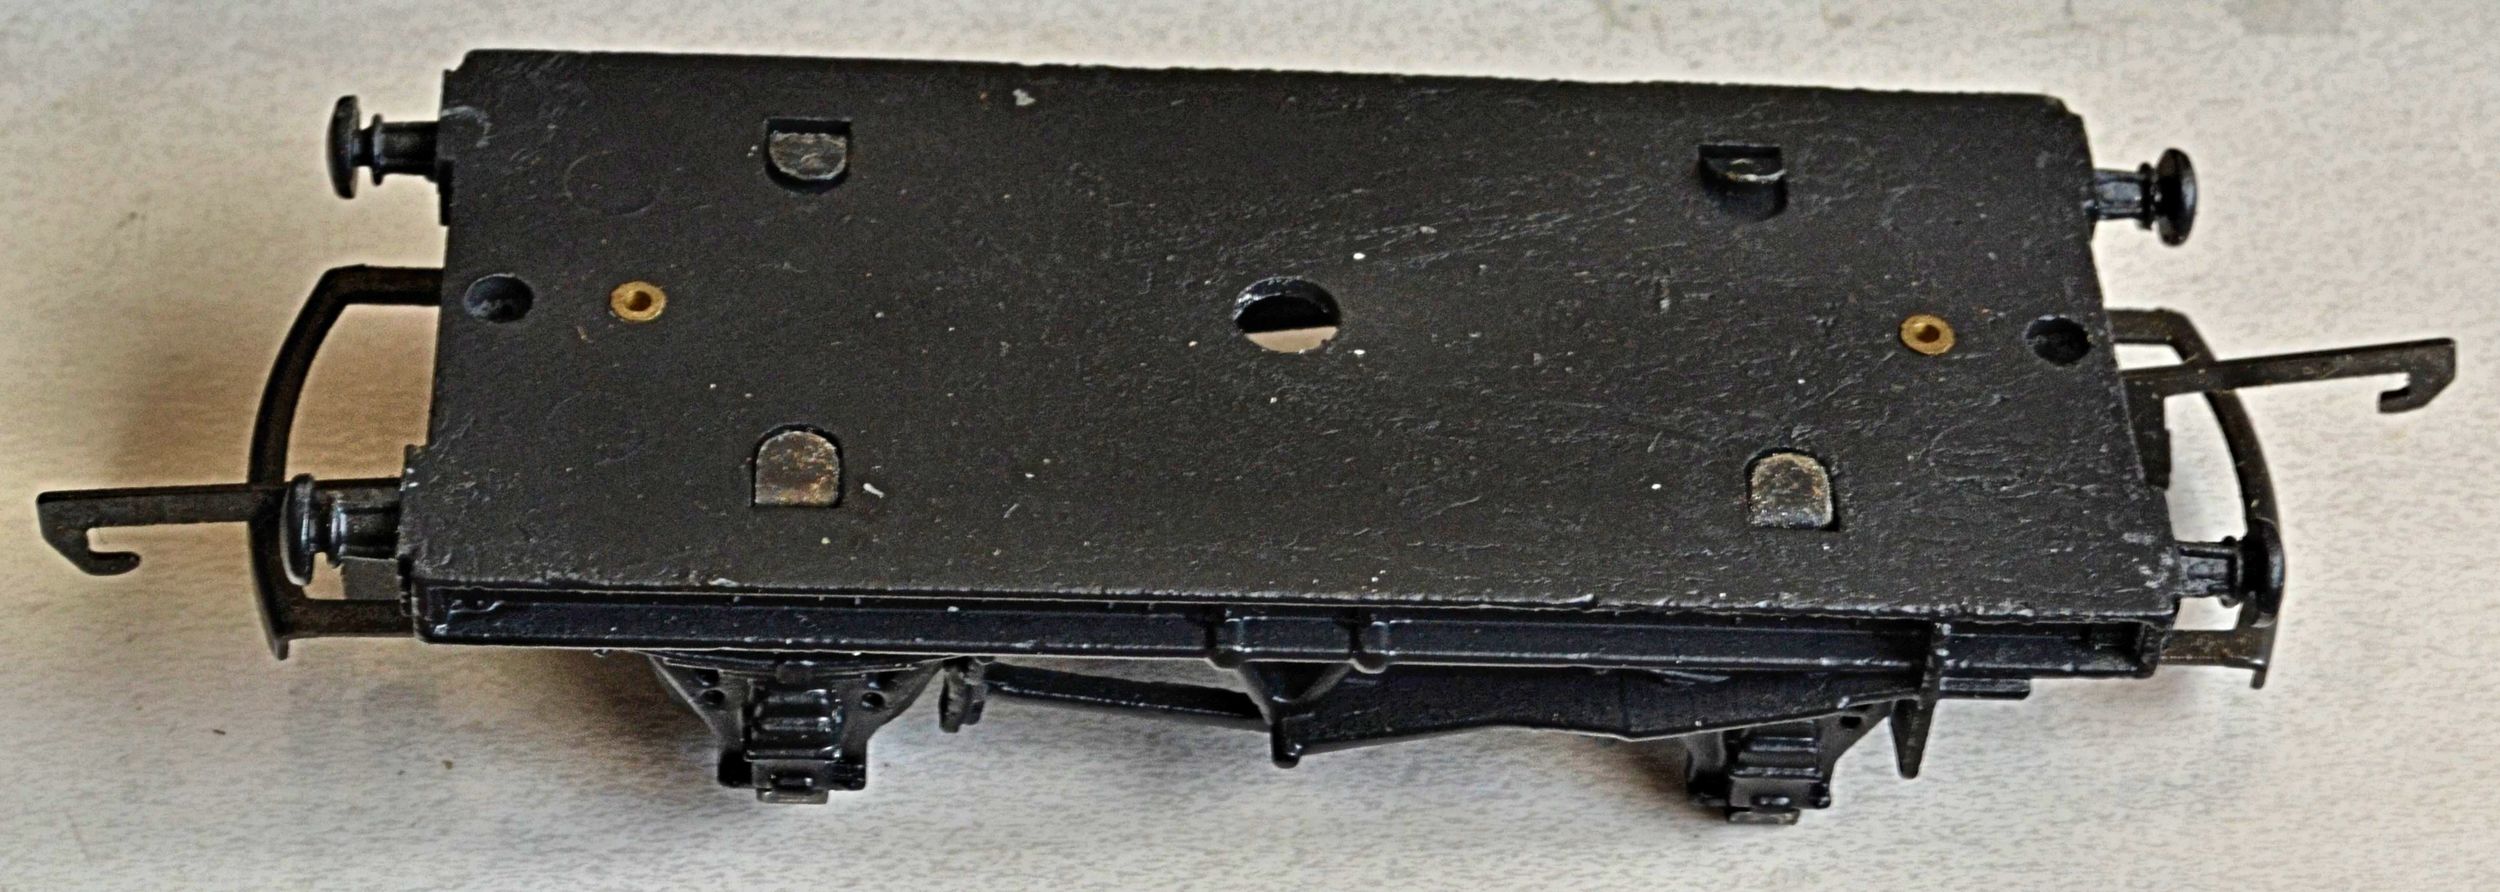
Turning to the chassis, I removed the metal Triang-type couplings with pliers and then filed down the stanchions to which they were fitted. These do not have to be removed entirely [unless you want to], but the rough heads at least should be ground down. Other parts of the chassis were dressed also, to remove mould lines, etc. Once satisfied, the chassis too were washed and left to dry. A photo below shows how much of the stanchions I removed [and the chassis after painting]. You can see how heavy, by today's standards, the chassis is. Tie rods will need fitting in due course.

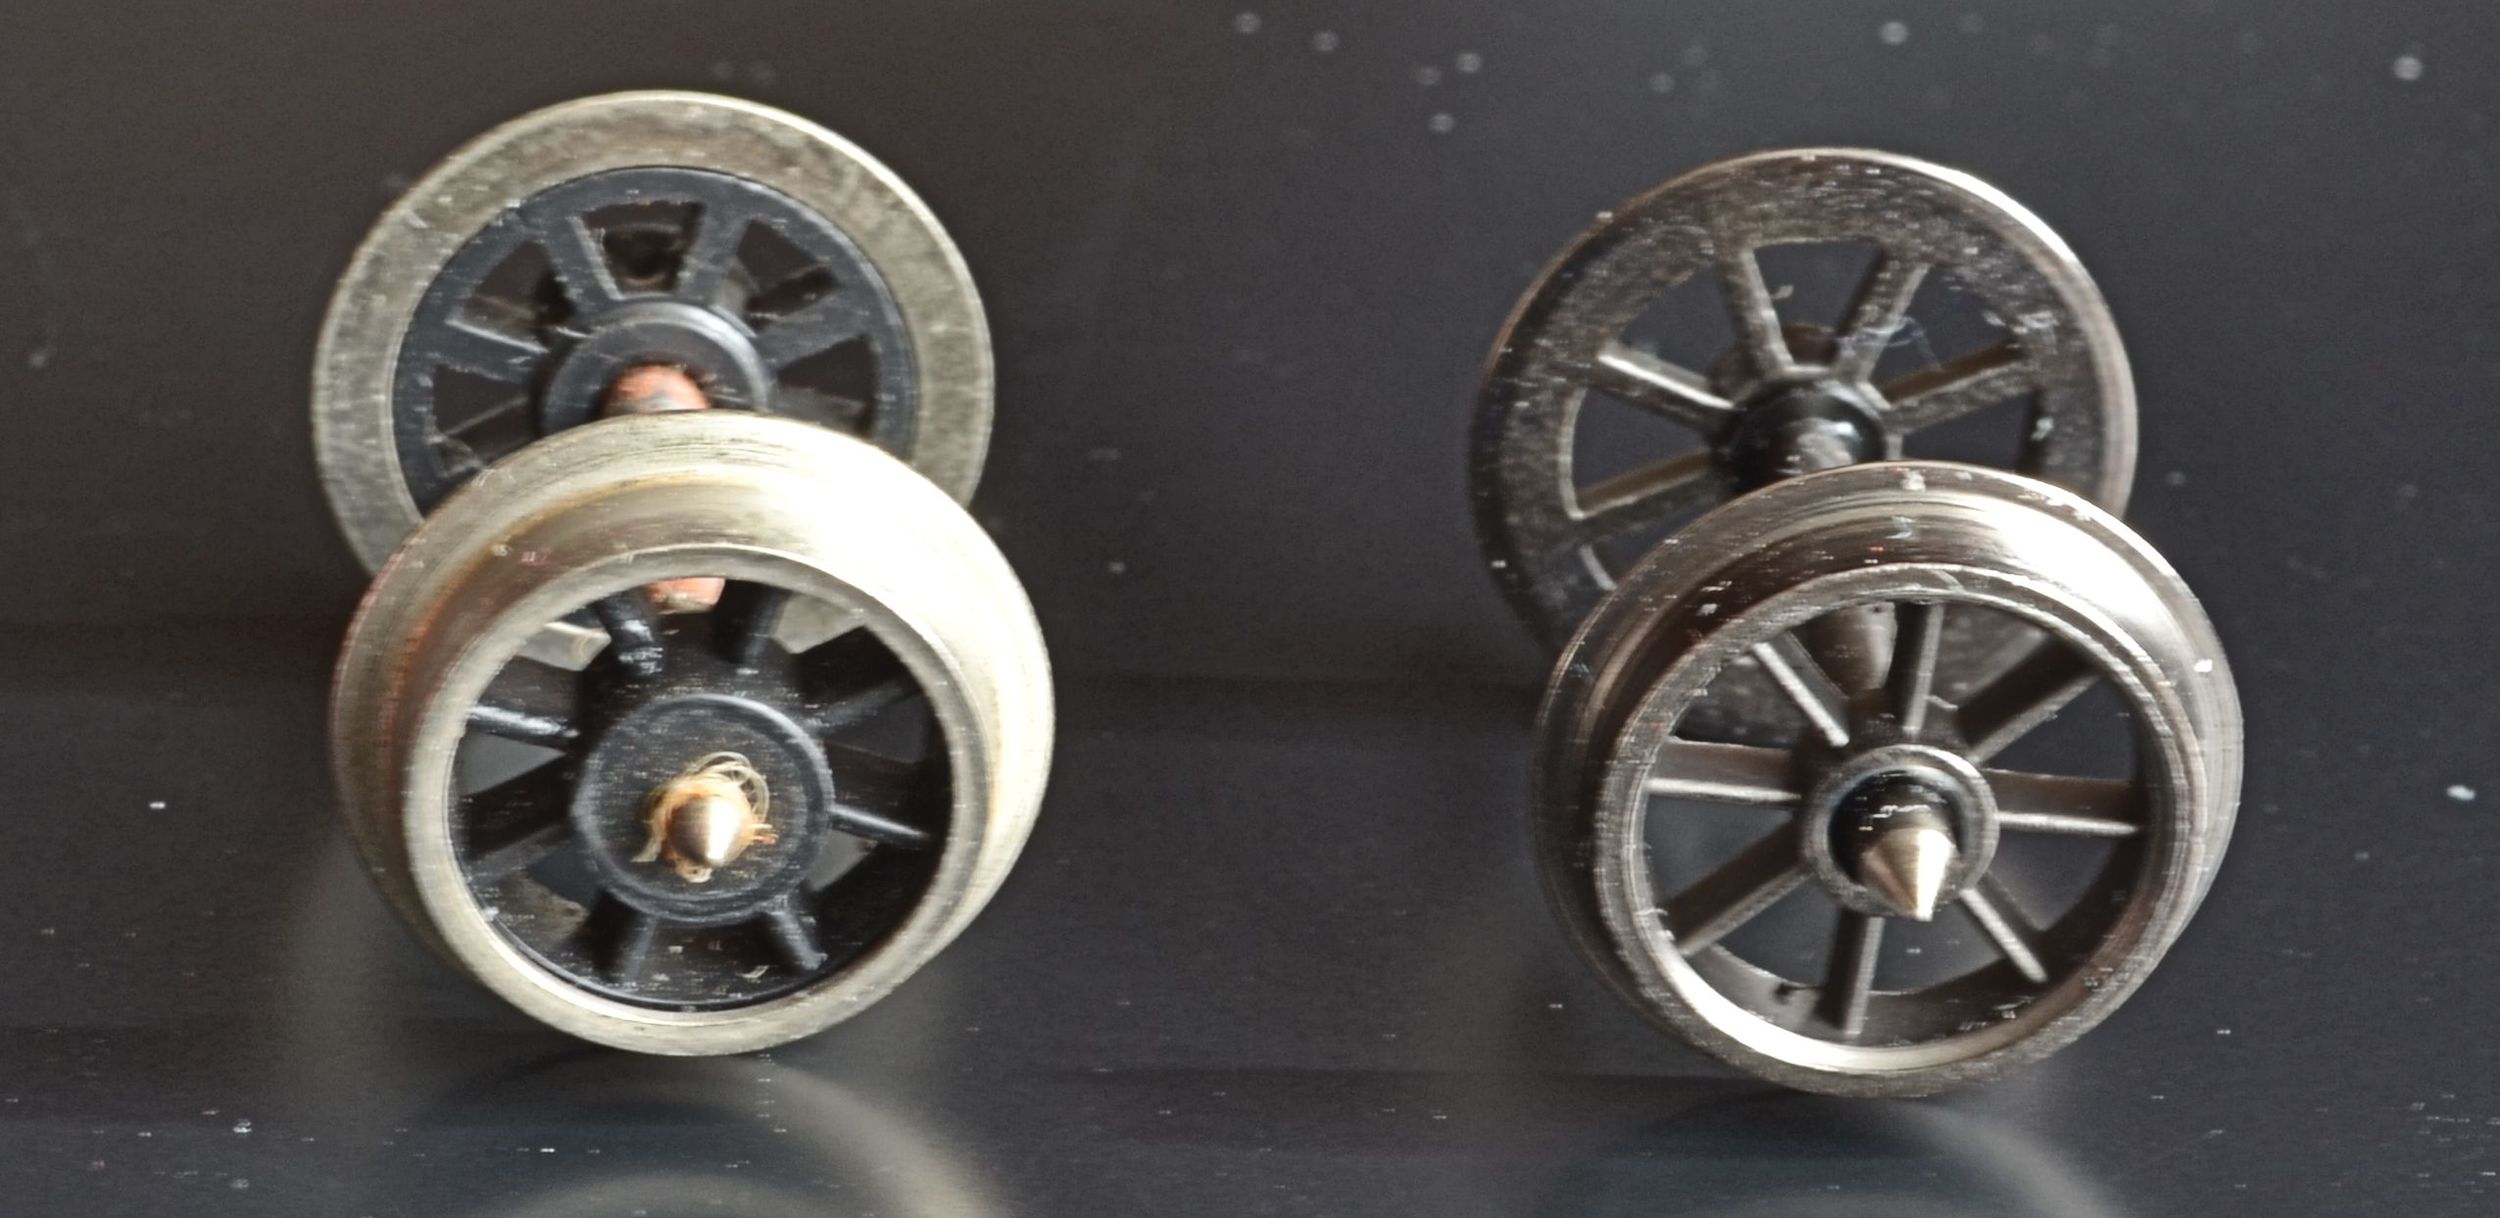
I next considered the wheelsets. Whilst the original Wrenn wheels are metal tyred, they are coarse and unrealistic. They had to go. I replaced them with standard Hornby 8-spoke 12.6mm wheelsets [part no. R.8098] and they made a huge visual and practical difference. For comparison, the two types of wheelset are shown in the next photo.
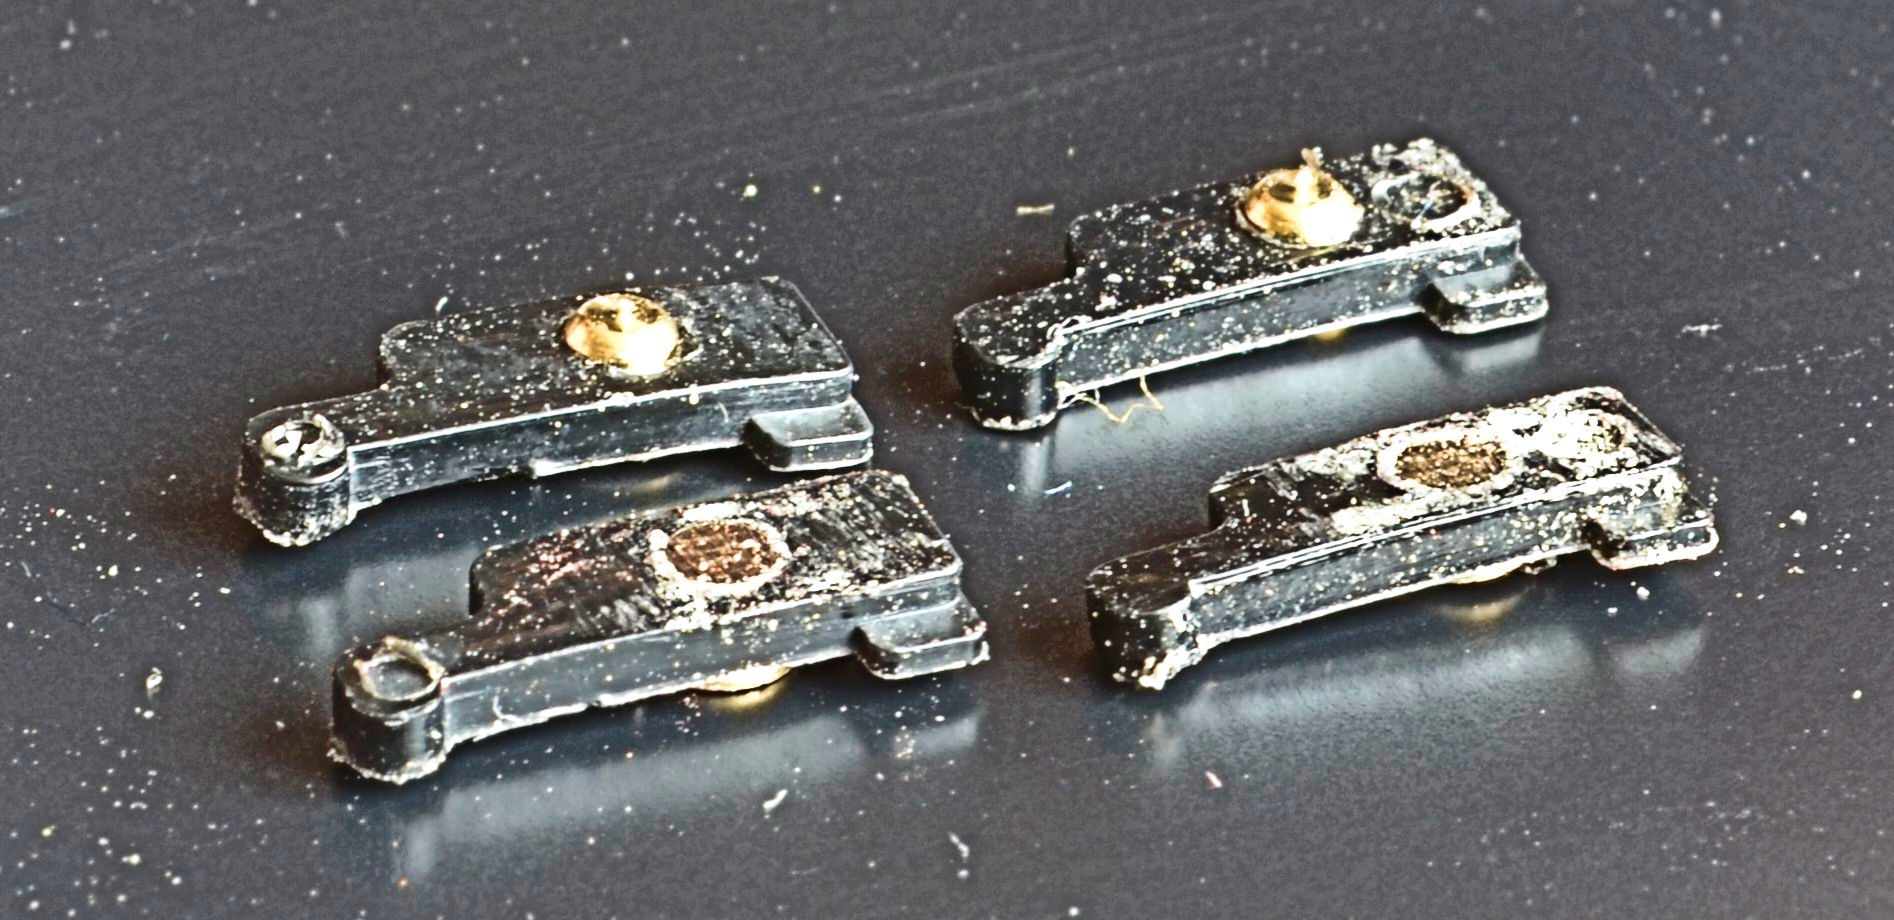
The van’s chassis, being cast in Mazak, is completely inflexible and, consequently, the axle boxes cannot be sprung at all to insert the wheel-sets. Because of this, the original wheels were held in place by plastic inserts. These we need to reuse, but not entirely in their original form. I drilled through the existing axle recess in each of the inserts so that I could insert a top-hat bearing to improve free-running. Top-hats are essential here, plain bearings will not do for reasons explained later.
As now fitted, the bearing-installed plastic inserts and the replacement wheel-set will not fit between the dummy axle boxes in the chassis: they will be around 2-3mm too wide. This is not a problem however as the backs of the bearings, being soft brass, can easily be filed down flush with the backs of the inserts. This will then enable an easy fit. This is also why top-hats are preferable to plain bearings, their rim keeping the cup in exactly the right position: plain bearings would probably just be pushed through the drilled-out insert during fitting. A photo below shows how much bearing protrudes before filing and how much has been removed after. Now refit the new wheels temporarily: a dry run should be attempted at this stage to ensure that all has gone to plan and the wheels spin freely.
Do excuse the dust. This is such a simple and effective improvement I'd recommend it for all Wrenn rolling stock that was not being kept in original condition. The chassis are now extremely free running and with their darkened wheel-sets they look more convincing.
Alternative chassis arrangements
Earlier releases of this model incorporated a different method for fixing the wheel-sets in place. These are known as 'Period 1' chassis and were made between 1966 and 1969. Plastic wheels, set into metal tabs, were employed and to remove these wheels one needs to detach the body in the usual manner and then gently prize up the metal tabs [on the top side of the chassis] to release the entire unit. Replacement with metal wheel-sets is a simple matter of reversing the procedure, with top-hat bearings glued into the metal tabs and filed down as required. You will also have to file down the rear of the W-irons however, as the replacement wheel-sets will almost certainly have wider axles. This is simply a matter of trial and error, and patience: it'll take a while and I spent an evening on just this task alone The photos below show the older chassis arrangement.

Paintshop
The paint work here is simplicity itself: Halfords’ rattle-cans, with satin black for the chassis and white and grey primer for the van body. I started with the chassis, spraying both black [one required primer first however as it was not already painted]. Once done, they were set aside to dry and harden. The van bodies were sprayed next, several coats of white primer, and they too were set aside to dry thoroughly, before being masked up for grey primer to be applied to the roofs. A photo below shows a repainted body: the detailed moulding is still quite crisp under the flat coat of primer. I know: the roof has yet to be painted.

Update and conclusion.......
Each of the chassis have been fitted with tie-rods as per the original vans. Brass wire was super-glued across the lower faces of the W irons and then painted black: they improve the appearance of the chassis considerably. Bachmann couplings were also attached to the original coupling stanchions with Araldite, so replacing the original coarse Triang-types. Again, a great improvement.
Each van roof was sprayed grey and the end steps, doors furniture and handrails [after de-rusting and priming] sprayed black. The instruction plates high-up at each end of the van bodies were painted red, as on the prototype.
Taking one body first, the sides were lettered and numbered. This presented difficulties as neither the relevant Pressfix nor Fox sheets contained either sufficient for two vans or the appropriate style / size of letters for the period. I sourced an excellent sheet of water-slide transfers from Model Master however and completed the job with a combination of both Model Master and Pressfix transfers. The results were quite acceptable. A flash of satin varnish sealed the lettering and then a light dusting with weathering powders completed the job.
The final task involved reuniting the completed body with its chassis by screwing it home. The second van will be completed in due course although it will be in ex works condition.
Photos below show the finished product. A rake of four would be good and I intend to source two other Wrenn vans in due course


Postscript
Over the past 12 months I have acquired six of these wagons and all have now been improved as above. I do not plan to purchase anymore as a rake of six is more than sufficient for my needs. Some are weathered and some have been left 'ex-works'. They all have different and prototypical running numbers and here they all are.…..
Lots of compromise here but, all things considered [and other cliches], a useful rake of Mica wagons which have improved on their origins considerably.