- A Silk Purse from a Sow's Ear -
by Tony Richards
The Ratio 20 ton GWR Toad to plus or minus Diagram AA20
When Is A Toad Not A Toad ?

The answer, I suppose, is when you buy a ready-to-run Toad from Bachmann or Hornby, or opt to construct the now venerable Ratio 20 ton Toad kit.
Both of the above purport to be a GWR 20 ton Toad to Diagram AA20, but both are also more generic than wholly accurate and suffer from moulded detail, missing parts and age: they are knocking on a bit now [Ratio left; Mainline / Bachmann right]
These Toads are also annoyingly ubiquitous, turning up on almost every GWR main-line or branch layout, seemingly without variation. In fact, the GWR used many different sizes and designs of Toad, this reflecting what the Railway had absorbed after the first grouping in 1923 and also, in some cases, the particular requirements of the line on which they were used [eg exceptionally low bridges, as in the case of the small Pontnewydd van]. So, variety was prototypical and would be welcomed in model form too.
But if you want variety, you’ll have to make it, because all that is available in r-t-r or easy kit form are the Toads identified above [or the occasional white-metal Keyser kit which can be found on eBay for a price]. If you are comfortable with brass, there’s a good variety of kits out there. If you are not however, like myself, you can still kit-bash the Ratio model into a number of variations and I’ve chosen to model a Toad to Diagram AA7.
This short 13 ton van was built by the GWR in a batch of 11 for use in the London area, particularly around Smithfield Market, and so would have run through the Metropolitan’s tunnels behind a 97XX condensing Pannier Tank. They were all attached to Acton Shed. I have just restored a Keyser Body-line model of one of these tanks and wanted a typical van to accompany it. My original plan was to acquire and modify a Keyser Toad: the Ratio kit involves less compromise however and should result in a more accurate and better-detailed model.
I have not been able to trace any photographs of these vans and so for dimensions am relying on a line drawing in ‘A History of GWR Goods Wagons’ [Atkins, Beard, Hyde & Tourret]. I’d also acknowledge with thanks a link to another drawing [from RMWeb] provided by NRM Forum contributor Skyblue [who is undertaking the same project, but using a Bachmann Toad body as the donor].
First Catch Your Toad………
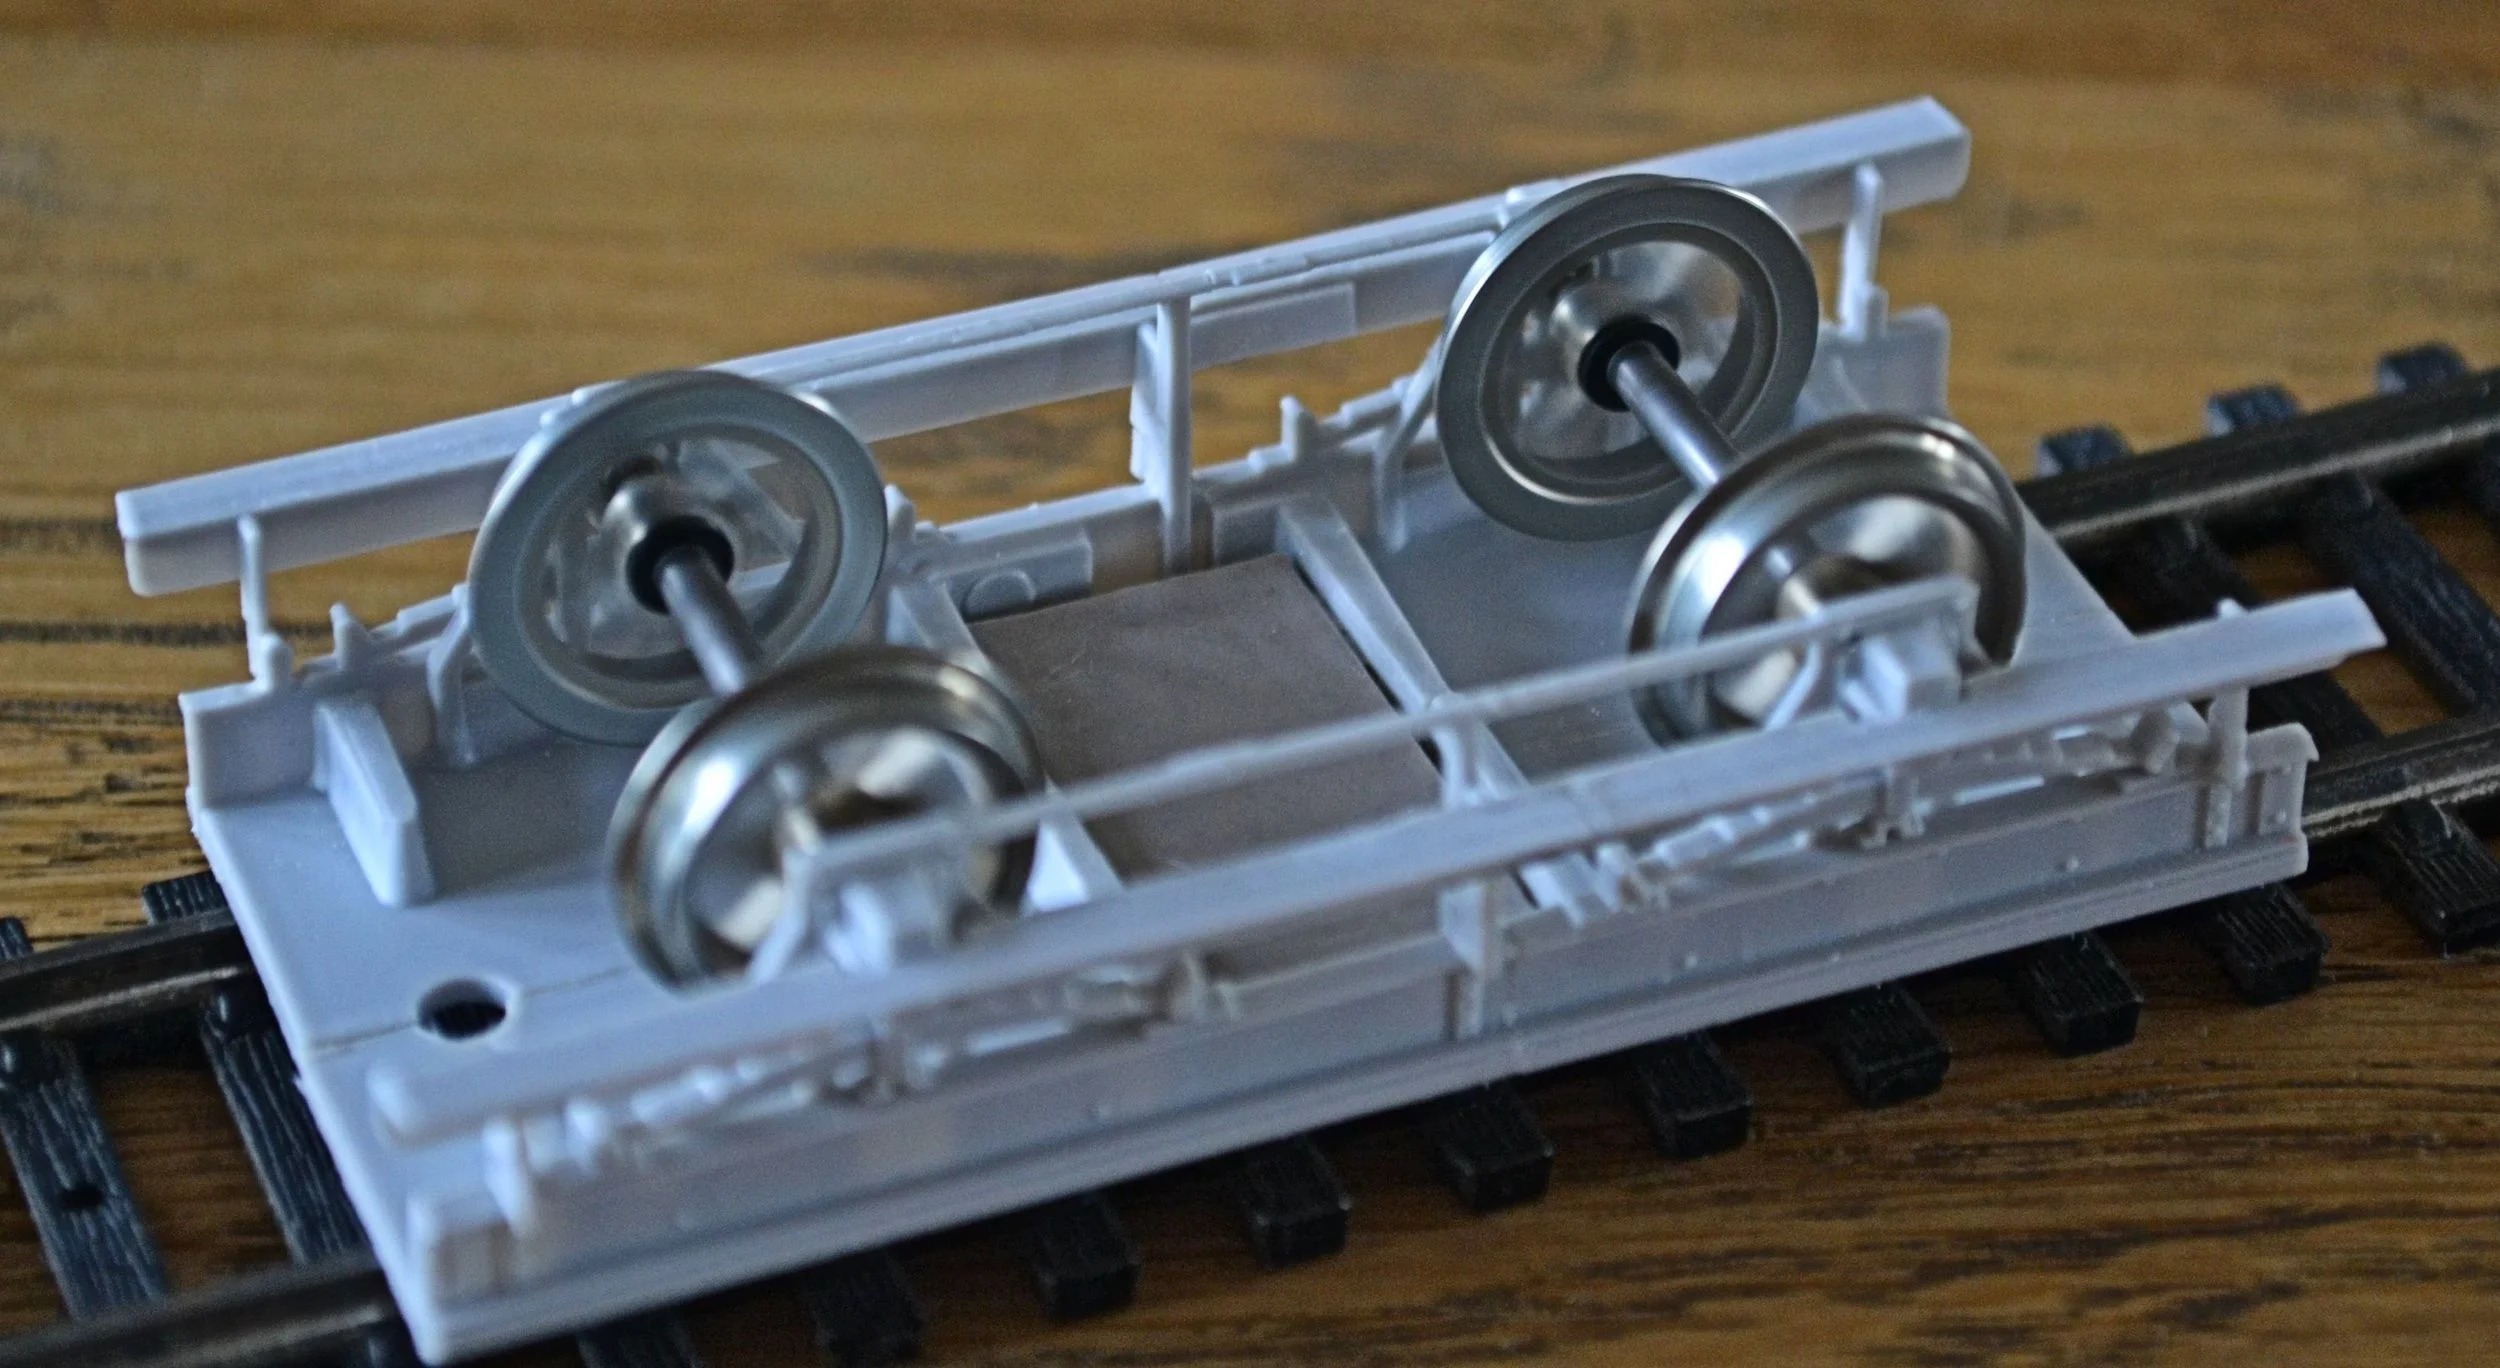
You have a choice here, either purchase the kit new from the usual sources or do what I did and bid for a cheapie on eBay. This one cost £8 all in and already having scale lamps and metal wheels, I’ll not have to buy anything else for the conversion. The photo below shows what you’ll get. Older kits are better than newer ones as they are plagued by less moulding flash. This one is very old, early 1970s, as evidenced by the advice to use carbon tetrachloride as an adhesive ! Not remotely sensible…….
Under The Knife…..
I made a start by deciding what I would not be doing. Ideally, I’d have liked to have removed the moulded handrails but that would have presented me with some difficulties: very tiny handrail knobs would have had to be sourced and a lot of small rivet detail reinstated. None of this would be impossible, but it would have required considerable additional effort and mistakes could have been quite difficult to hide.
I then measured up the sides against the drawings: somewhere in the region of 30mm would need to be removed from the sides in four or five cuts. Disguising the resultant joins will be an interesting challenge. The roof, too, would need a similar amount removed. The photos below show how drastic the shortening needed to be, compared with a unaltered side. The first shows in black approximately the amount that needed cutting out from the side. The second shows the [as yet unglued and loose] rejoin, with the original side above for comparison. The shortened side is about two-thirds of the original.
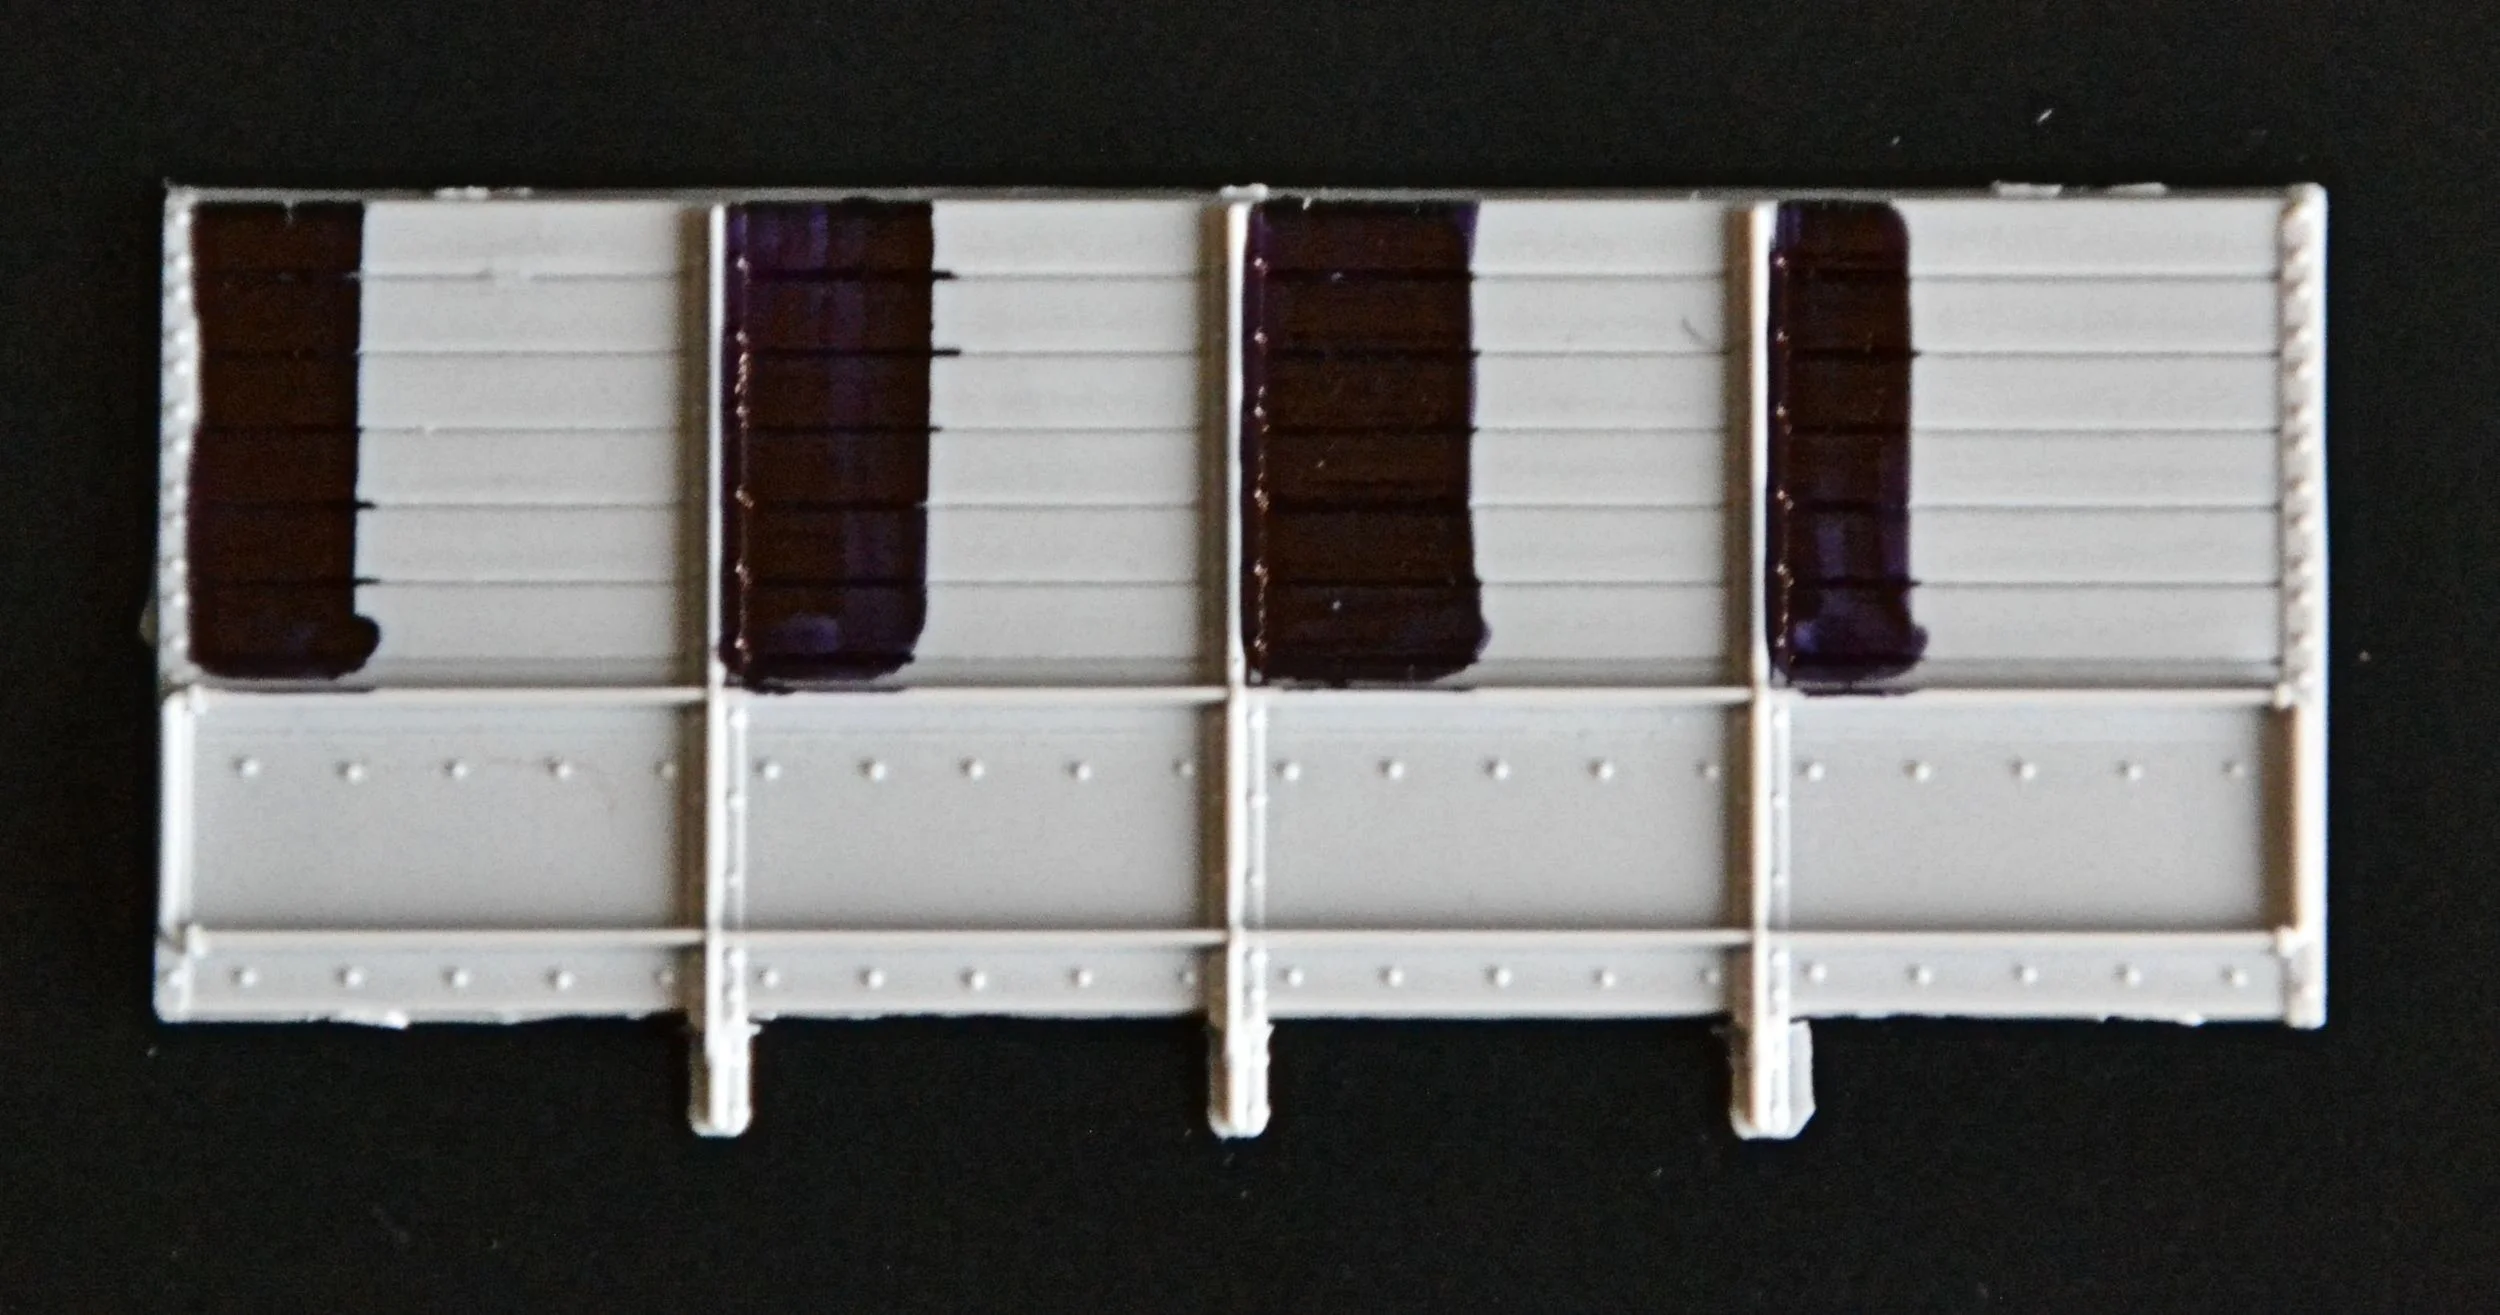
To make the cuts I used a very fine razor saw and a scalpel with a new blade. You'll notice that I changed my mind over where the cuts would be made and some of the blacked-out area remains. I marked up .5mm in over-measurement each time to allow for the width of the cut. It was then possible to carefully sand the edges back so that this part of the side was exactly 43mm long. Even though great care was given to the cuts, they are not 100% perfect and will require very careful filling in places. Paint will hide the major part of any flaws left.
The sides cannot be joined until planking is scribed over the steel sheet lower sides. This is now underway.
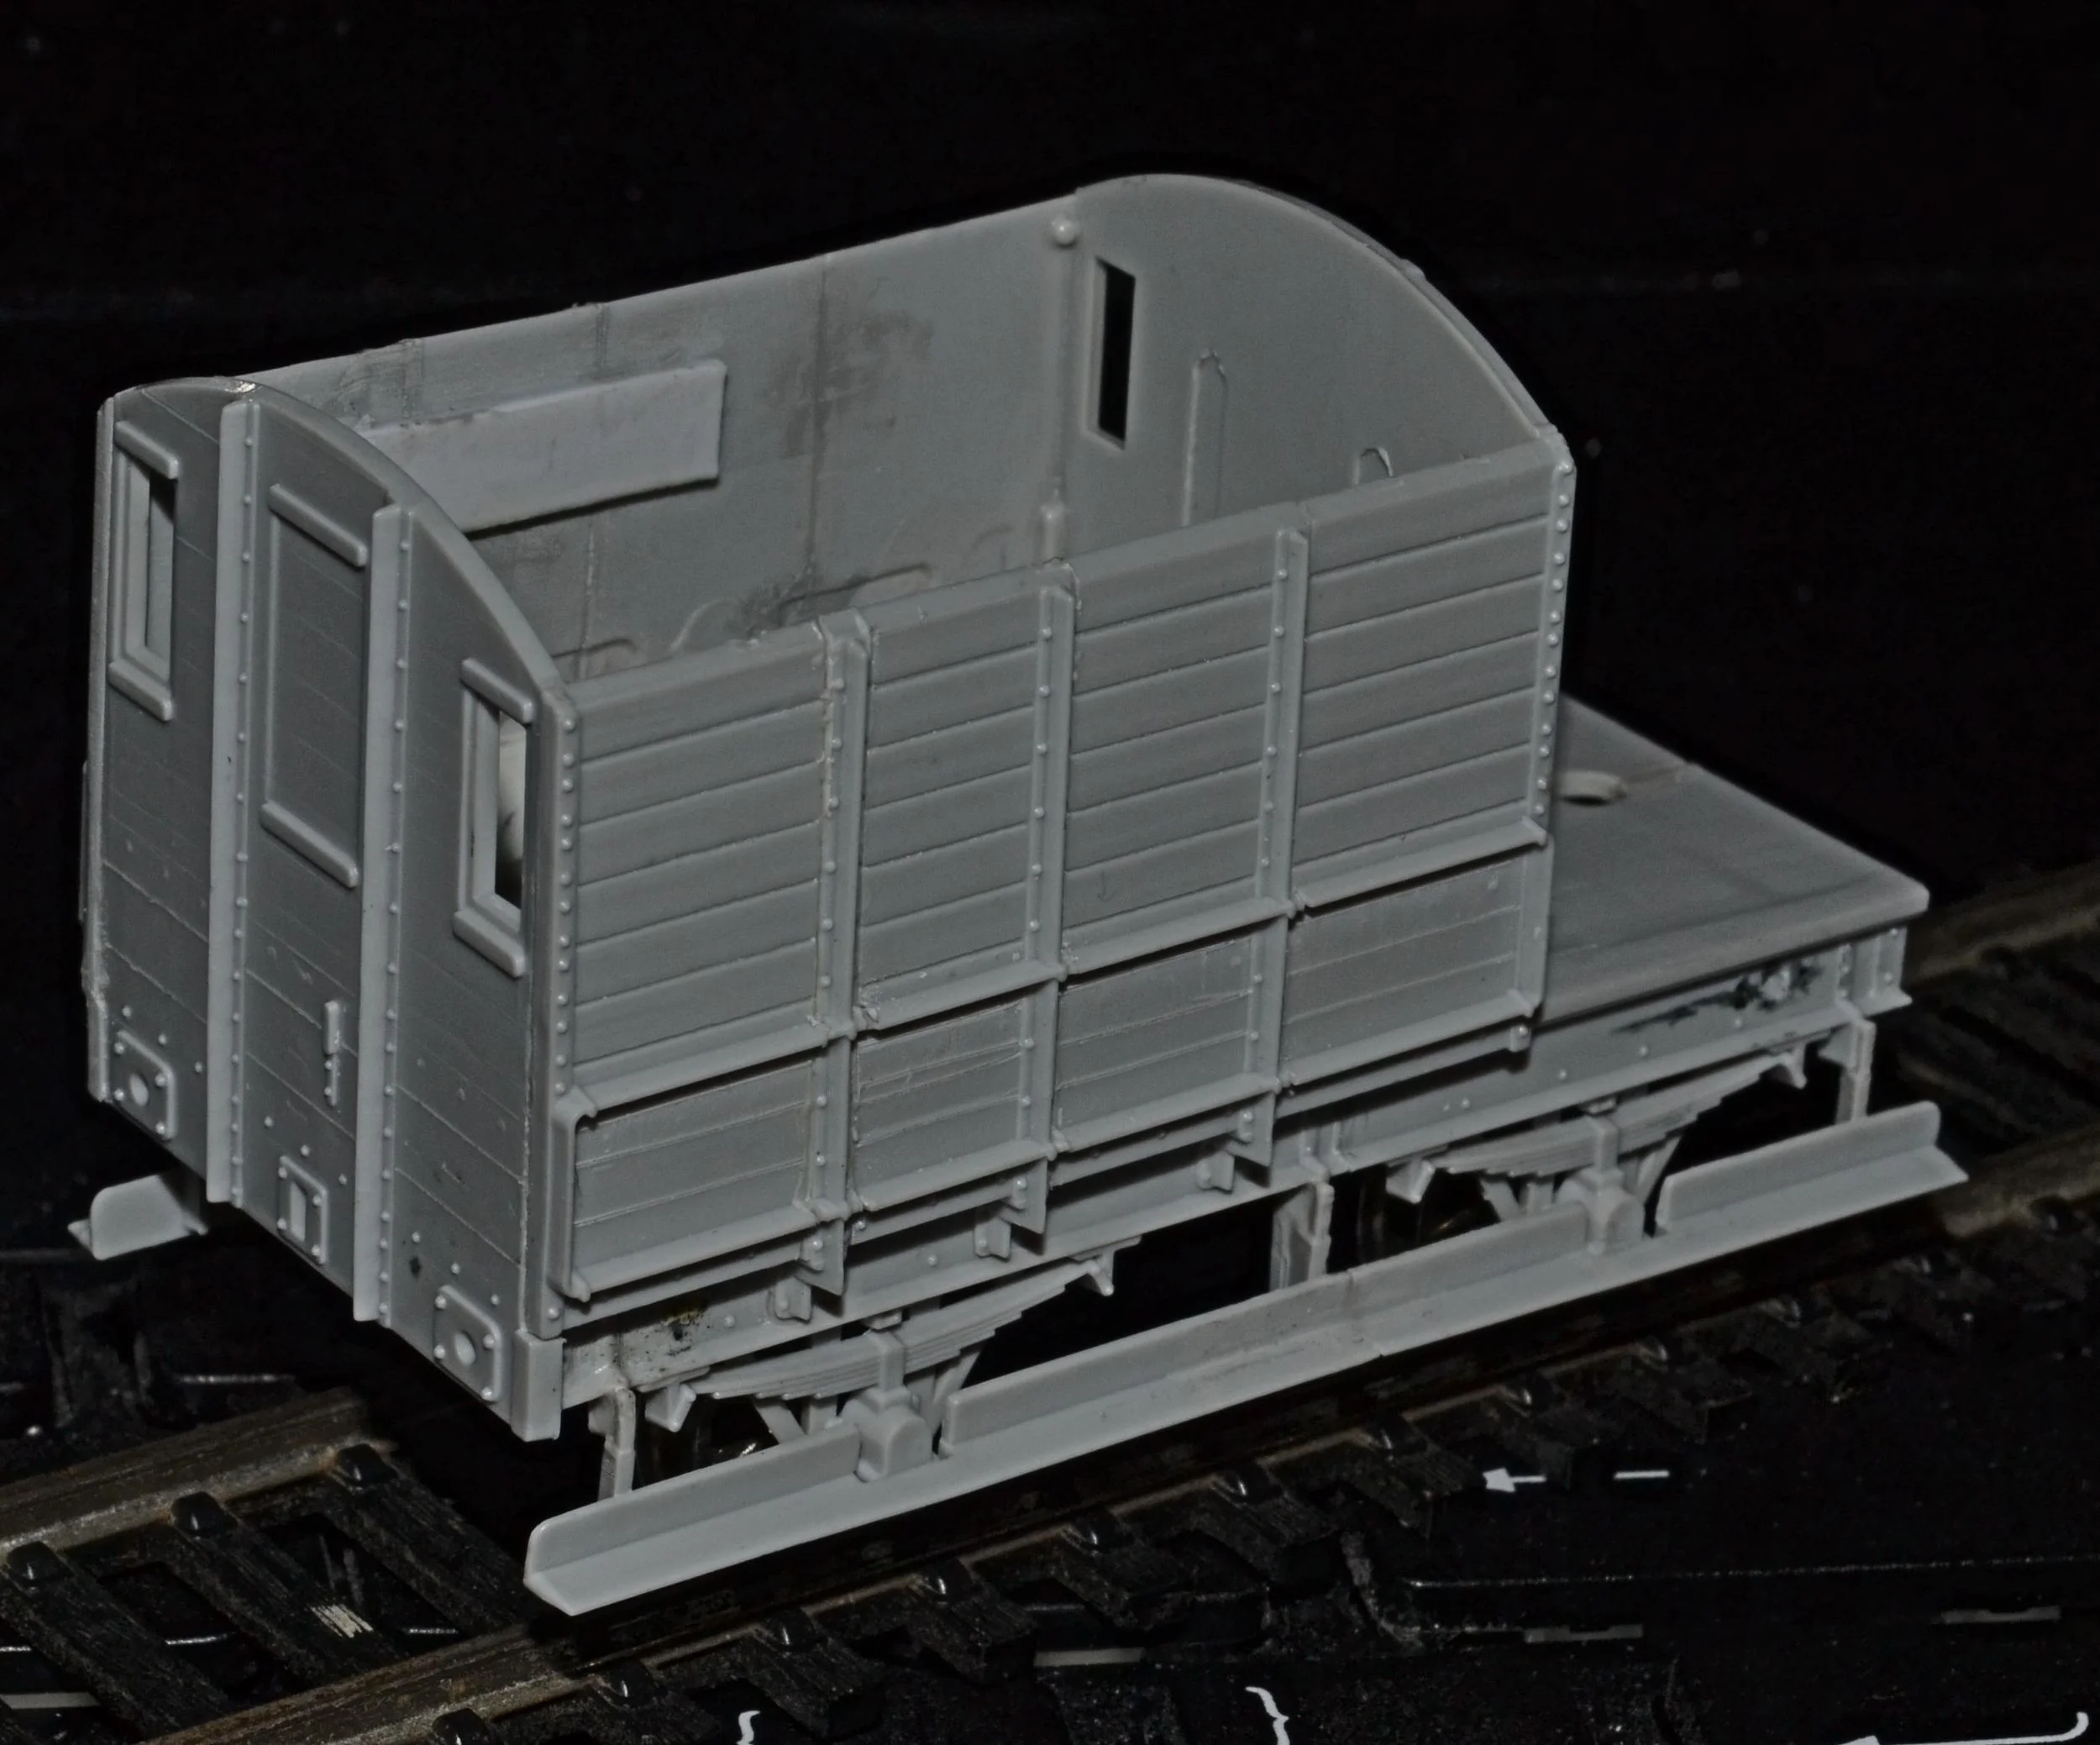
A Small Progression And An Irritating Problem.........
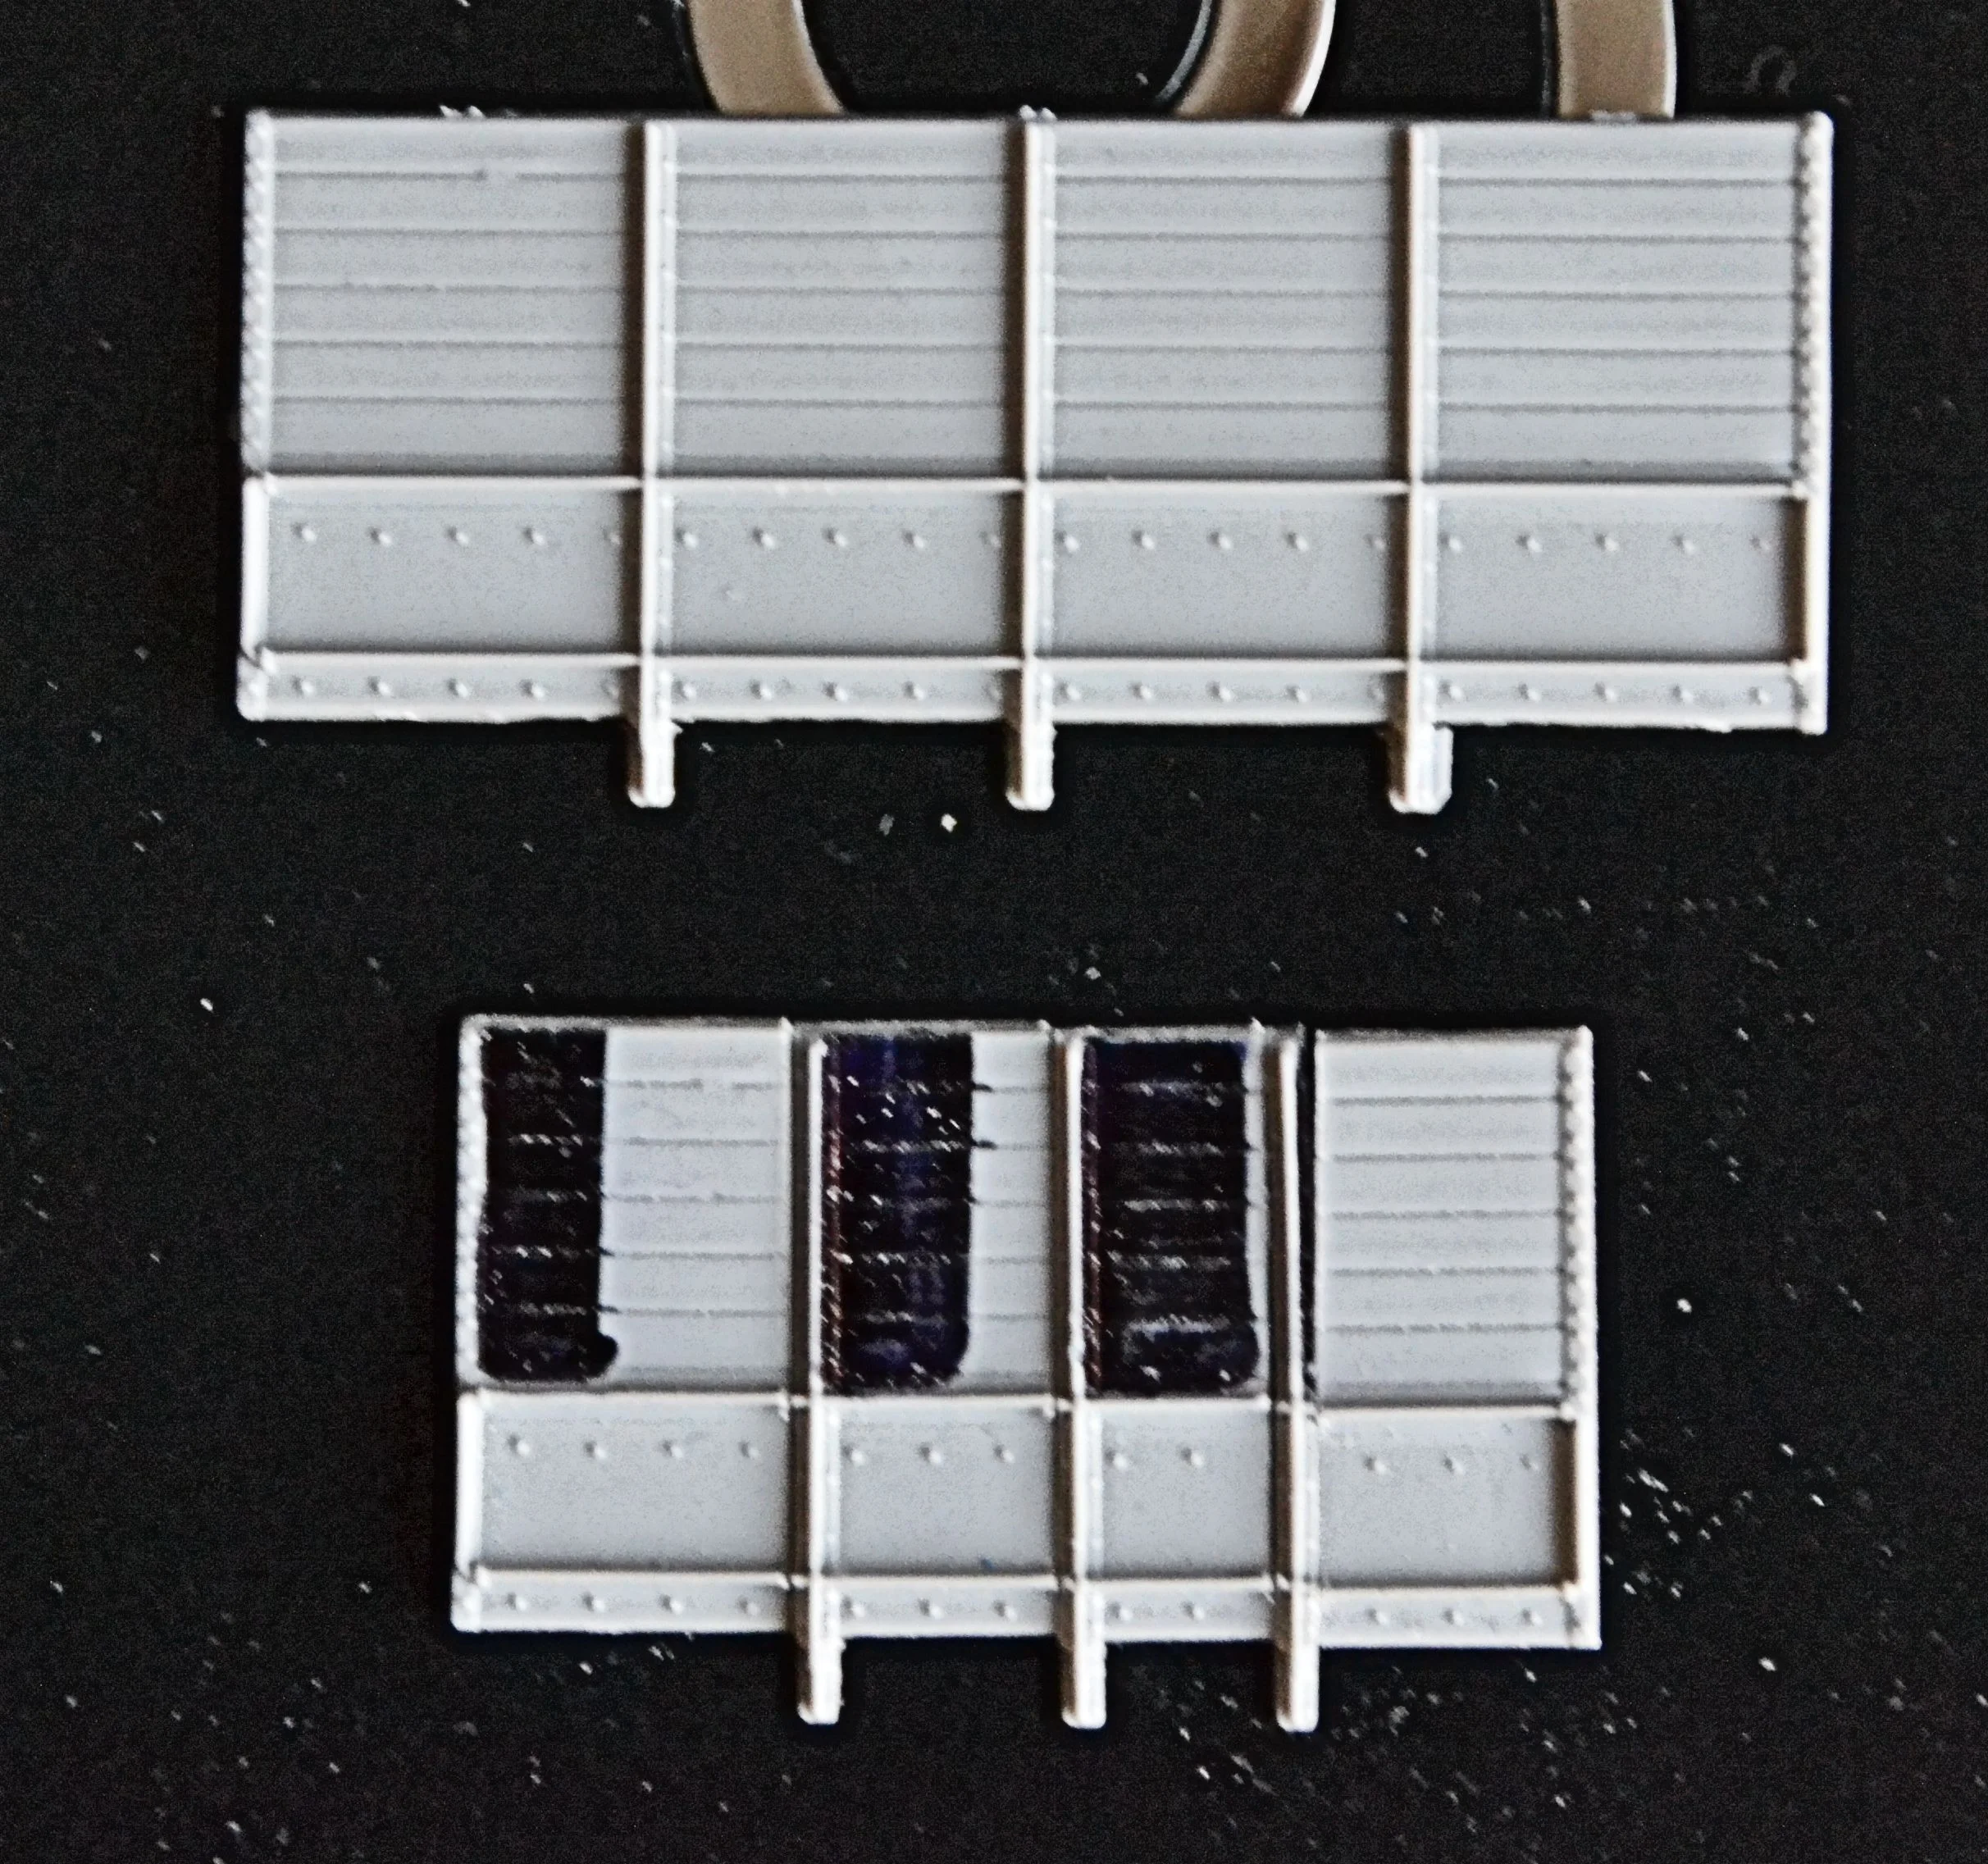
As ever, the demands of the real world have impacted upon progress but some things have moved forward. Both sides have been reduced in length and rejoined and the photo below shows just how much shorter they are. The left hand image is a near-perfect job and requires no remedial attention apart from, perhaps, the smallest amount of filler in the handrail area: the right hand is not however, and has warped badly. Correcting this is going to be extremely difficult but it is necessary and so some thought will need to be given to this task. For information, each side comprises five separate parts.
The roof has also been shortened - by 30mm - and the parts now await joining. a chimney will need constructing in due course and fitted centrally [rather than offset as on the donor model]. Rain strips will also need applying.
The join in the roof is pleasingly square and once glued should only need sanding with fine-grade emery to disguise it completely. To reinforce the joint [which would otherwise be tricky to establish neatly and risk some solvent damage at the join] I cut a slice of the removed part and glued it underneath; its radius made a perfect fit. The photos show the roof halves, the method of fixing and a dry run before applying solvent to the two halves.

A Little More Achieved.....
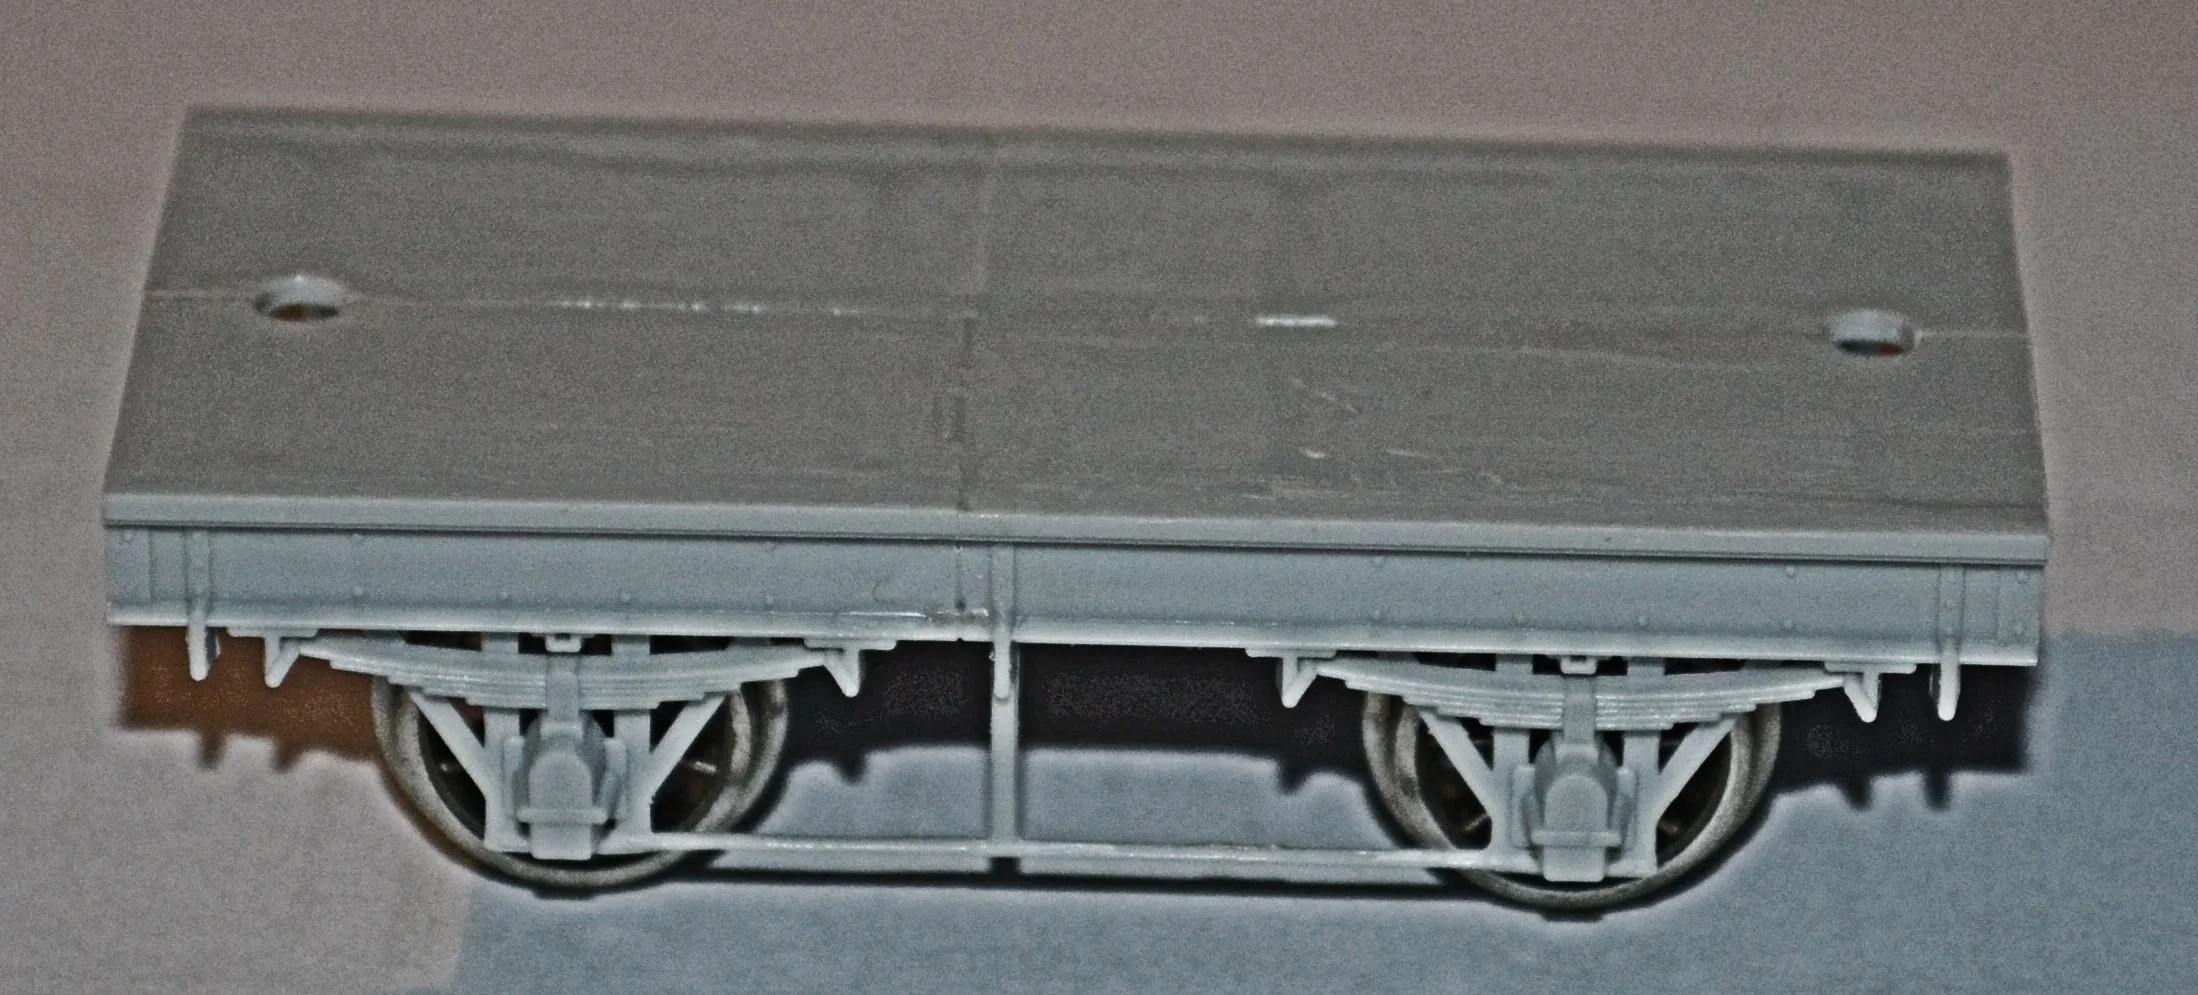
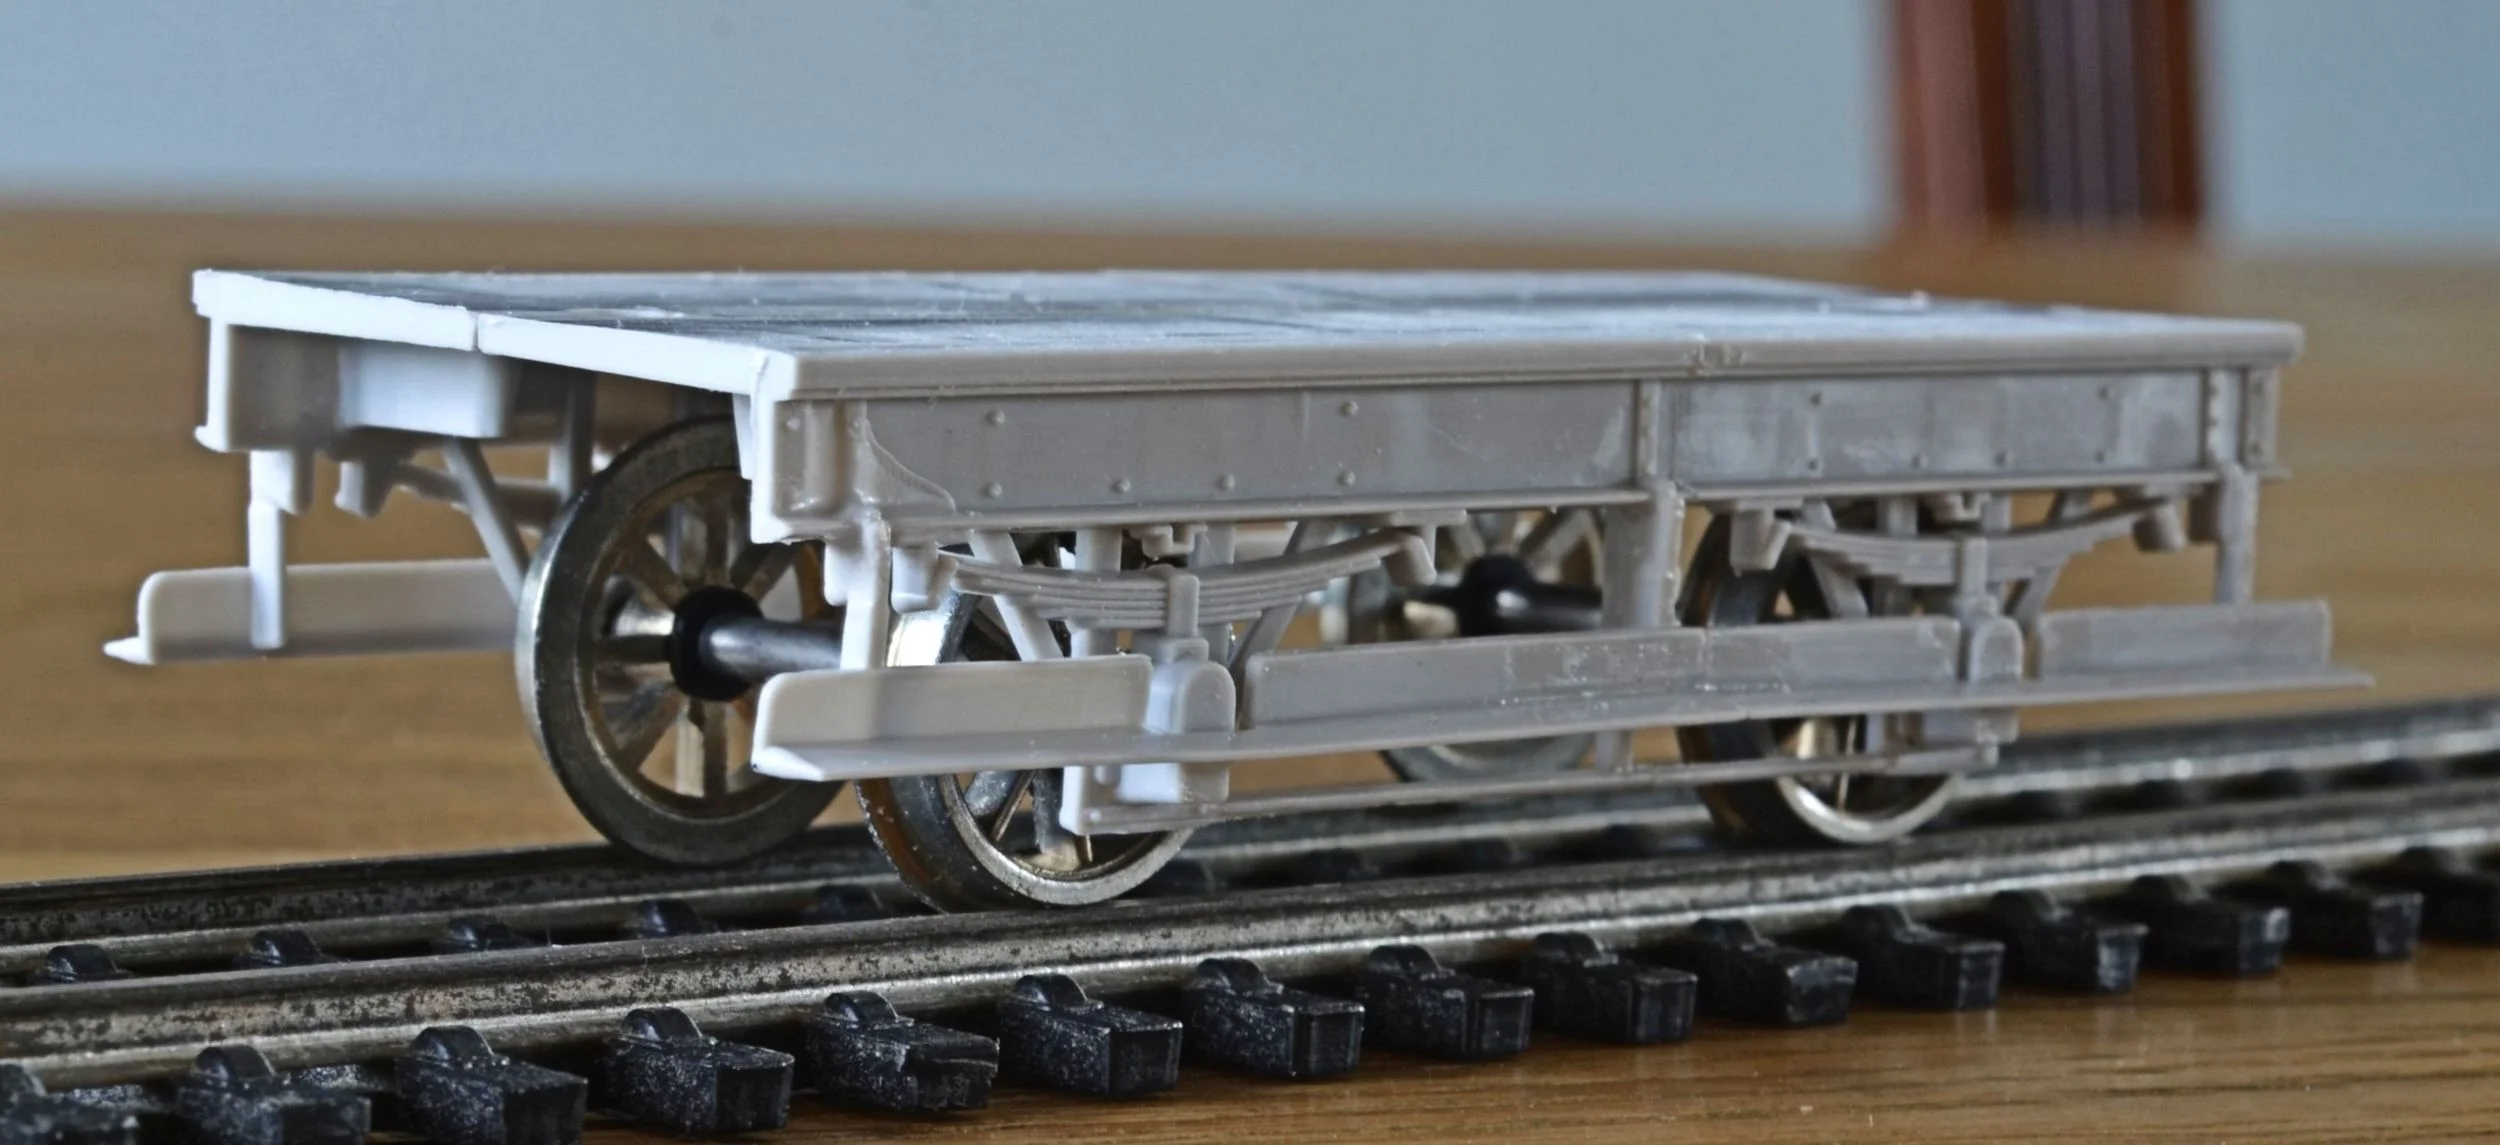
The roof has been joined and sanded after curing. Apart from a tiny nick at the top left [of the photo] it's fine. The nick will be easily removed with Milliput and the faint join-line will disappear altogether under primer. A start has also been made on the chassis. I approached this with some trepidation because of the fineness of some of the moulding. However, all went to plan and one side has been completed. It awaits footboards. Photos below show progress on the roof and a 'before-and-after' of the chassis.

The 'before-and-after' photo shows once again just how much smaller the 13 ton vans were. For the chassis sides, 30mm had to be removed in two cuts. I managed to retain the fragile truss rods fortunately. They could easily have been replaced by brass wire but some under axle-box detail would have then been lost, and brass wire doesn't quite have the right profile.
A Tale Of Two Halves.........
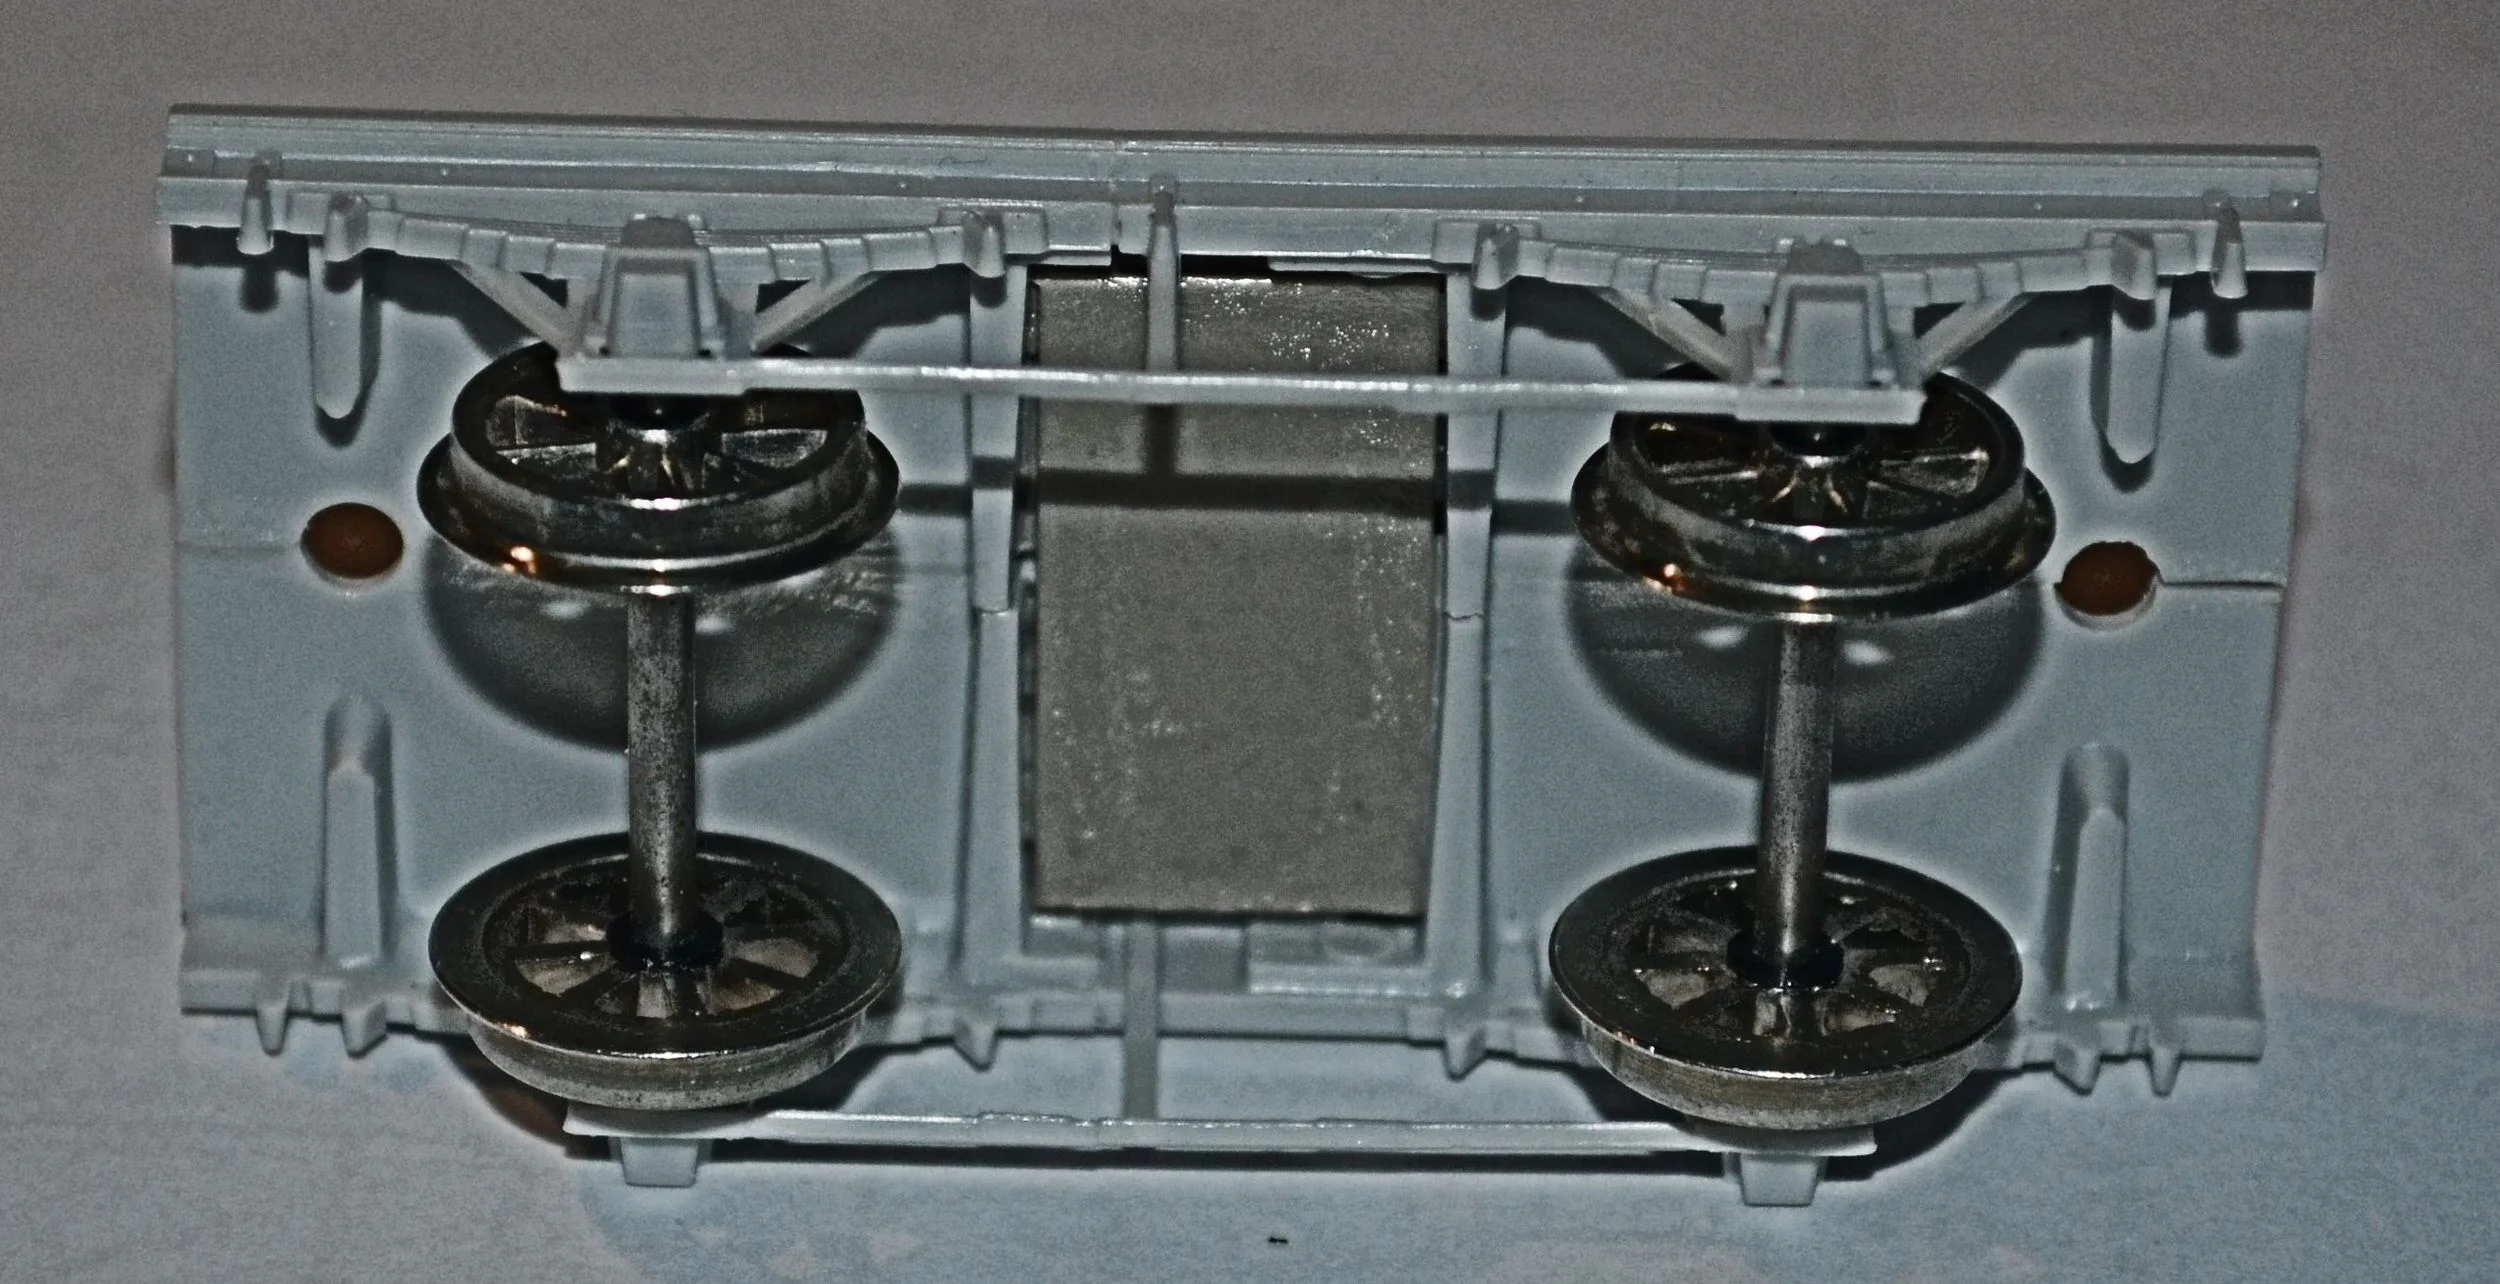
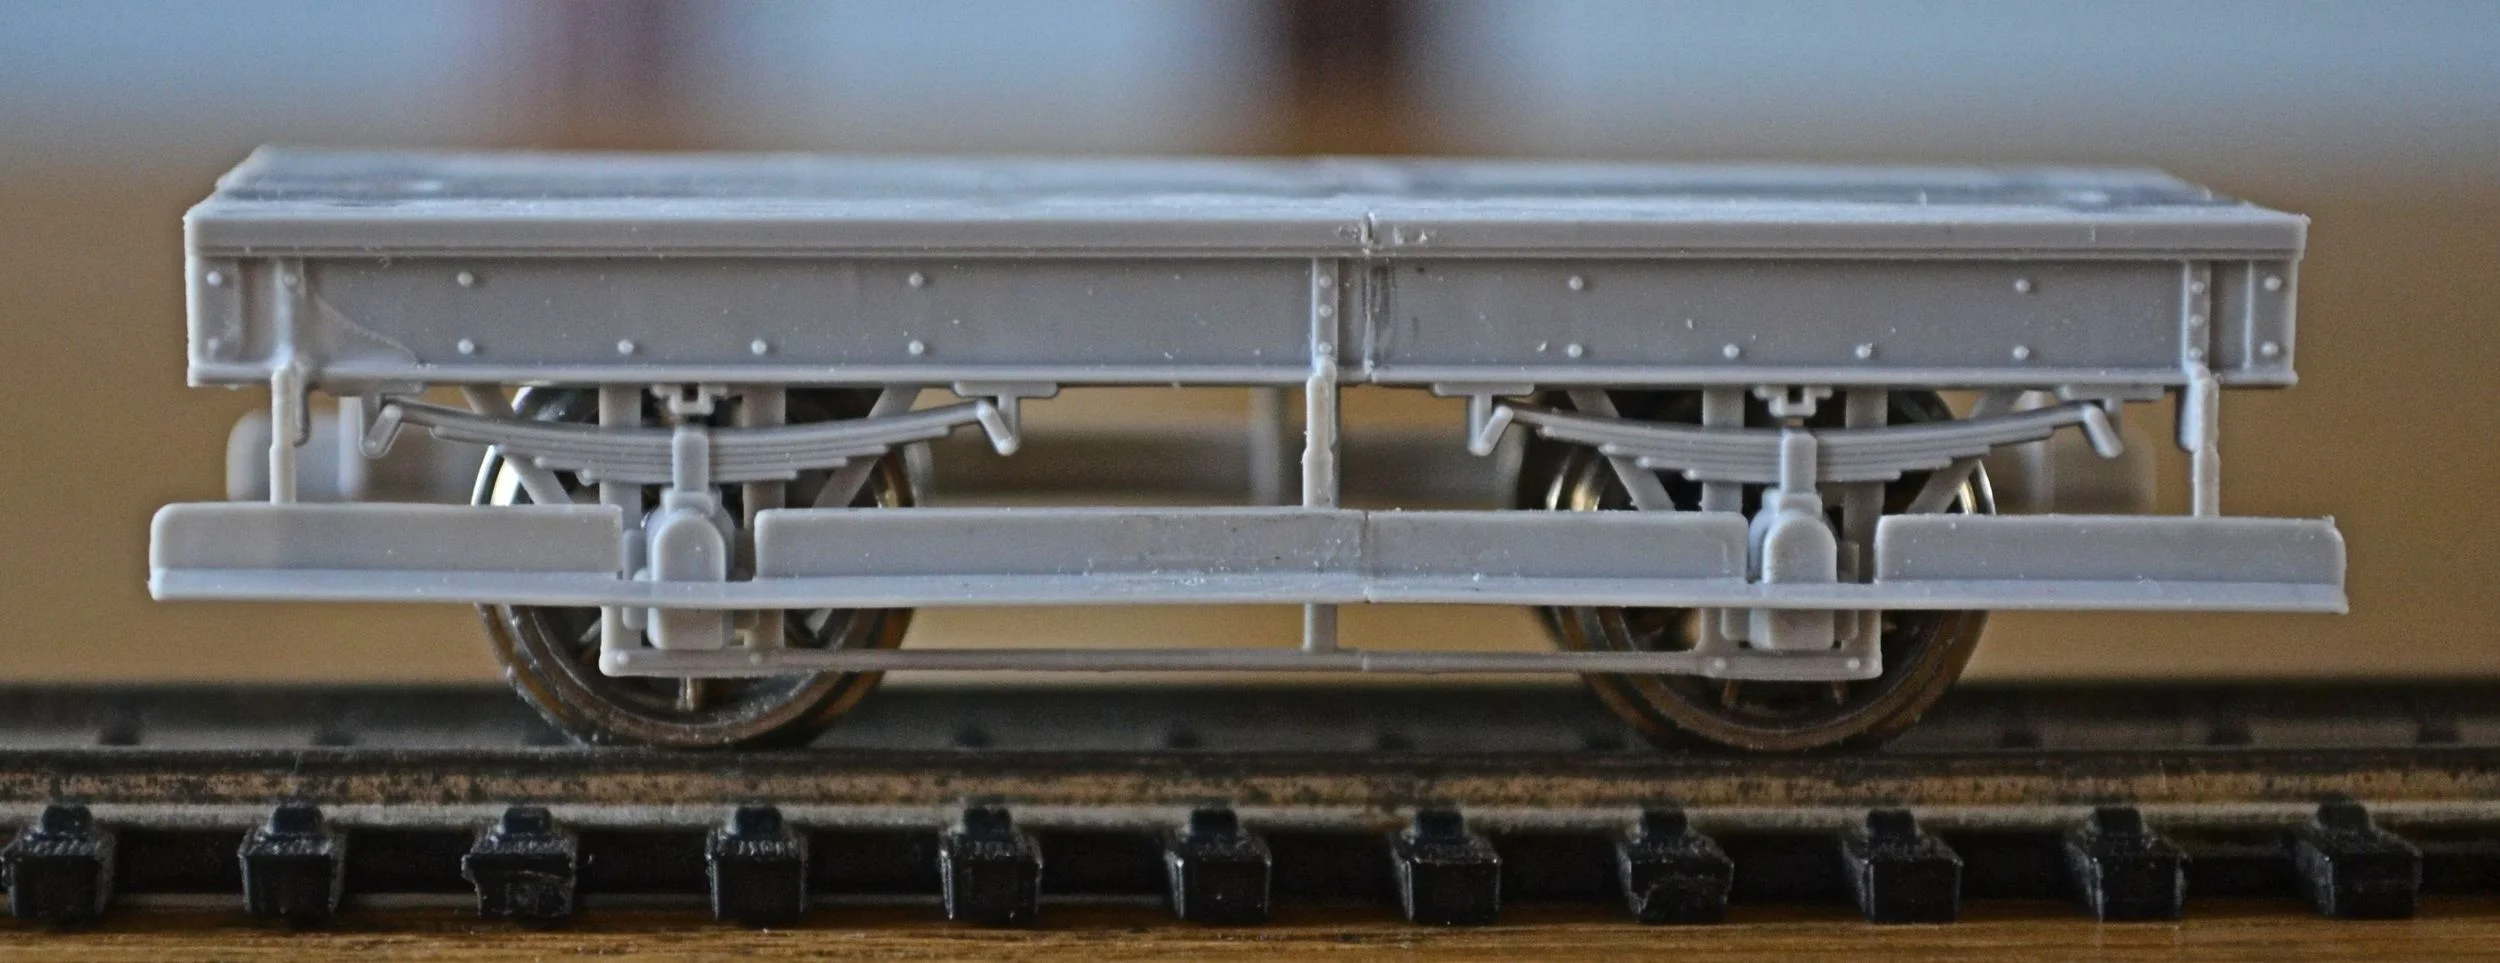
A pleasant couple of hours tonight saw the second side's sole-bar / floor cut and joined and both units then glued together to form the complete chassis. As the floor and sole-bars halves are formed as combined, it is essential that the whole goes together completely square. A couple of steel rules and some final sanding with an emery board to fine tune helped achieve this.
Before assembly, the axle-box holes were drilled out slightly with a pin-chuck and plain brass bearings then sunk into them. Wheel sets were sprung in after and the unit runs extremely freely and, critically, with all four wheels on the track at the same time.
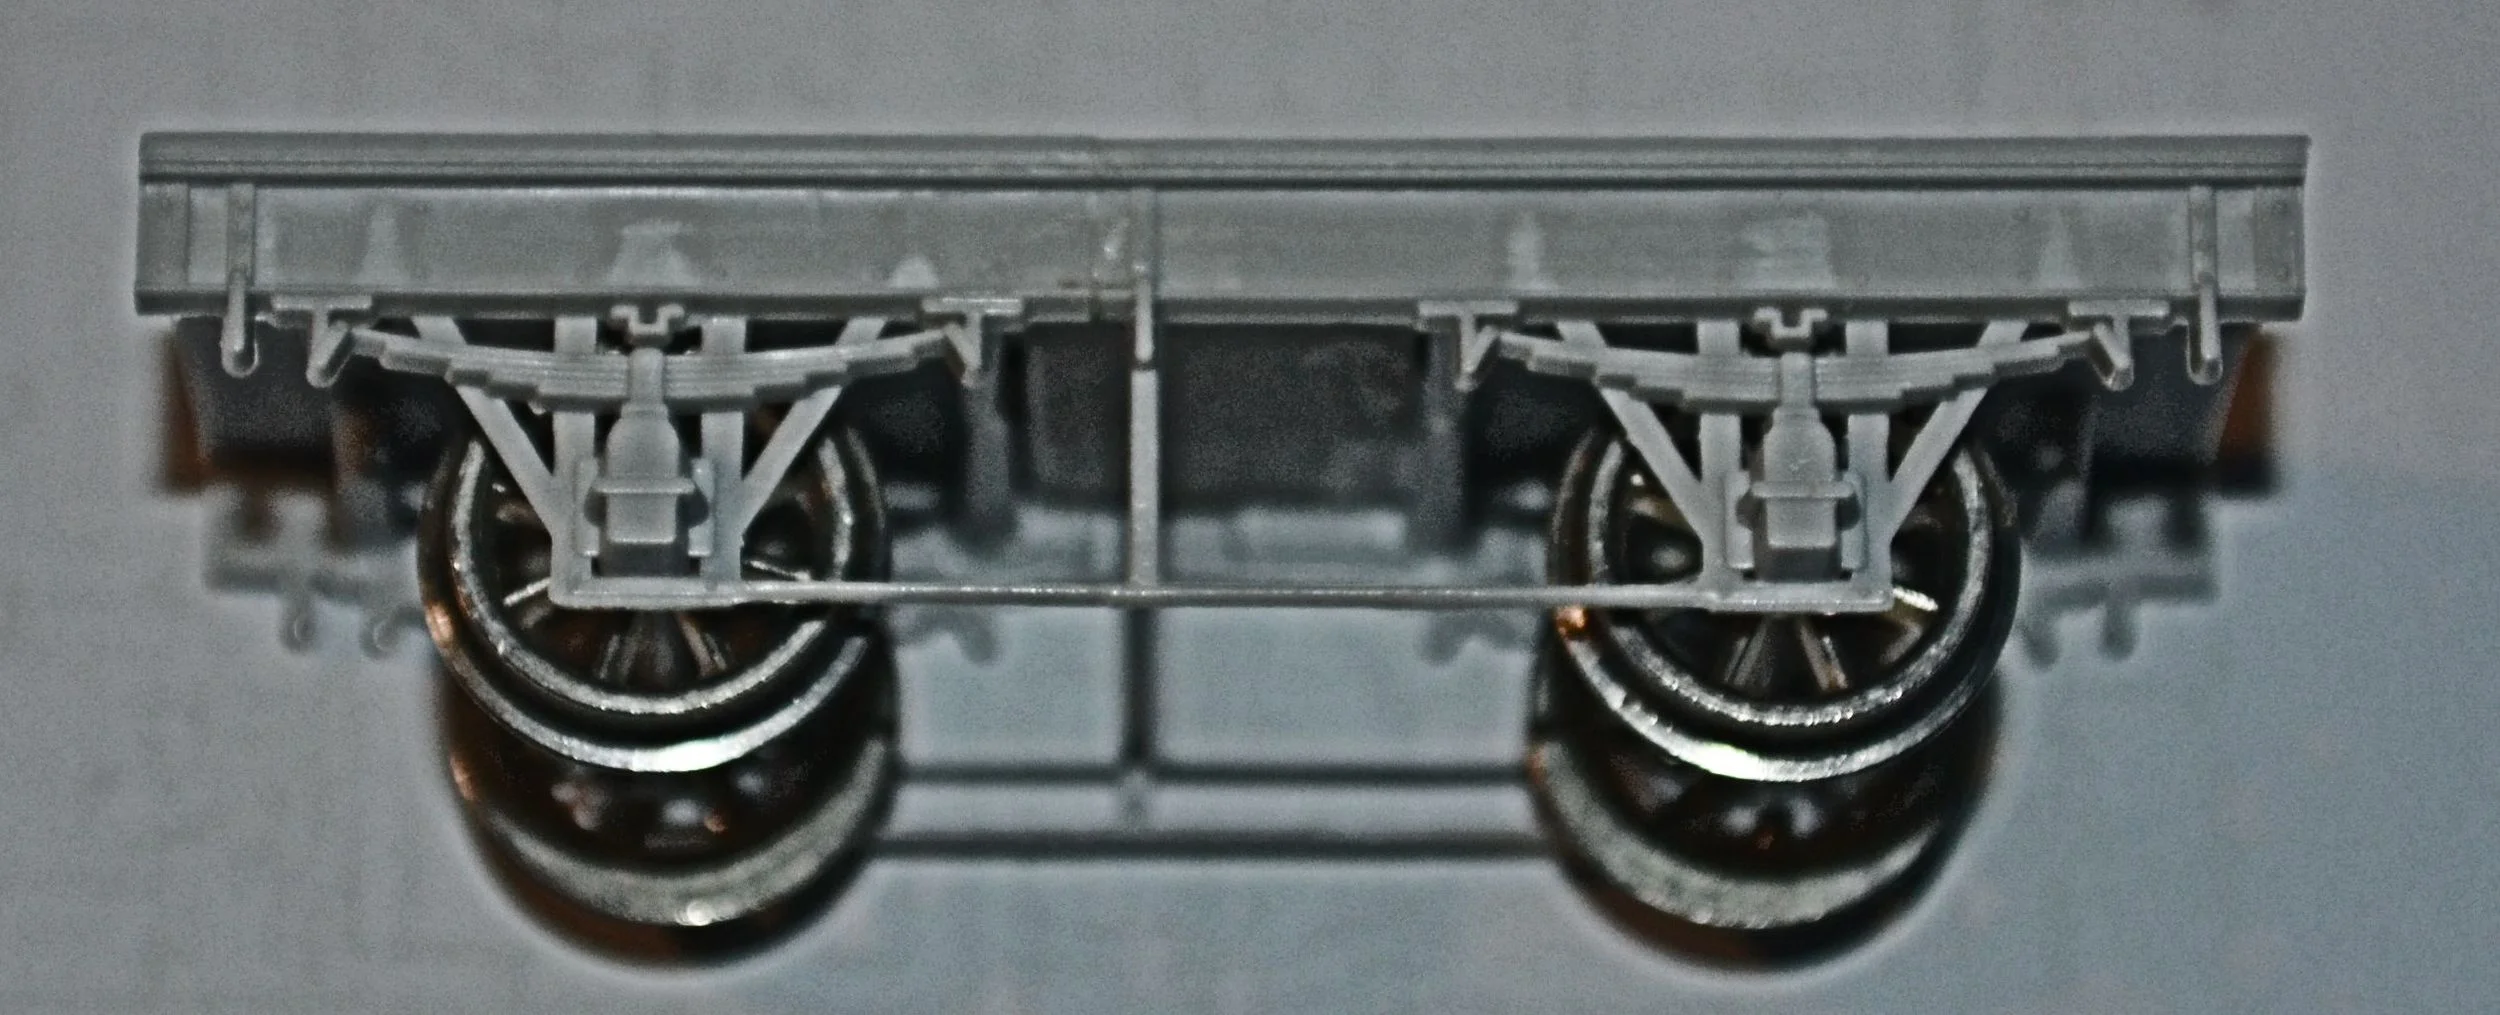
The next task, before returning to the body, will involve cutting down the step-boards and fitting them halfway up over the axle boxes [just above the ridge].
Photos below show the chassis unit so far. For those who are interested in such things, the wheelbase is a scale 3" too short. I think you'll allow me that one.........
In the meantime, I still have to think about how to straighten out that warped side and also source a rattle-can of GWR Freight Grey. I just realised that I had run out........
Step Up, Step Up..................
The step-boards have now been fitted to the rolling chassis. I was able to cut the components for the step-board hangers to match up with the brackets on the solebars, which made fixing a lot easier. The step-boards themselves are a thin and fragile 'L'-section moulding. Difficult enough to cut without damaging, they then had to be butt-joined. There was little surface area to actually glue and, consequently, each join was reinforced from behind with thin plastic strip. A photo shows this. The whole is now quite secure. Slight irregularities, exaggerated by the digital images, will be carefully sanded out prior to priming. Photos below show progress. I could not resist taking one with the wheels spinning !
Oh, an aerosol of GWR Freaight Grey has now been sourced. I am still spitting feathers over the postage cost however: at £7.70 it is greater than the price of the paint. Don't let me go on over that one...........
Progress [or, I've Run Out Of Ideas For A More Original Heading.....]
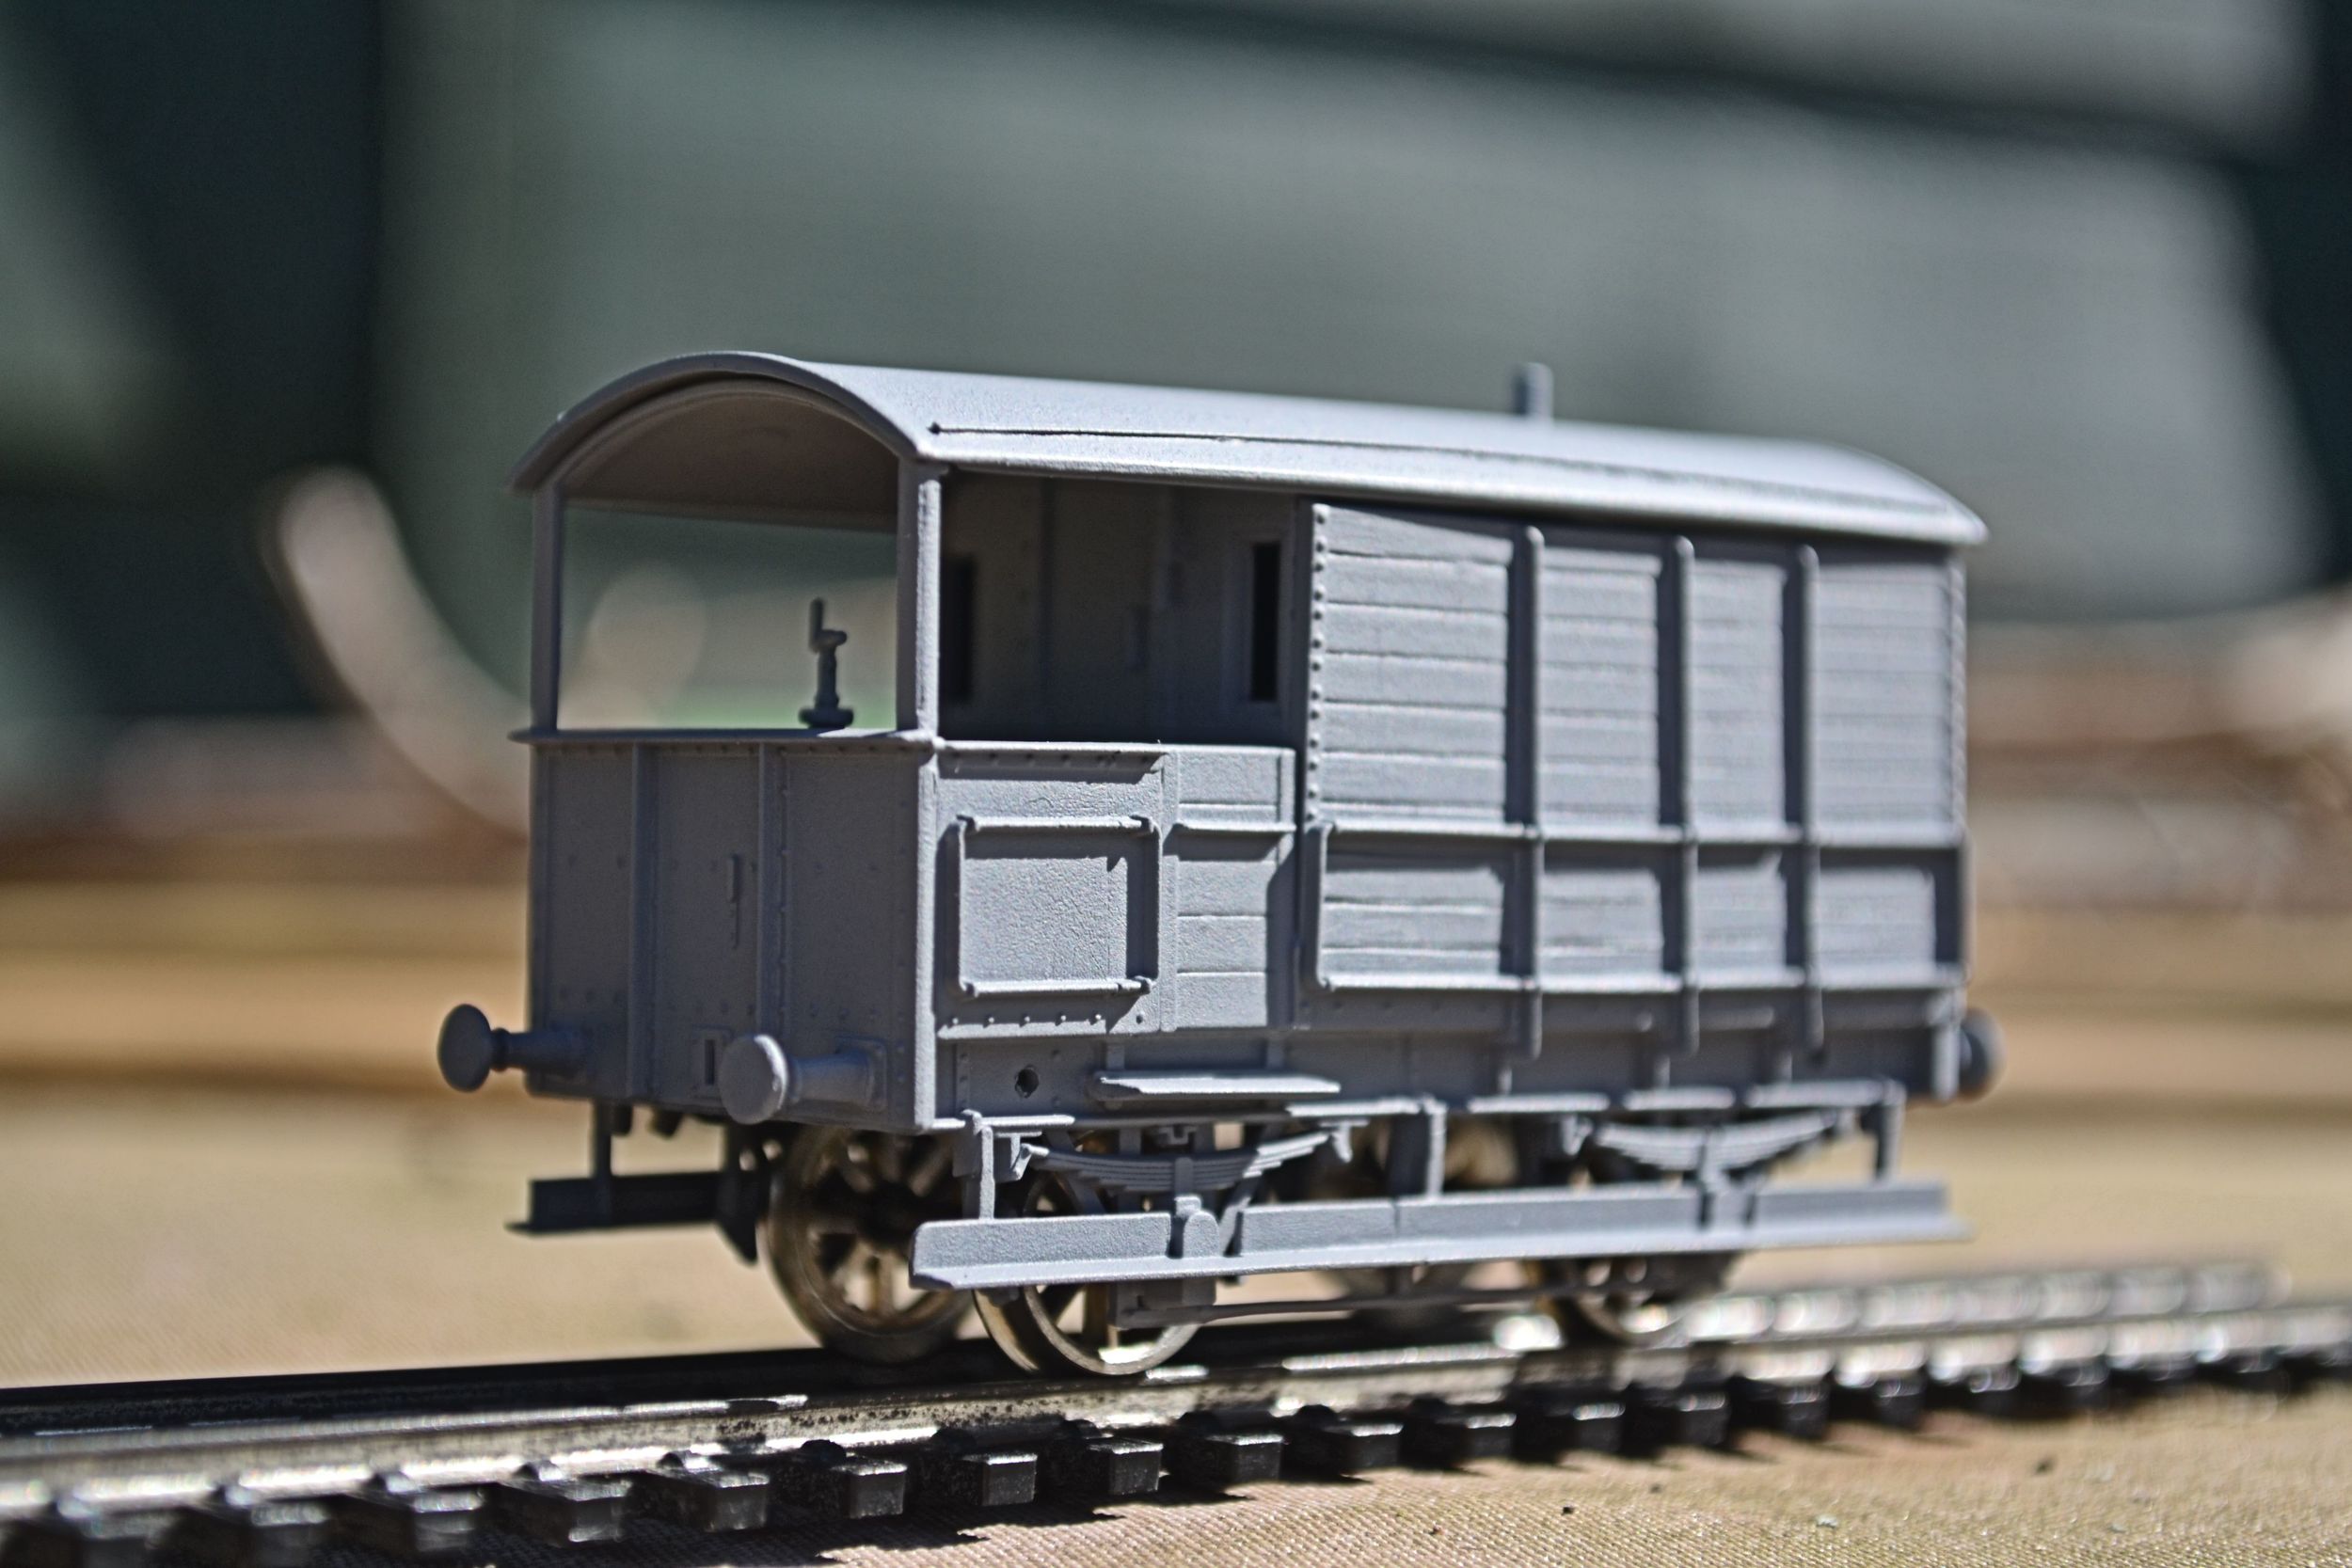
The annoying warp in one of the sides has now been resolved. By gently cracking open the top half of the end-most joint and then glueing some plastic card behind to keep the top half open, I was able to straighten the side and then fill the gap with Humbrol filler. The left-hand photo shows how this was done. The overall flat curve was easily then rectified when the side was glued onto the chassis. The nick in the roof shown earlier has also be attended to and cannot now be seen. The verandah sides have been cut down and rejoined, with their doors attached. Nothing now stands in the way of final construction.
The photos below show the cabin attached to the chassis. A little filing and reshaping was required to ensure a completely flat fit but, overall, and considering the amount of surgery that every part of this kit has had, everything went together remarkably well. I suppose that this wasn't really the most difficult build ever though.....

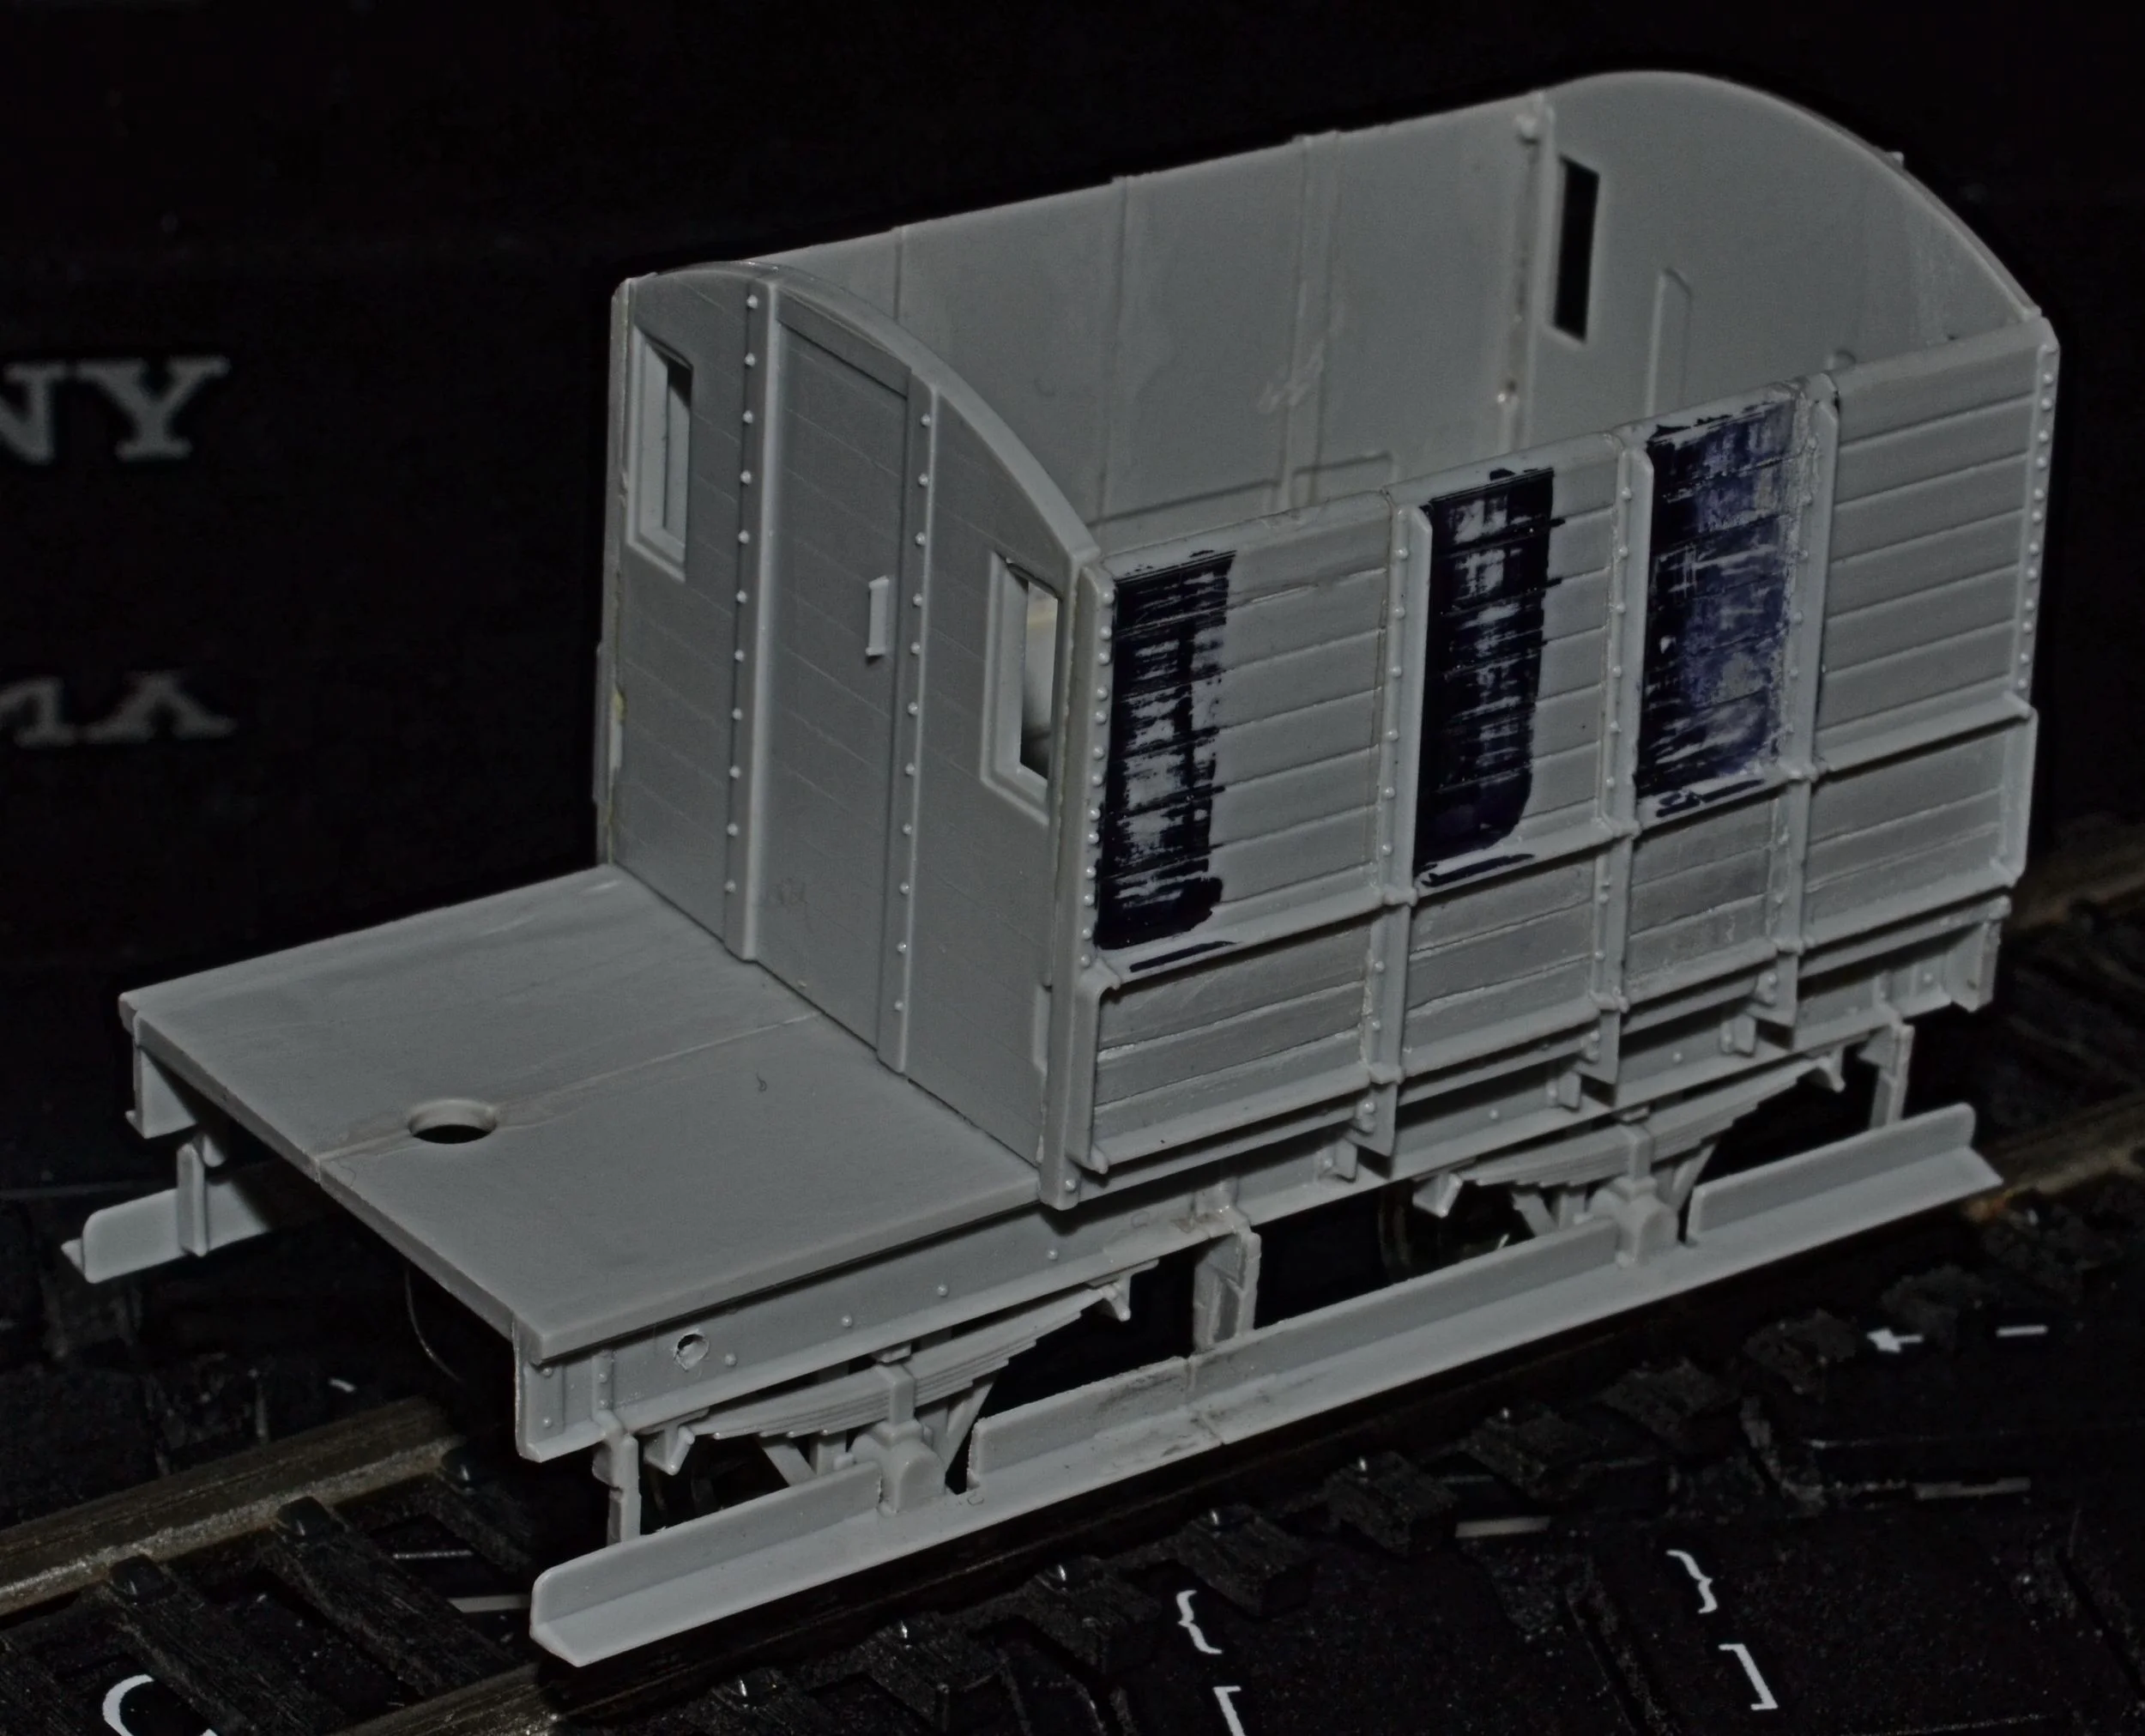
The solebars need a hole drilling through towards each end. I've attended to this but made a complete horlicks of one so that has been filled with Milliput to be attended to again. You might be able to see this in the left-hand photo.
Once the verandah sides and end have been attached, and various other bits of external detail added [buffers, etc], I'll give the model a flash of grey primer. That will identify any further need for sanding or filling. The van can then be lettered, varnished, glazed and, finally, have the roof attached.
I'm conscious that my other project, the two K's 4 wheel coaches, remains unfinished. I'm waiting for a fine, dry day to finish painting them and will update their blog in due course. I'm also already well down the road in terms of planning for my next build: the restoration of a GEM [George E. Mellor] white-metal kit of a 56XX 0-6-2 tank, another half-century old beauty. The plan is to radically alter a modern Bachmann chassis [the motor at present non-operational] to place underneath it. A blog for that will commence eventually. In the meantime I must finish Mr Toad however.......
Nearly There.......
The verandah area has now been completed and the brake stanchion and sand-boxes installed. A rudimentary sand-box mechanism was scratched-up out of wire. It will barely be visible once the roof is in place so 100% accuracy was not an imperative. I also planked the floor in the verandah area and added a lever by the inner cabin door to simulate the rear sanding mechanism. Brake blocks were fitted to the chassis, steps to the solebar below the verandah doors and some weights [two twopence pieces] glued inside the cabin, centrally. The whole was then given a coat of primer to check for flaws. Apart from some of the scribed planking being flooded out, everything seemed fine. I'll re-scribe the planking prior to a final coat being applied. A coupling hook from the kit was fitted to the inner end of the van: the outer end will receive a more detailed fitting later. Lamps will be fitted later, also.
The photos below show some of the detail parts together with the van sitting under its as-yet unglued roof.


Some tiny nicks in the handrails, where the joins were made, may need a little filler. I'll decide after they have been painted as matt white paint may do the job for me.
Marking Time.............
I can go no further now until the paint I ordered arrives. I really hate being held up by things like this. Anyway, all that was left to do [add rain strips and a chimney to the roof, and then prime it] has been done and the photos below show where I'm up to. The roof is placed loosely on the body, hence the poor fit.

Painting And Lettering
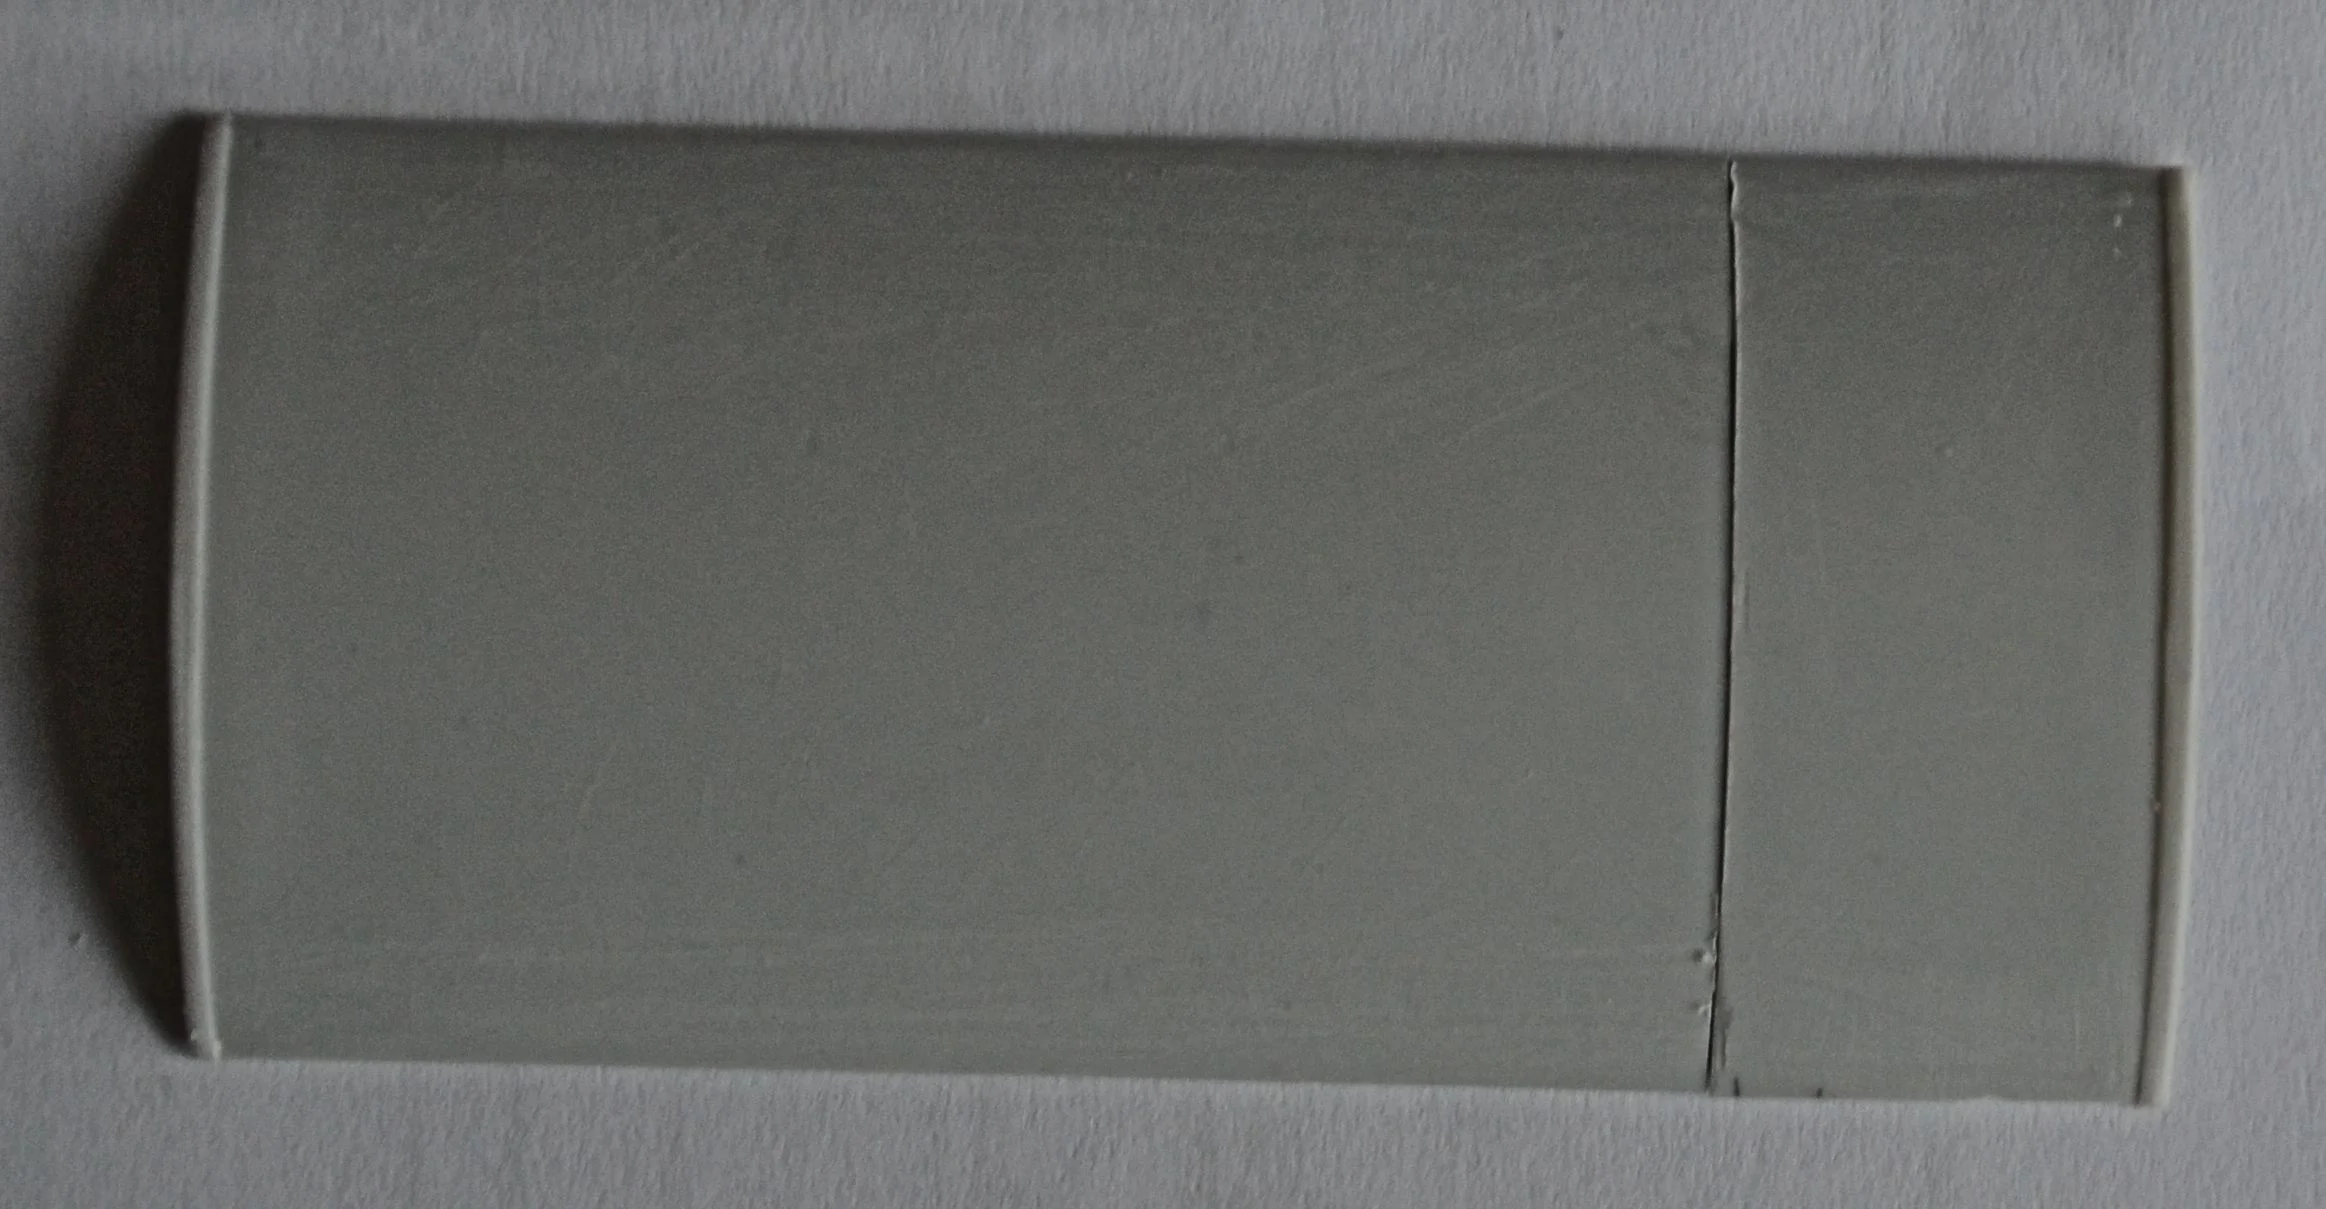
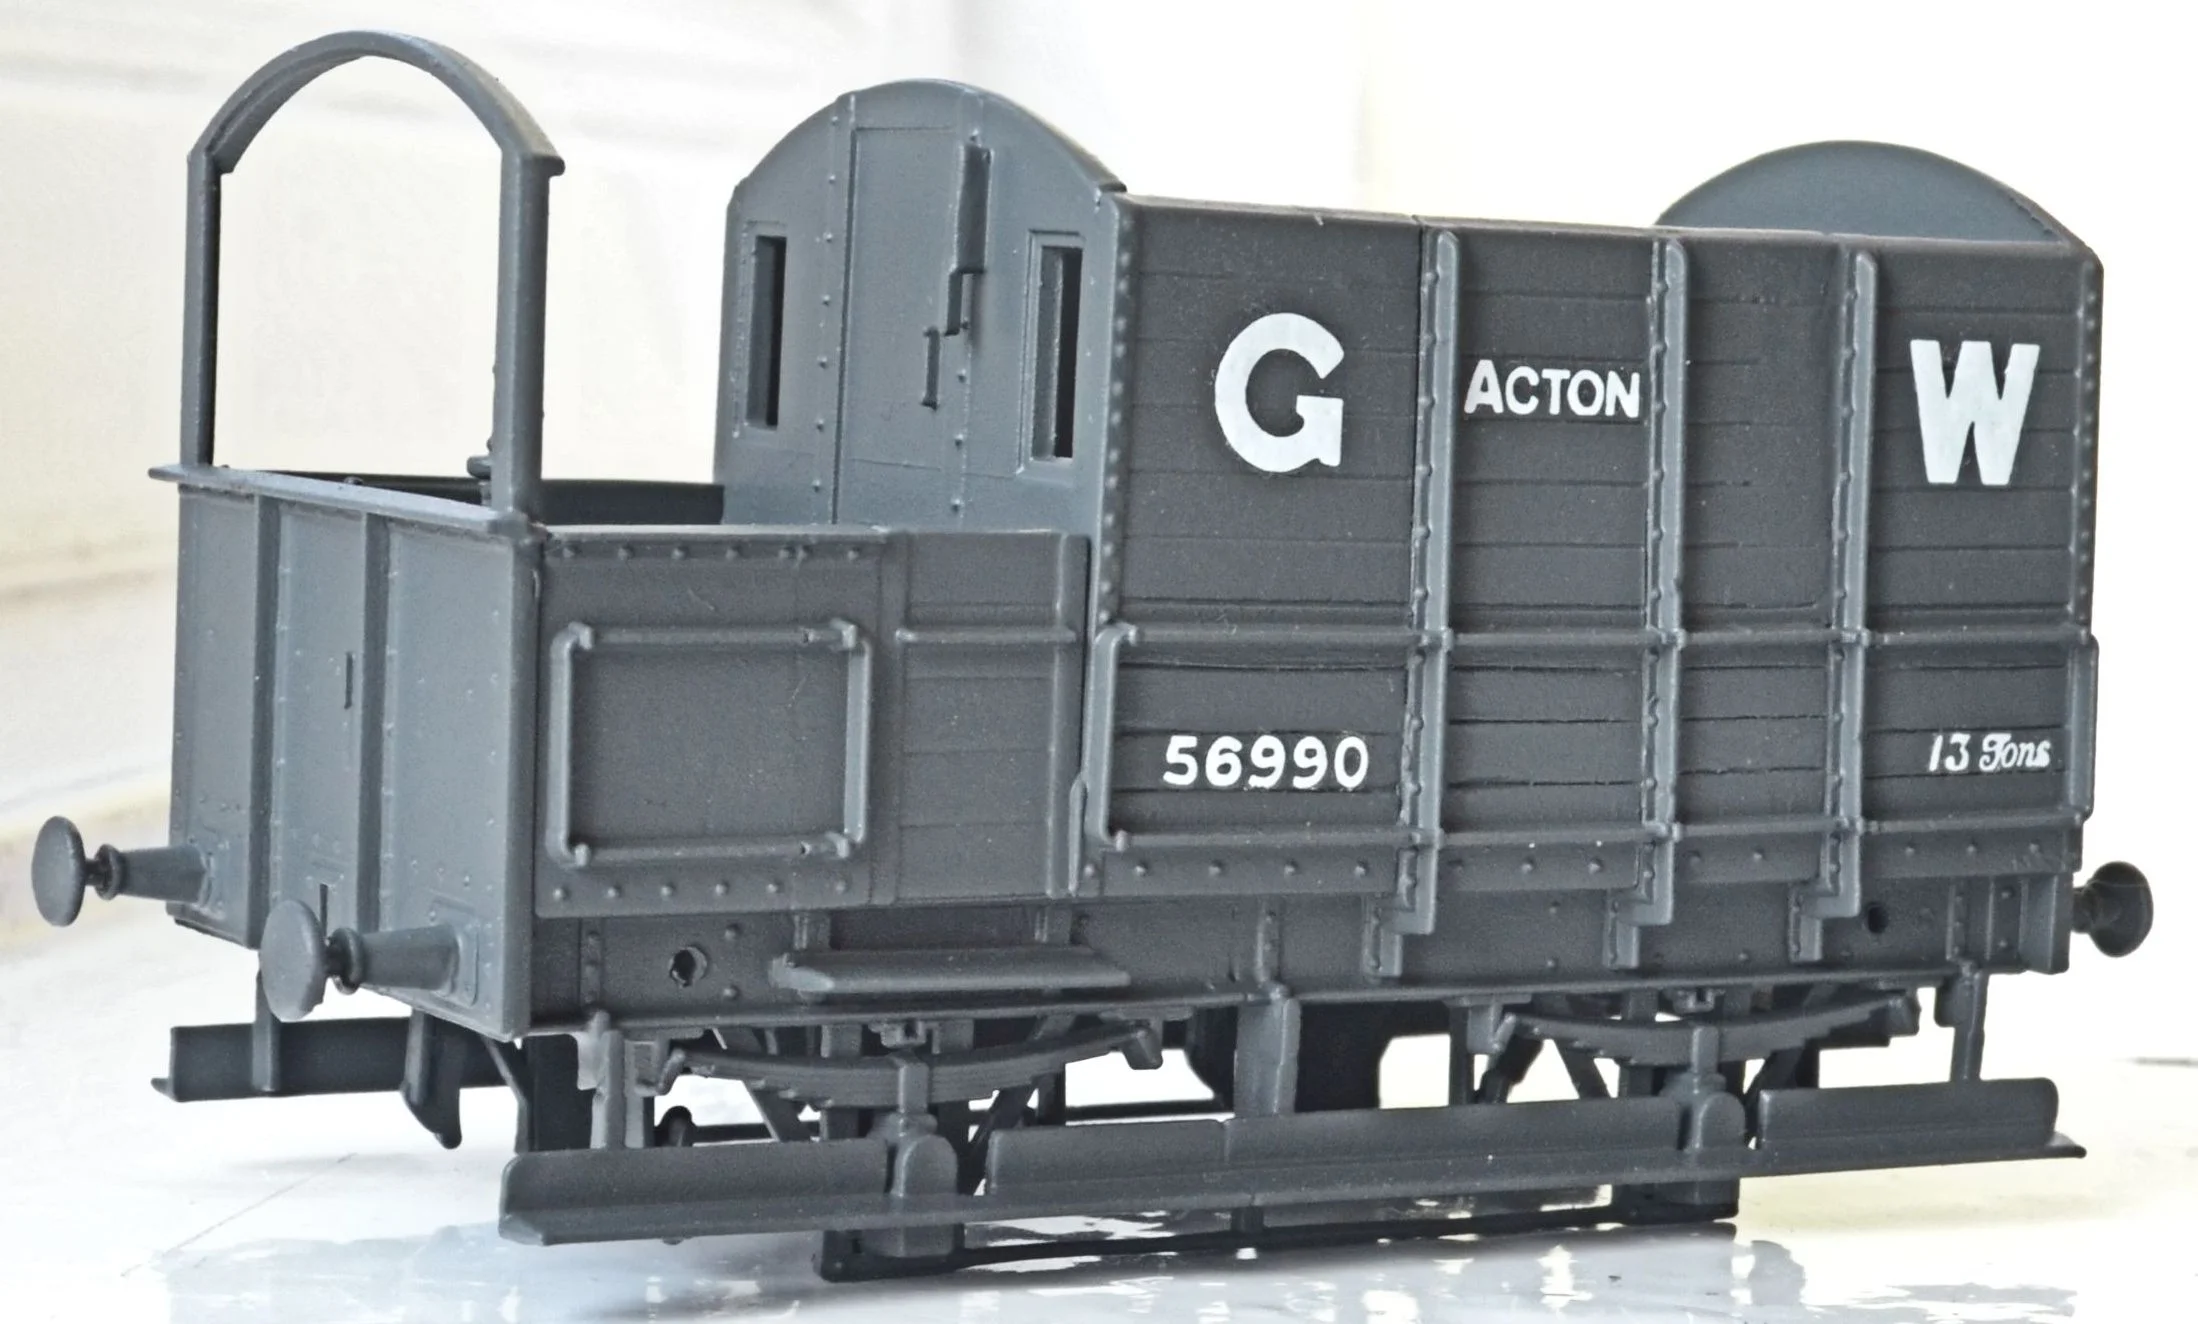
With its final coat of Freight Grey and the branding and numbering completed, the van is nearly complete. A coat of matt varnish awaits and then white-work, glazing and the roof can be applied. I was particularly pleased with the aerosol of Railmatch paint: it gave a fine, strong misting which allowed a blemish-free finish.
The lettering for the lower panels was a problem as I've seen three different models for this van, each with the numbers and tonnage is different combinations. In the end I opted for what was the most aesthetically pleasing. The transfers were by Pressfix by the way.
The photos below show progress to date [minus the wheel-sets].

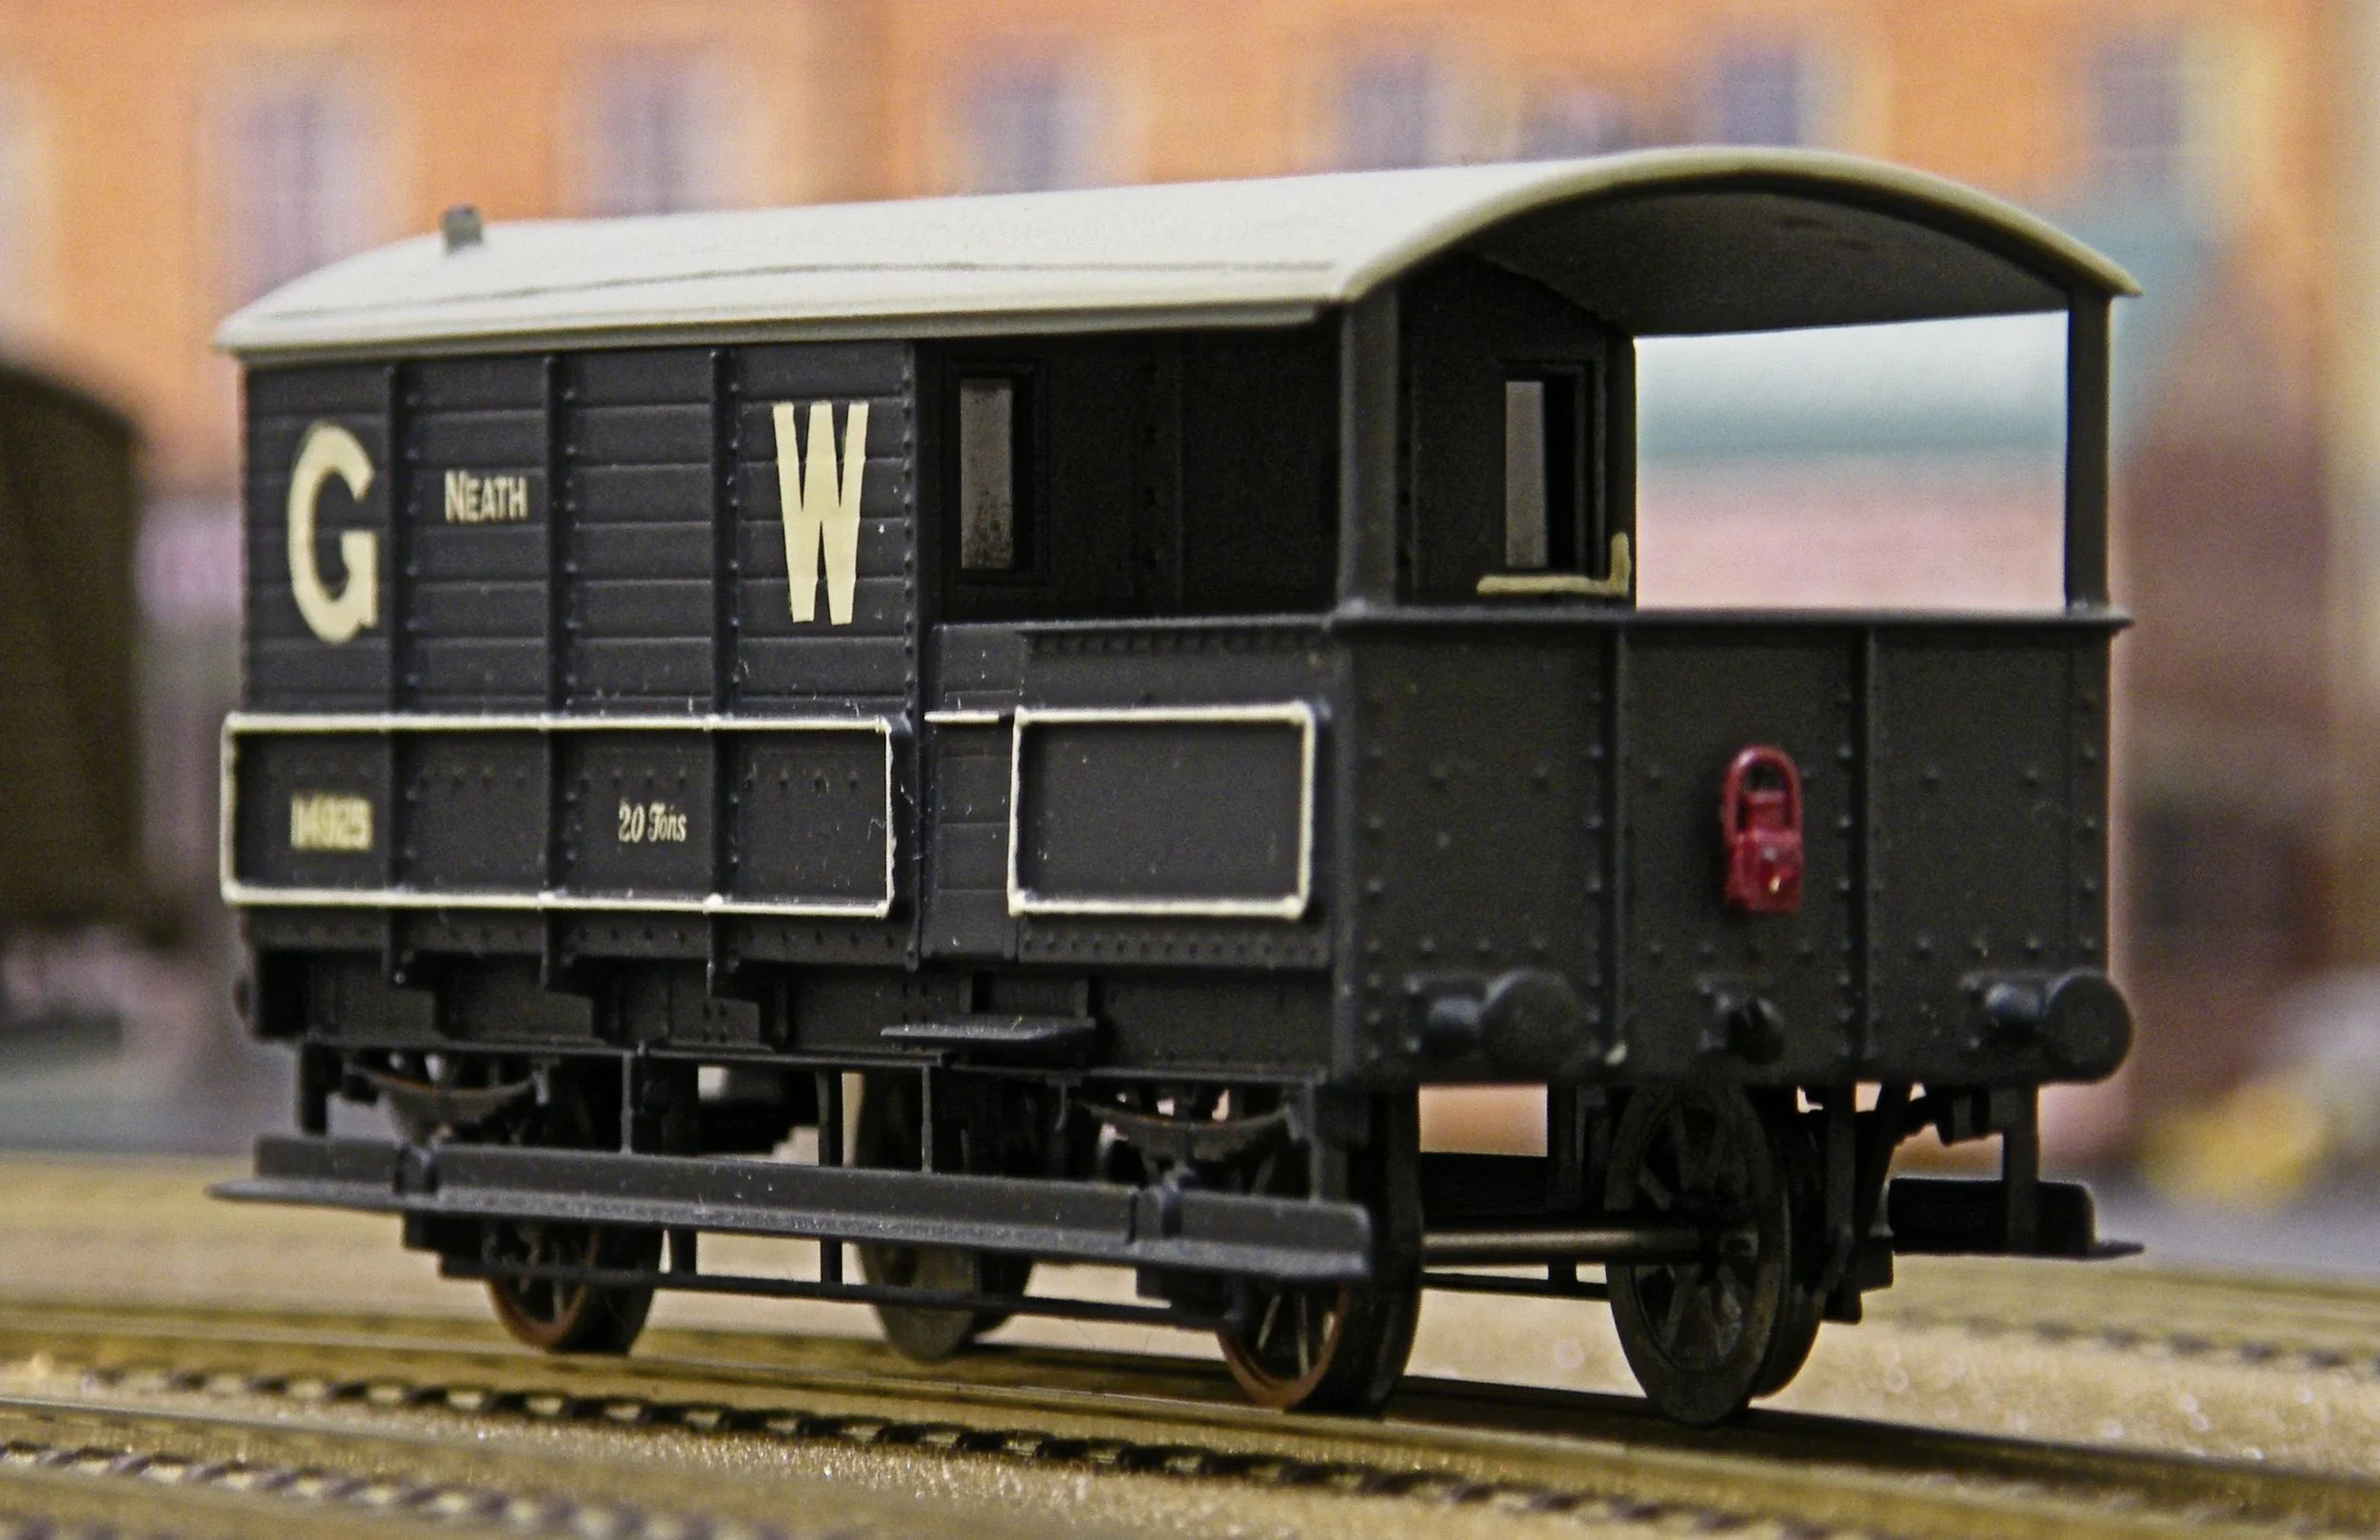
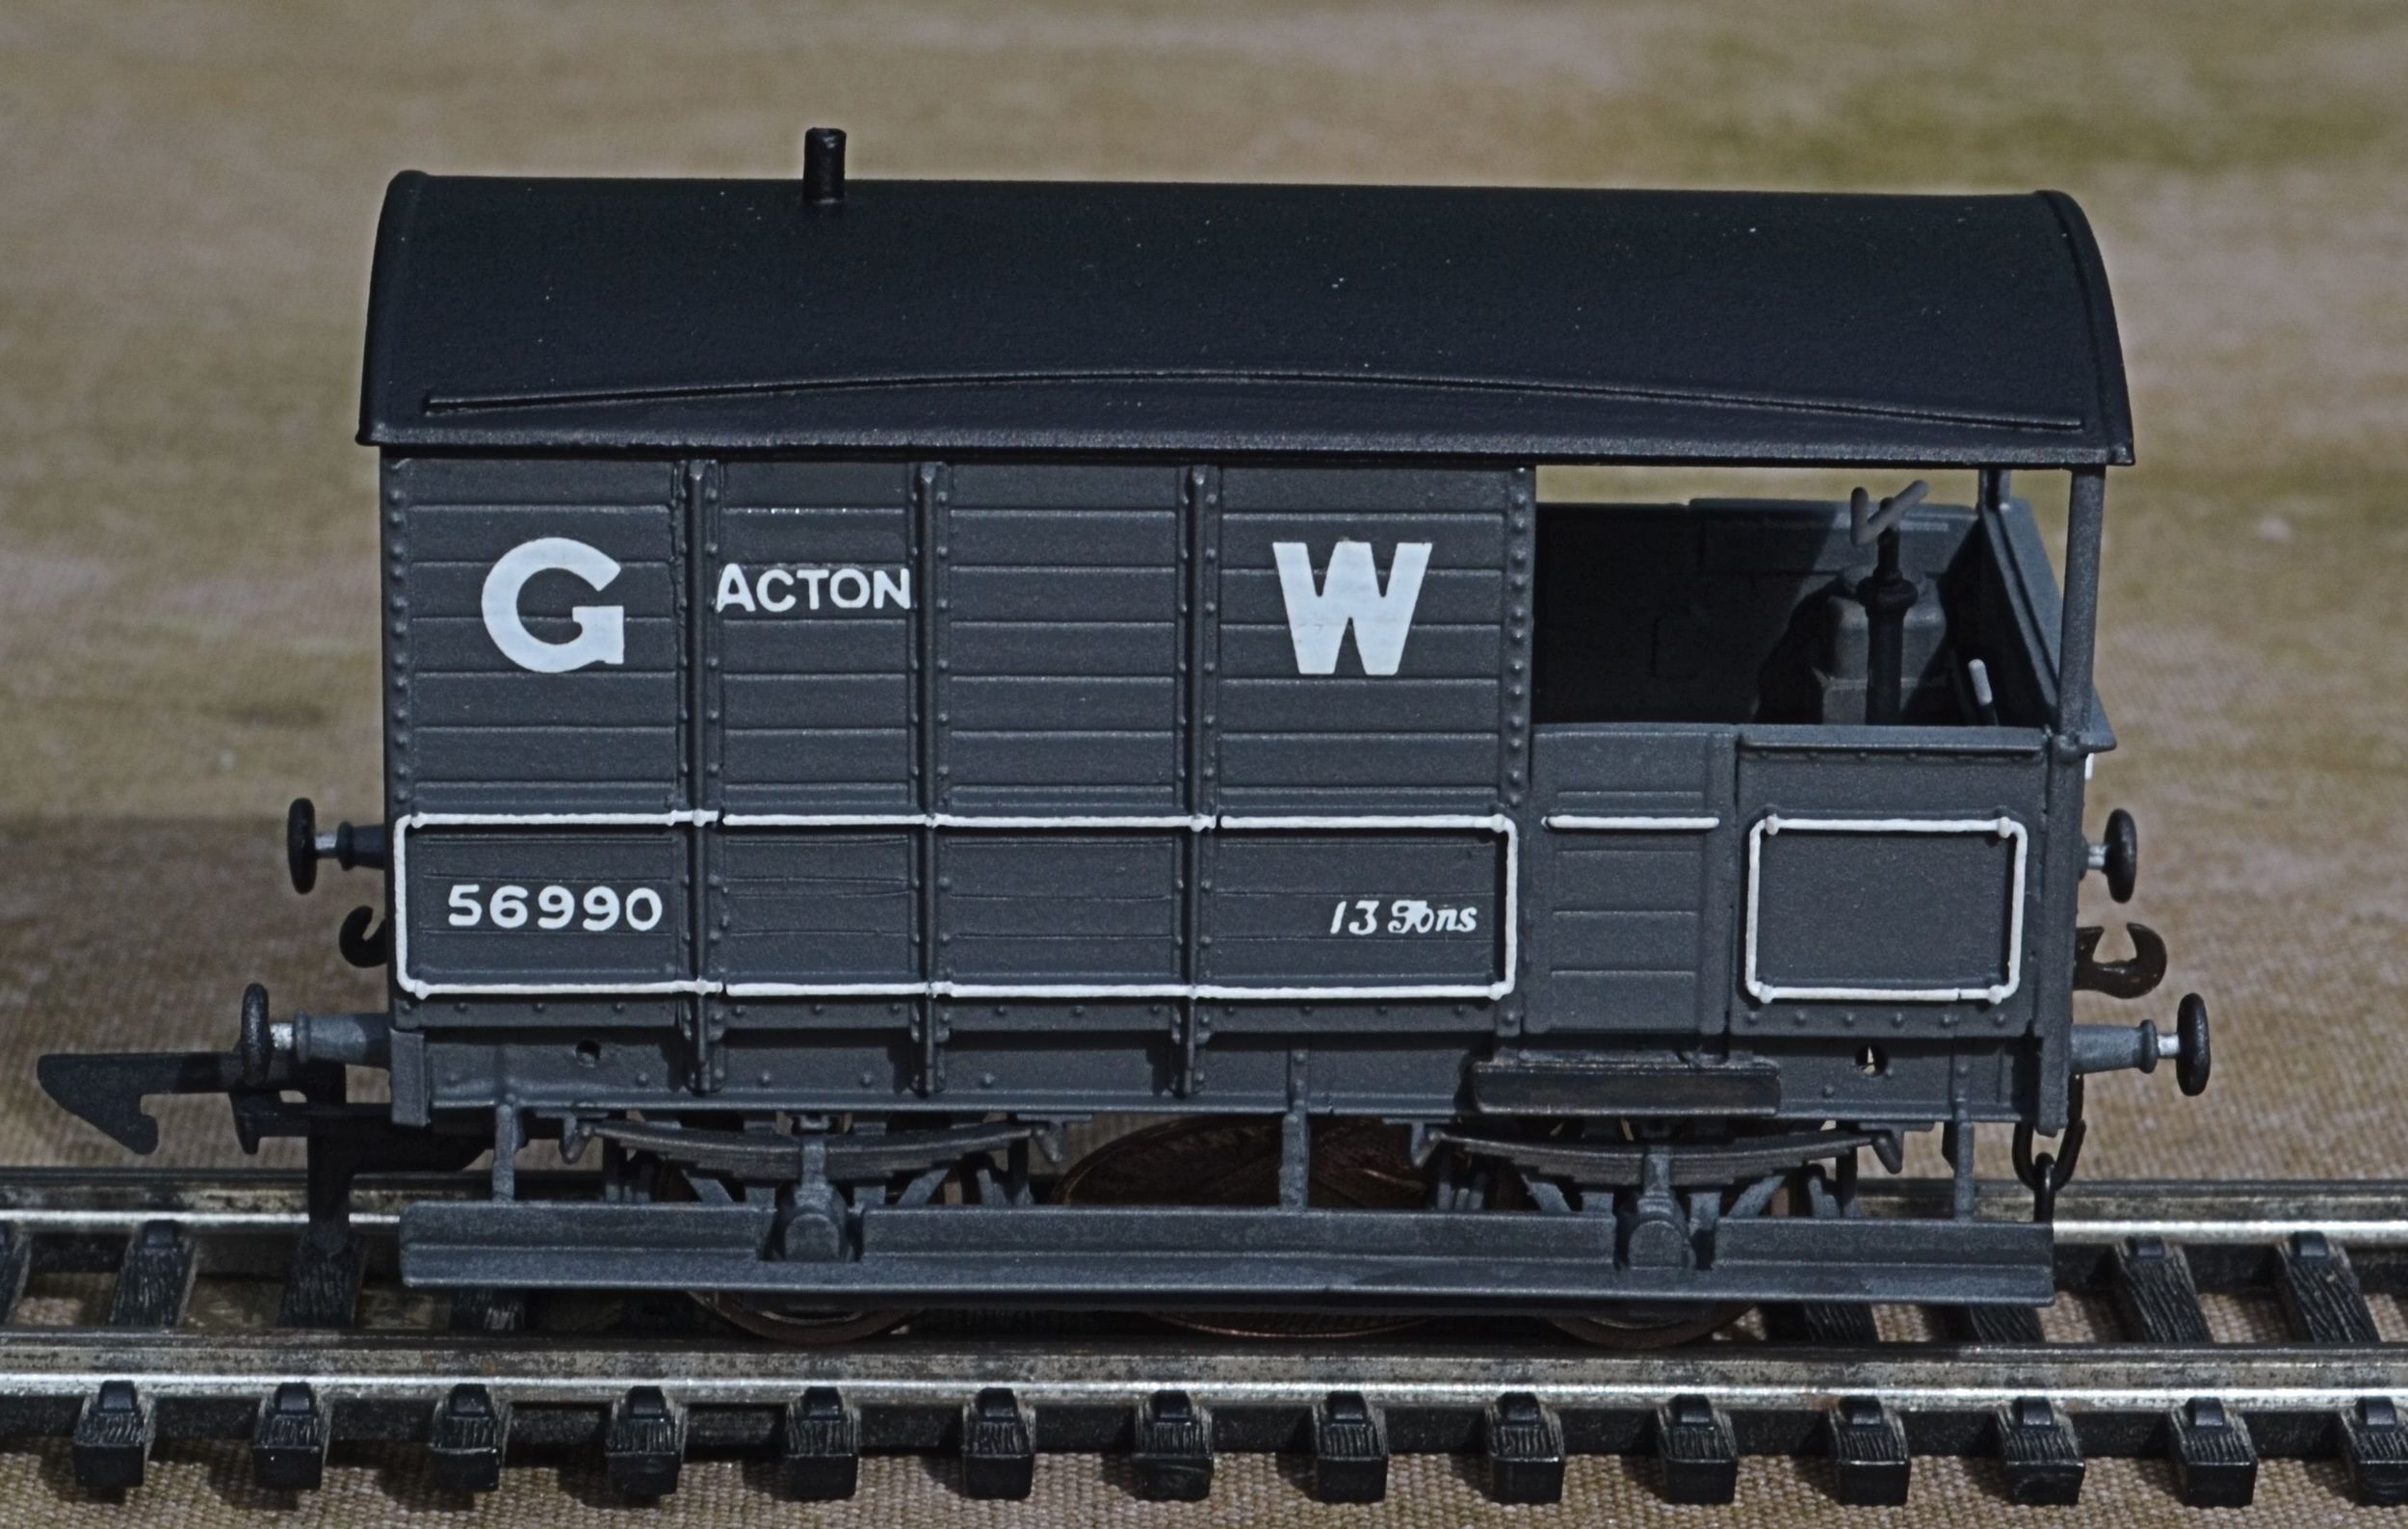
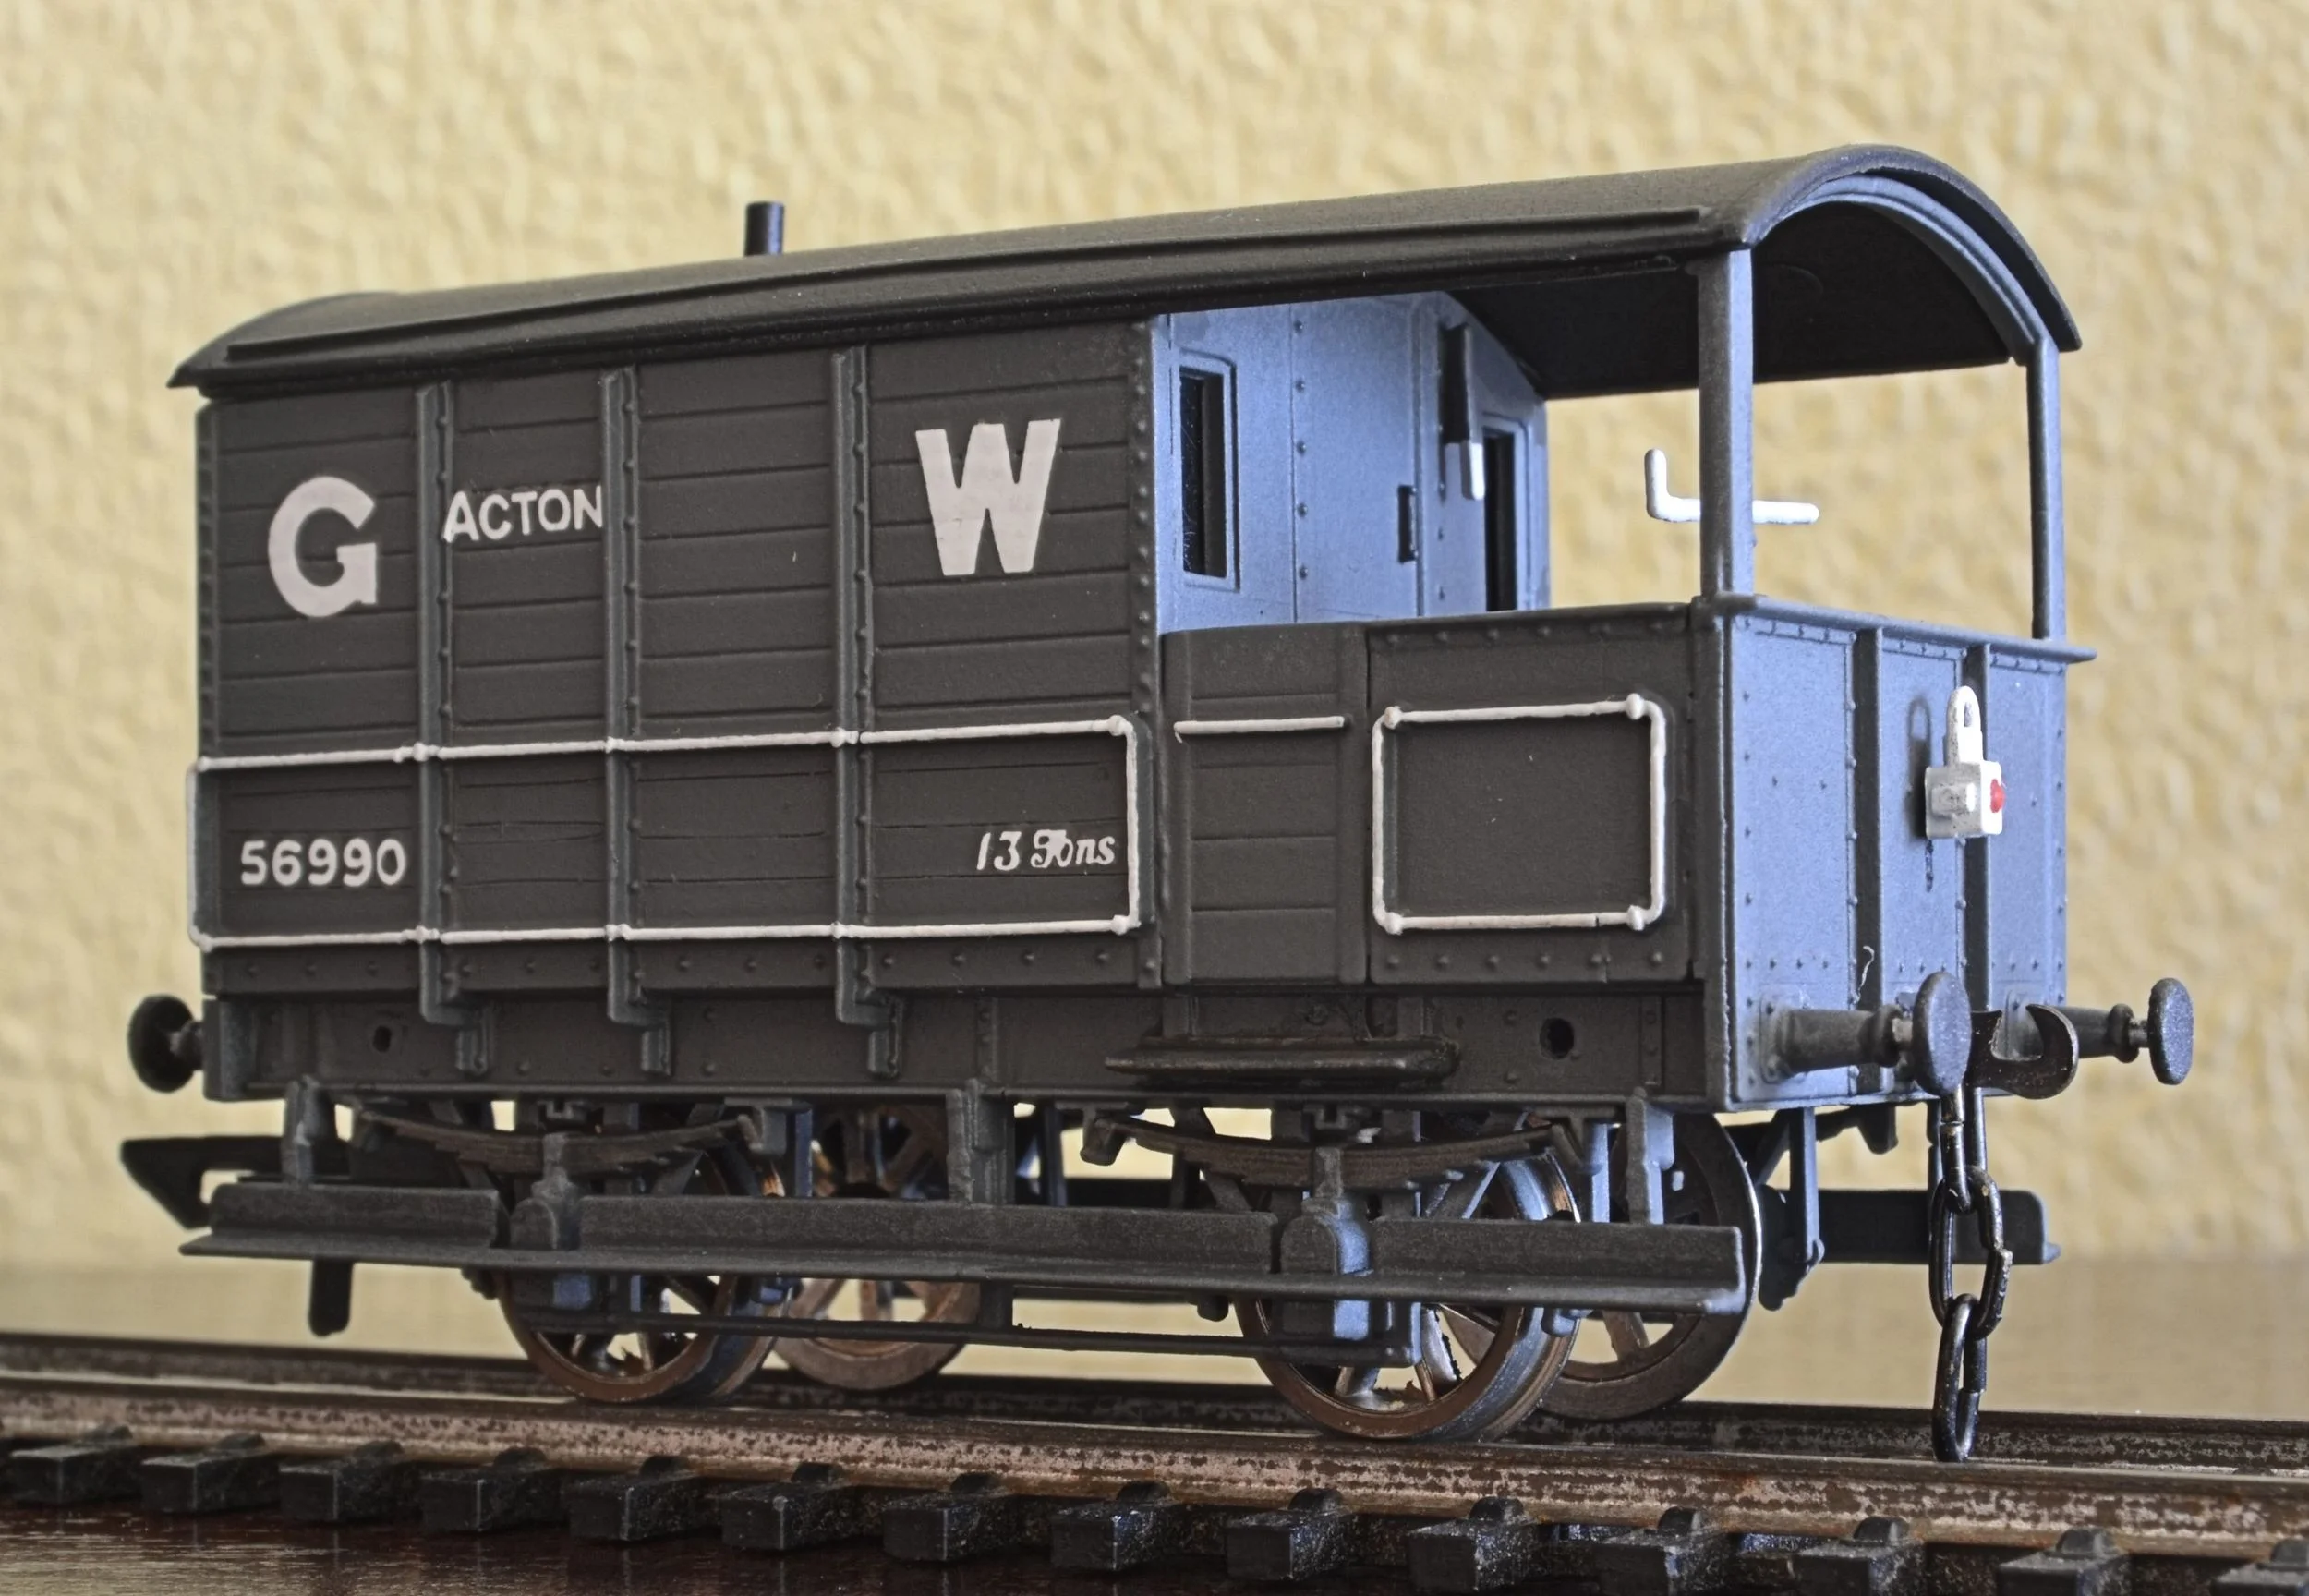
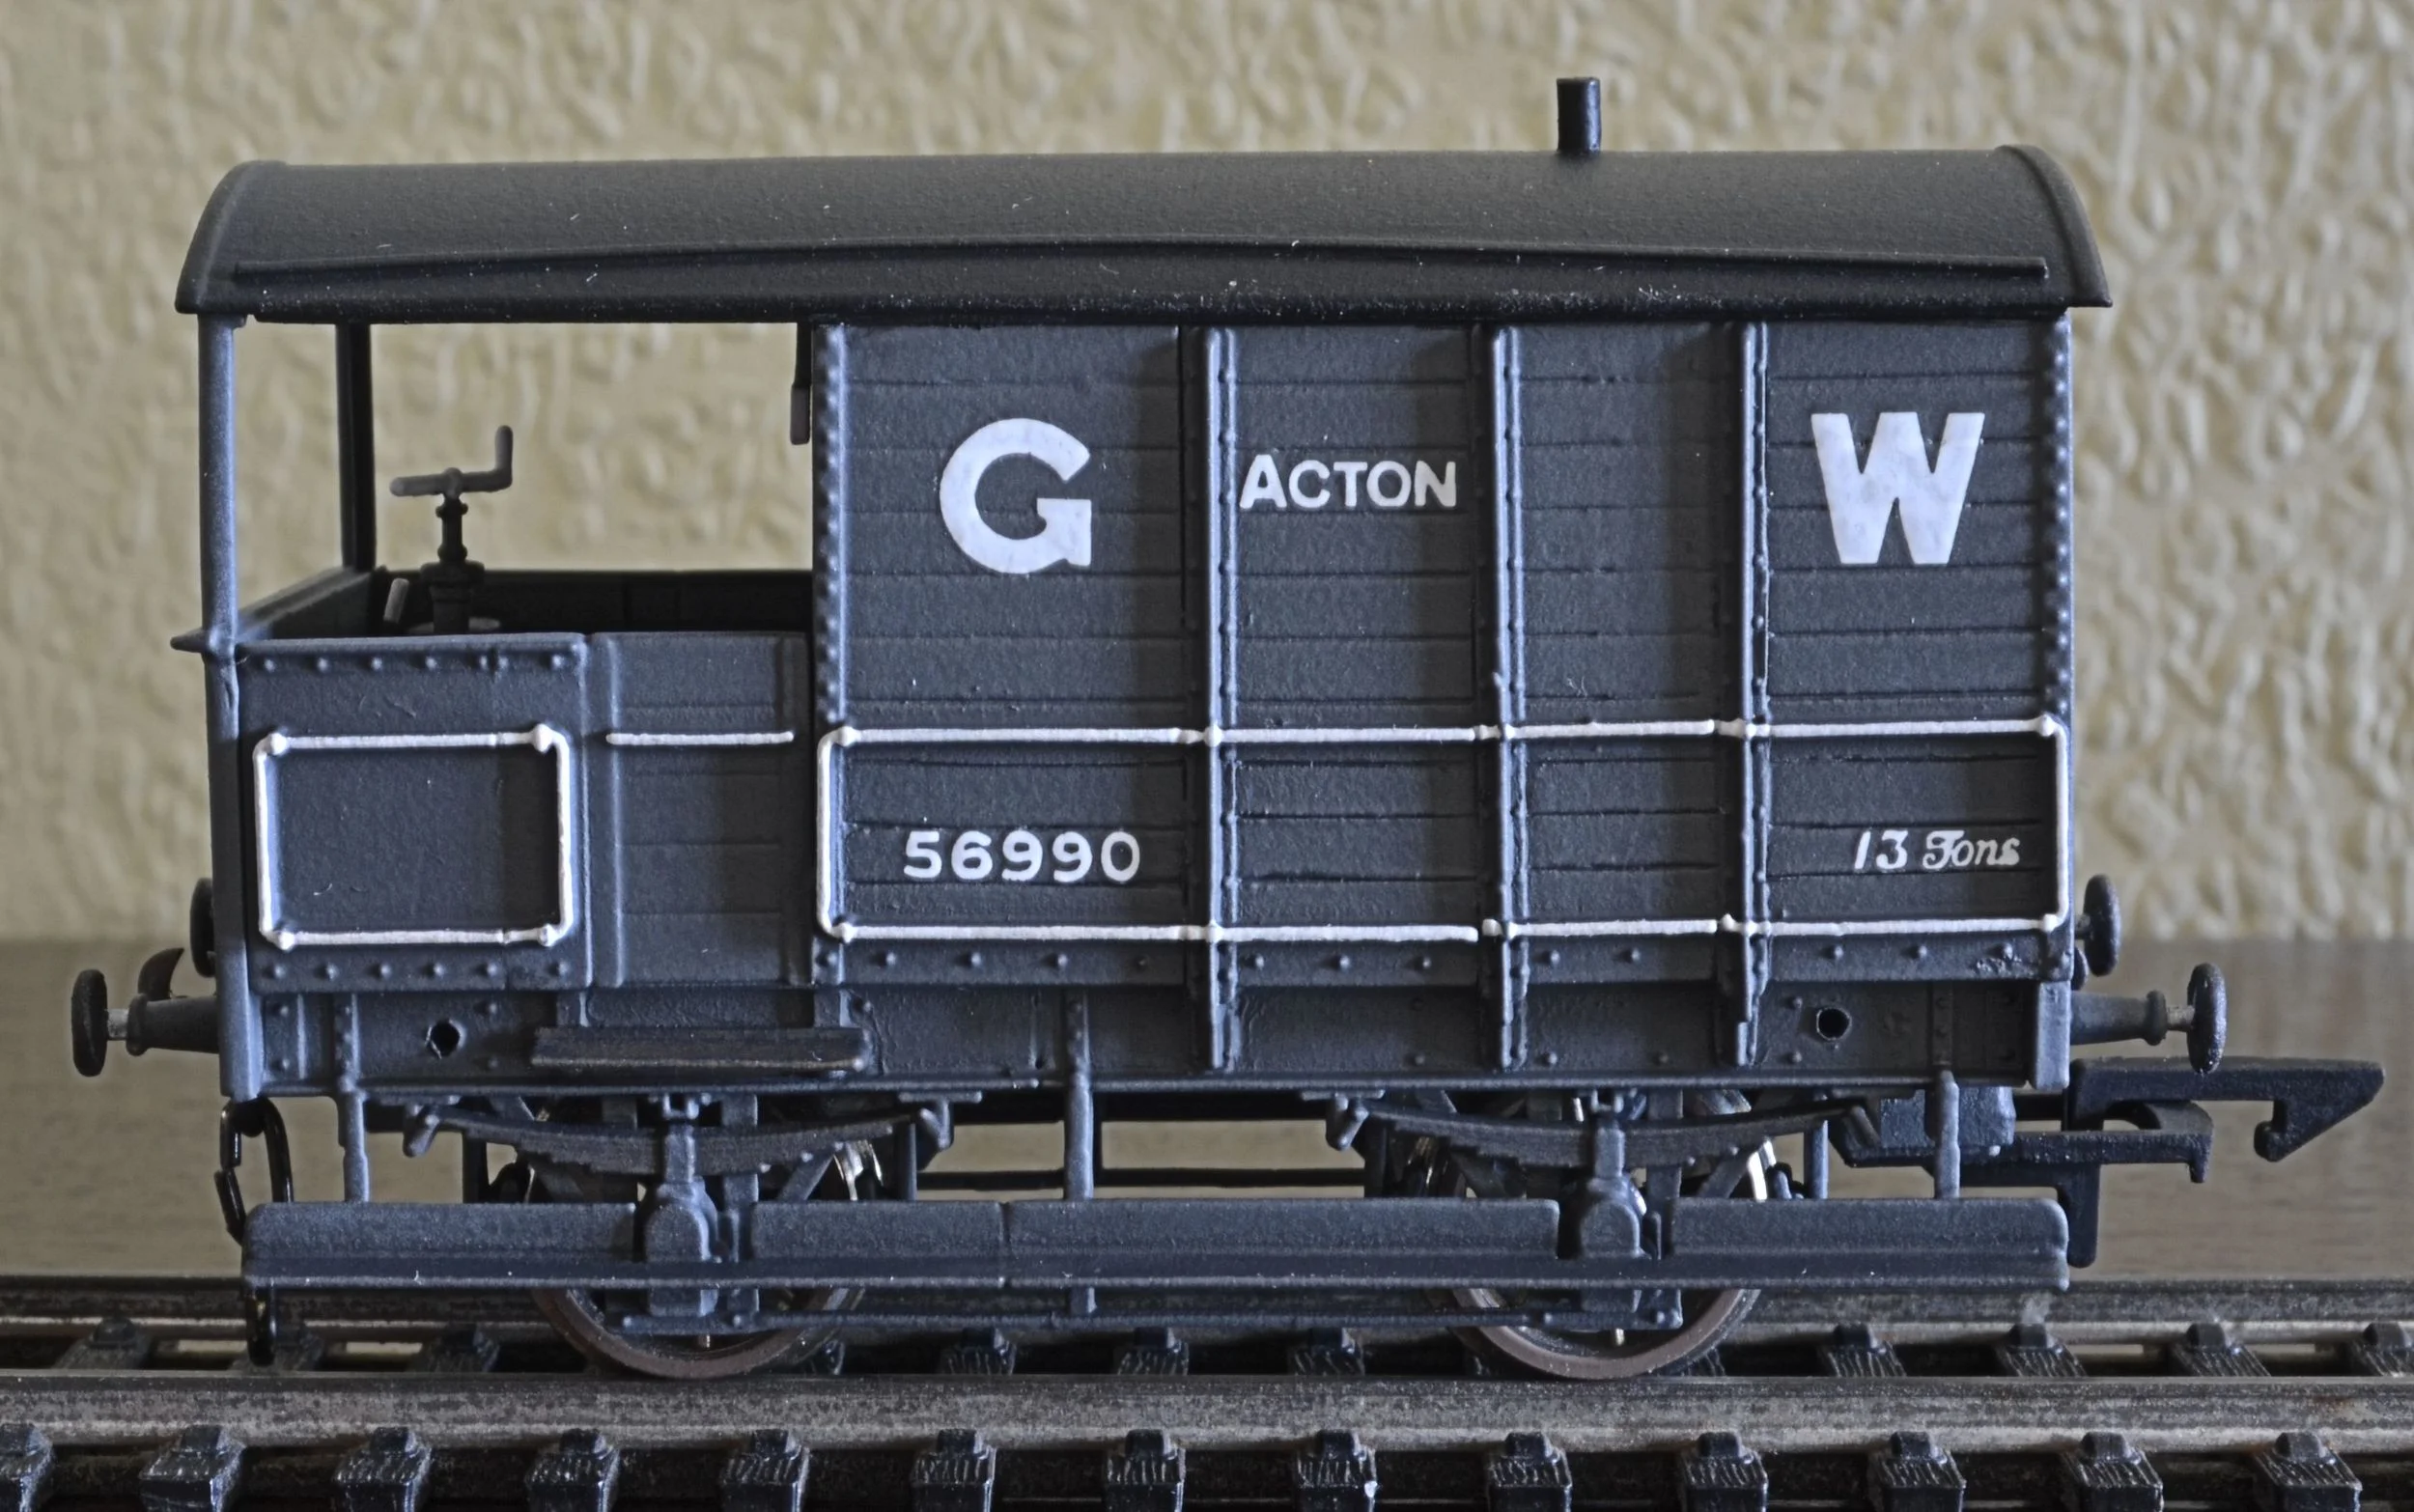
At Last, Ready To Run.........
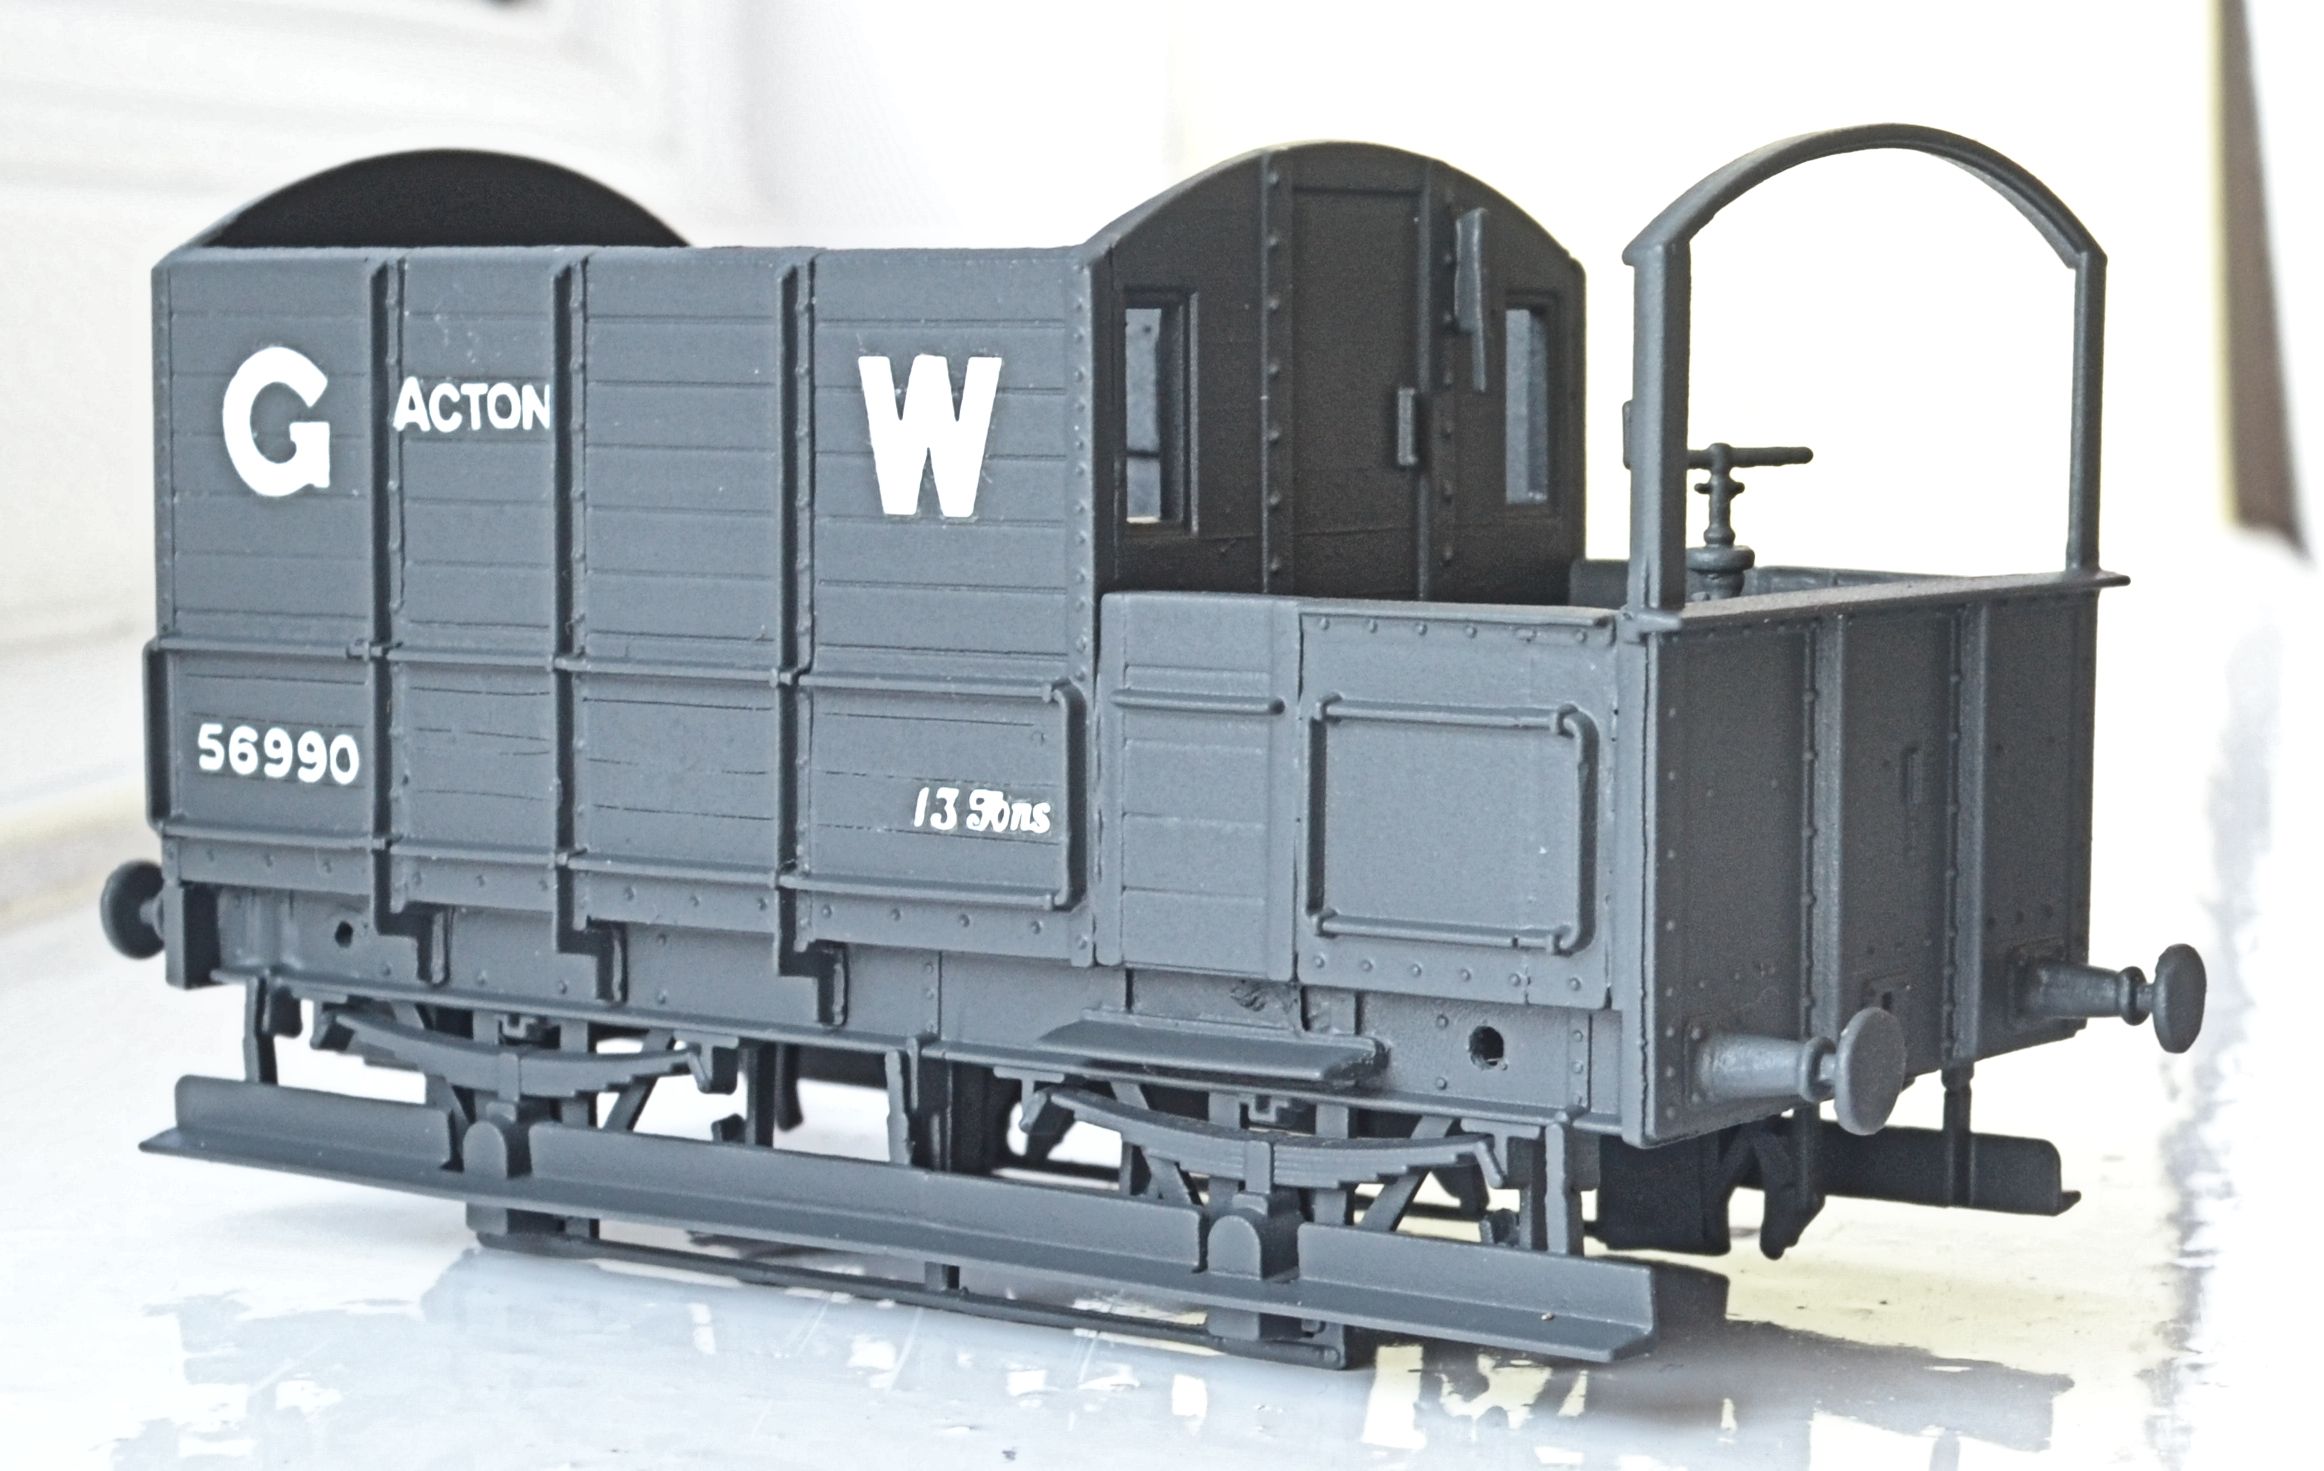
The build is now complete and it's been a very pleasant project. Glazing, couplings, final paint-work and the roof have all been added with the body being given a final quick flash of satin varnish. The photos below show the finished product and, as a give-or-take AA7, it's reasonably convincing. Anyway, the 97XX tank now has a partner to accompany it through those long, dark, damp tunnels between Paddington and Smithfield. The next task will be to provide some interesting stock to run between them: but that's another story.........


Pip-Pip........